HOT SURFACE
IGNITERS
The hot surface igniter is a silicon
carbide igniter with a ceramic base
and plug in connections. The igniter
did perform two functions. When
energized, the igniter temperature
reaches approximately 2600°F to light
the gas burners. Once the gas lights,
the igniter becomes a flame sensor
using the process of flame
rectification. Units with date codes
between 1893 and 3294 only use the
igniter to light the burners. A remote
flame sensor now detects flame. The
igniter has a 34-second warm up
period before the gas valve opens.
NOTE: Power polarity to the ignition
control board must be correct or the
flame sensing circuit cannot sense the
burner flame and the furnace shuts
down. Inadequate equipment and/or
chassis grounding can also result in
failure to sense flame
NOTE: Handle the igniter with care as
it is easily damaged.
Check. Unplug the igniter 2-prong
connector from the wiring harness to
the furnace control board prior to
conducting this test.
1. Call for heat at the thermostat.
2. Allow the induced draft blower to
operate for 30 seconds.
3. Use a voltmeter to measure the
voltage coming to the igniter at
the 2-prong connector junction
plug 30 seconds after the induced
draft blower starts.
4. If there is no voltage, and the
pressure switch is closed, replace
the control board.
5. If there is voltage, inspect the
igniter for:
A. cracks or damage to the
carbide tip
B. frayed or damaged wiring
C. properly seated pins in the
connector
6. Use an Ohmmeter to check the
resistance of the igniter. Make this
check with the igniter at room
temperature (70°-75°F).
A Norton 201 (black leads)
45-250 Ohms
8. ISi (Starlight) (orange leads)
20-300 Ohms
7. Be sure the igniter is positioned
properly in the flame.
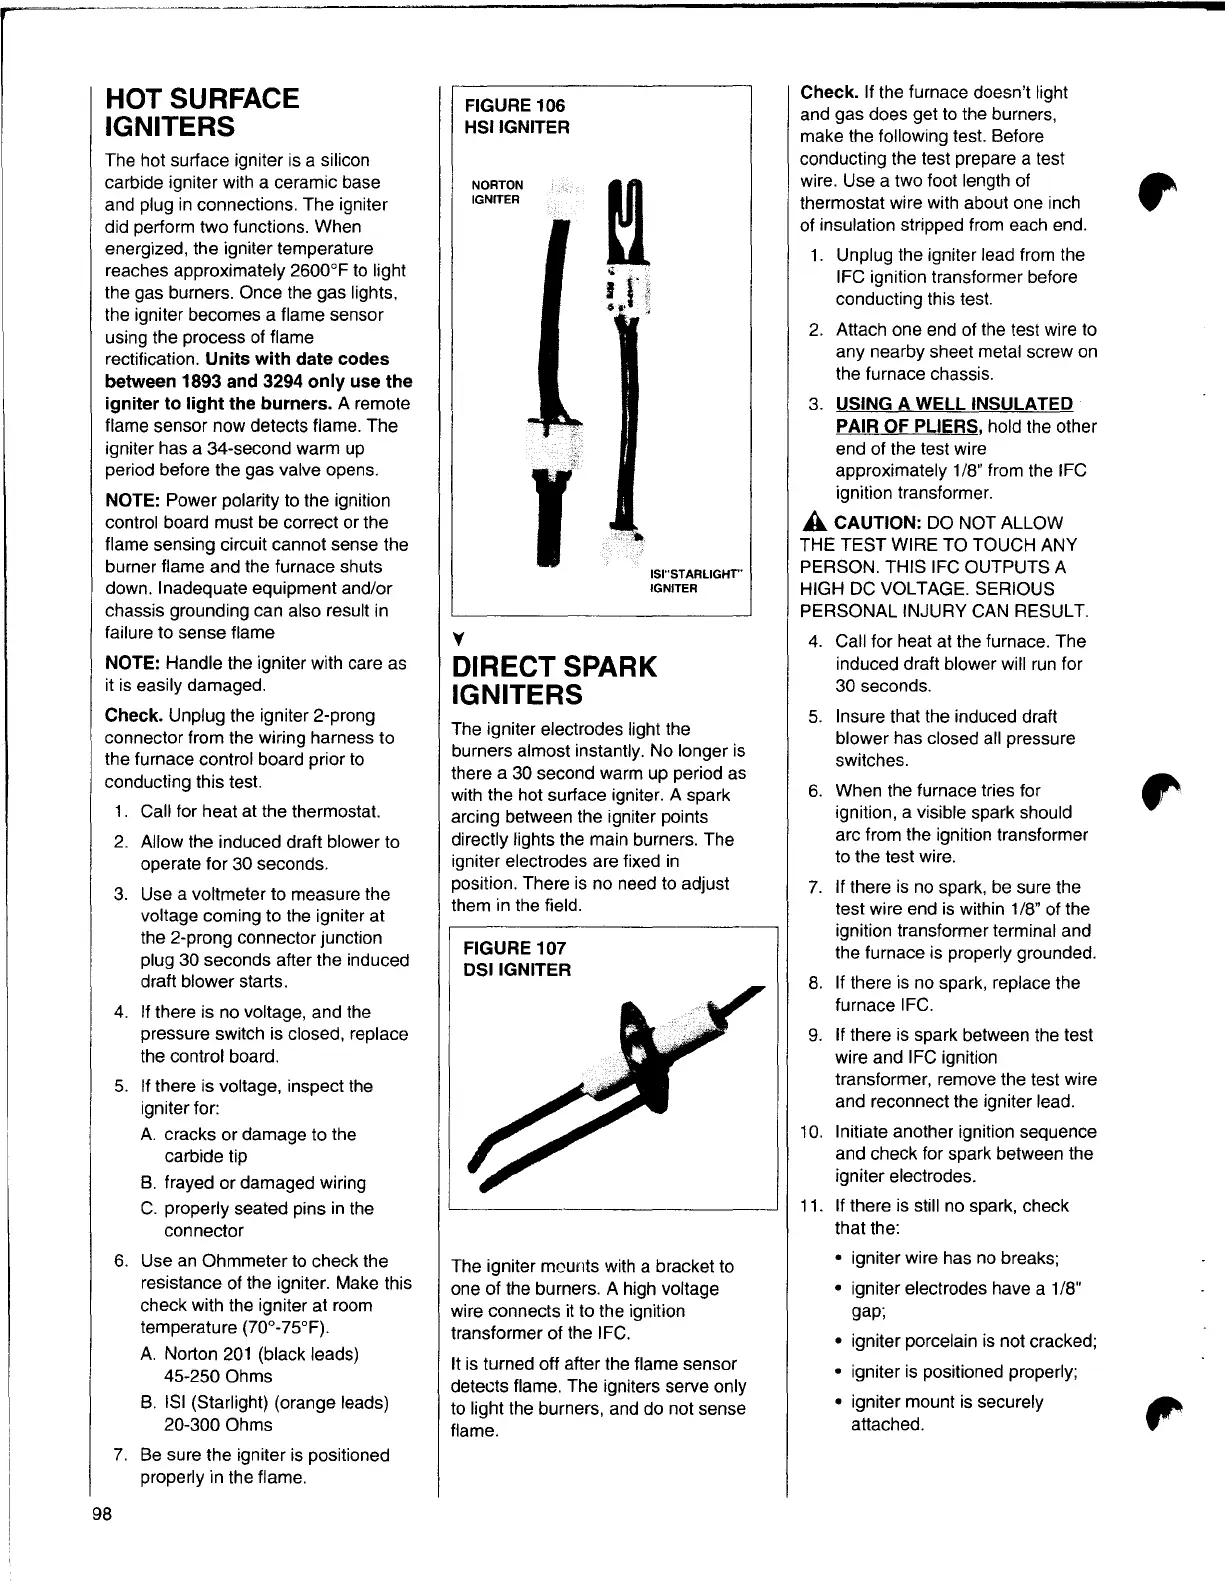
FIGURE 106
HSI IGNITER
NORTON
IGNITER
r
ISl"STARLIGHr'
IGNITER
y
DIRECT SPARK
IGNITERS
The igniter electrodes light the
burners almost instantly. No longer is
there a 30 second warm up period as
with the hot surface igniter. A spark
arcing between the igniter points
directly lights the main burners. The
igniter electrodes are fixed in
position. There is no need to adjust
them in the field.
FIGURE 107
OSI IGNITER
The igniter mounts with a bracket to
one of the burners.
A high voltage
wire connects it to the ignition
transformer of the IFC.
It is turned off after the flame sensor
detects flame. The igniters serve only
to light the burners, and do not sense
flame.
Check. If the furnace doesn't light
and gas does get to the burners,
make the following test. Before
conducting the test prepare a test
wire. Use a two foot length of
thermostat wire with about one inch
of insulation stripped from each end.
1. Unplug the igniter lead from the
IFC ignition transformer before
conducting this test.
2. Attach one end of the test wire to
any nearby sheet metal screw on
the furnace chassis.
3. USING A WELL INSULATED
PAIR OF PLIERS, hold the other
end of the test wire
approximately 1/8" from the IFC
ignition transformer.
A CAUTION: DO NOT ALLOW
THE TEST WIRE TO TOUCH ANY
PERSON. THIS IFC OUTPUTS A
HIGH DC VOLTAGE. SERIOUS
PERSONAL INJURY CAN RESULT.
4. Call for heat at the furnace. The
induced draft blower will run for
30 seconds.
5. Insure that the induced draft
blower has closed all pressure
switches.
6. When the furnace tries for
ignition, a visible spark should
arc from the ignition transformer
to the test wire.
7. If there is no spark, be sure the
test wire end is within 1/8" of the
ignition transformer terminal and
the furnace is properly grounded.
8. If there is no spark, replace the
furnace IFC.
9. If there is spark between the test
wire and IFC ignition
transformer, remove the test wire
and reconnect the igniter lead.
10. Initiate another ignition sequence
and check for spark between the
igniter electrodes.
11. If there is still no spark, check
that the:
• igniter wire has no breaks;
• igniter electrodes have a 1/8"
gap;
• igniter porcelain is not cracked;
• igniter is positioned properly;
• igniter mount is securely
attached.
98