Do you have a question about the Flexim FLUXUS WD and is the answer not in the manual?
Prior to any work, read the operating instruction carefully and in full.
The measuring equipment is intended for the measurement of fluid properties in closed pipes.
Prior to any work on the transmitter (e.g., installation, dismounting, connection, service and maintenance),
If you detect a transport damage when unpacking the delivery, please contact the supplier or FLEXIM.
The flow velocity of the fluid is measured in the TransitTime mode using the ultrasonic-transit time.
Diagonal arrangement with 1 beam, Reflection arrangement with 1 beam, Diagonal arrangement with 2 beams.
The pipe has to be acoustically penetrable at the measuring point.
Some flow elements (e.g., elbows, valves, pumps, reducers) distort the flow profile in their vicinity.
The measurement system consists of a transmitter, the ultrasonic transducers and the pipe on which the measurement is carried out.
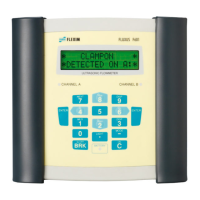
The transmitter is operated via the keyboard.
Structure
The keyboard has 15 keys, including the 3 function keys: ENTER, and C.
The command panel can be accessed by opening the housing cover.
Fix the transmitter with 4 screws to the wall, see Fig. 6.4.
Installation on a 2'' pipe
The correct selection of the measuring point is crucial for achieving reliable measurement results.
It is recommended to run the cables from the measuring point to the transmitter before connecting the transducers.
Remove the blind plug for the connection of the transducer cable.
The installation of the power supply is carried out by the operator.
Connect the output cable to the transmitter.
When starting up the transmitter for the first time, the following settings are required: language, time/date, unit of measurement.
As soon as the transmitter is connected to the power supply, the menu is displayed in the adjusted language.
The operation state is indicated by LEDs, see Fig. 8.1.
The following schema shows the program branches.
The pipe and fluid parameters are entered for the selected measuring point.
The transducer (here: CDP2E52) connected to the transmitter is displayed.
Outer pipe diameter, Pipe circumference, Pipe material.
Select the program branch Options.
A measurement is not possible because no signal is received.
Make sure that the recommended min. distance to any disturbance source is observed.
A fluid with a wrong sound speed was selected.
The values of the totalizers are too small.
In the Standarduser mode, all measurements can be carried out for the corresponding application.
Some menu items that are not visible in the StandardUser mode are displayed.
Some menu items that are not visible in the StandardUser or ExpertUser mode are now displayed.
It is possible to define a correction of the flow velocity: vcor = m · v + n.
In addition to the analog outputs, the transmitter can be equipped with binary outputs.
The switching condition (status OK) is defined.
The function of the output can now be tested.
A pulse output is an integrating output which emits a pulse when the volume or the mass of the fluid.
The transmitter has a data logger which stores the measured values during the measurement.
It is possible to set a starting time if it is necessary to synchronize the storing of measured values for several transmitters.
The storage rate indicates the interval how often the measured values are transmitted or stored.
The setting of the ringbuffer influences the storing of measured values as soon as the data logger is full.
The total volume or total mass of the fluid at the measuring point can be determined.
The FastFood mode allows to measure high dynamic flows.
In addition to the ultrasonic measuring channels, the transmitter has 2 virtual calculation channels Y and Z.
It is possible to configure max. 4 independent event trigger R1, R2, R3, R4 per channel.
| Brand | Flexim |
|---|---|
| Model | FLUXUS WD |
| Category | Measuring Instruments |
| Language | English |