Vital Signs Simulator
Autosequences
65
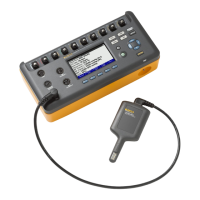
Perform an Oximeter Limits Test
Most oximeters have alarms that you can set for the parameters it measures.
You can use the Product to trip the alarm as a test. Connect the Oximeter to the
Product as shown in Figure 45.
Oxygen Limits Test
You do a sensitivity test on an oximeter through SpO
2
value adjustments. To do
an oxygen limits test:
1. Set the oxygen alarm limit value(s) on the oximeter.
2. From the SpO2 screen, push or to highlight the SpO
2
value.
3. Push .
4. Push to increase the oxygen saturation until the oximeter alarm sounds.
5. Push to decrease the oxygen saturation until the oximeter alarm sounds.
Pulse Rate Test
You can simulate different patient conditions while you monitor the effect of
different pulse rates on the SpO
2
measurement. To do a pulse rate test:
1. Set the pulse rate alarm limit value(s) on the oximeter.
2. From the SpO2 screen, push or to highlight the Heart Rate value.
3. Push .
4. Push to increase the heart rate until the alarm sounds.
5. Push to decrease the heart rate until the alarm sounds.
You can decrease the heart rate to 0 BPM to simulate asystole or no pulse.
Pulse Amplitude Test
You can increase or decrease the peak-to-peak amplitude of the blood pressure
wave tested by the Product. You can decrease the amplitude to find where the
oximeter fails to sense a pulse. To do a pulse amplitude test:
1. From the SpO2 screen, push or to highlight the Pulse Amplitude
value.
2. Push .
3. Push to decrease the pulse amplitude value until the oximeter no longer
shows a pulse or the oximeter alarm sounds.
Autosequences
Autosequences are a series of steps that change the output of the Product
automatically. For example, to do a temperature test on a monitor, you must
change the temperature of the temperature simulation a number of times for a
specified time period. To do this manually, you can go to the temperature
function, push and then push or to change the temperature and then
push again. After some time period, you do these same steps for the
subsequent temperature change. The Temperature autosequence does these
changes for you automatically. Each step of the temperature autosequence sets
the temperature and after the allotted time period, it does the subsequent step.