© Flytec USA, 2007 – 2014 Printed on 100% post-consumer recycled paper
average period between 1 and 30 seconds in the Average time field. This is very useful in determining the
actual strength of a rough thermal.
Alternatively, the digital vario can be set as a Netto (air-mass) vario, which shows the vertical motion of the
surrounding air, by setting Digital vario mode to 1. It is possible to set the digital vario to serve as an averaged
vario while climbing and as a netto vario (air mass vario) while gliding, by setting the Digital vario mode field to
2. For more information, see Section 12.2. In order to receive accurate netto vario information from the 6030,
you must first install an accurate polar for your flight configuration (i.e., your particular glider, wing loading,
harness, air speed sensor, etc.). Please see Section 12.4 for more information.
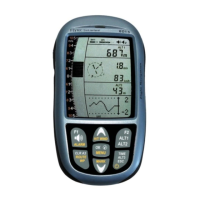
3.1.3 Average Thermal Climb Indicator
Soaring pilots know that thermal strength can vary considerably from day to day and throughout any given day.
The 6030 has an Average Thermal Climb indicator that shows the strength of a thermal averaged over a
predetermined period (up to 10 minutes). The Average Thermal Climb rate is shown in the shaded outer ring
(this ring is black when McCready sound is turned on) of the analog vario dial. In the example below the
averaged strength of the last thermal is 2 m/sec. You are gliding optimally when you control your air speed so
that the McCready indicator points to the value of the average thermal climb indicator. Also see Section 12.5,
McCready Theory. The period over which the thermal strength is averaged can be set between 1 and 20 in
Menu>Pilot settings>Vario>Thermal Averager, where the values represents units of 0.5 minutes. The default is
20, which is 10 minutes (20*0.5 min).
3.2 Altimeters and Air Pressure
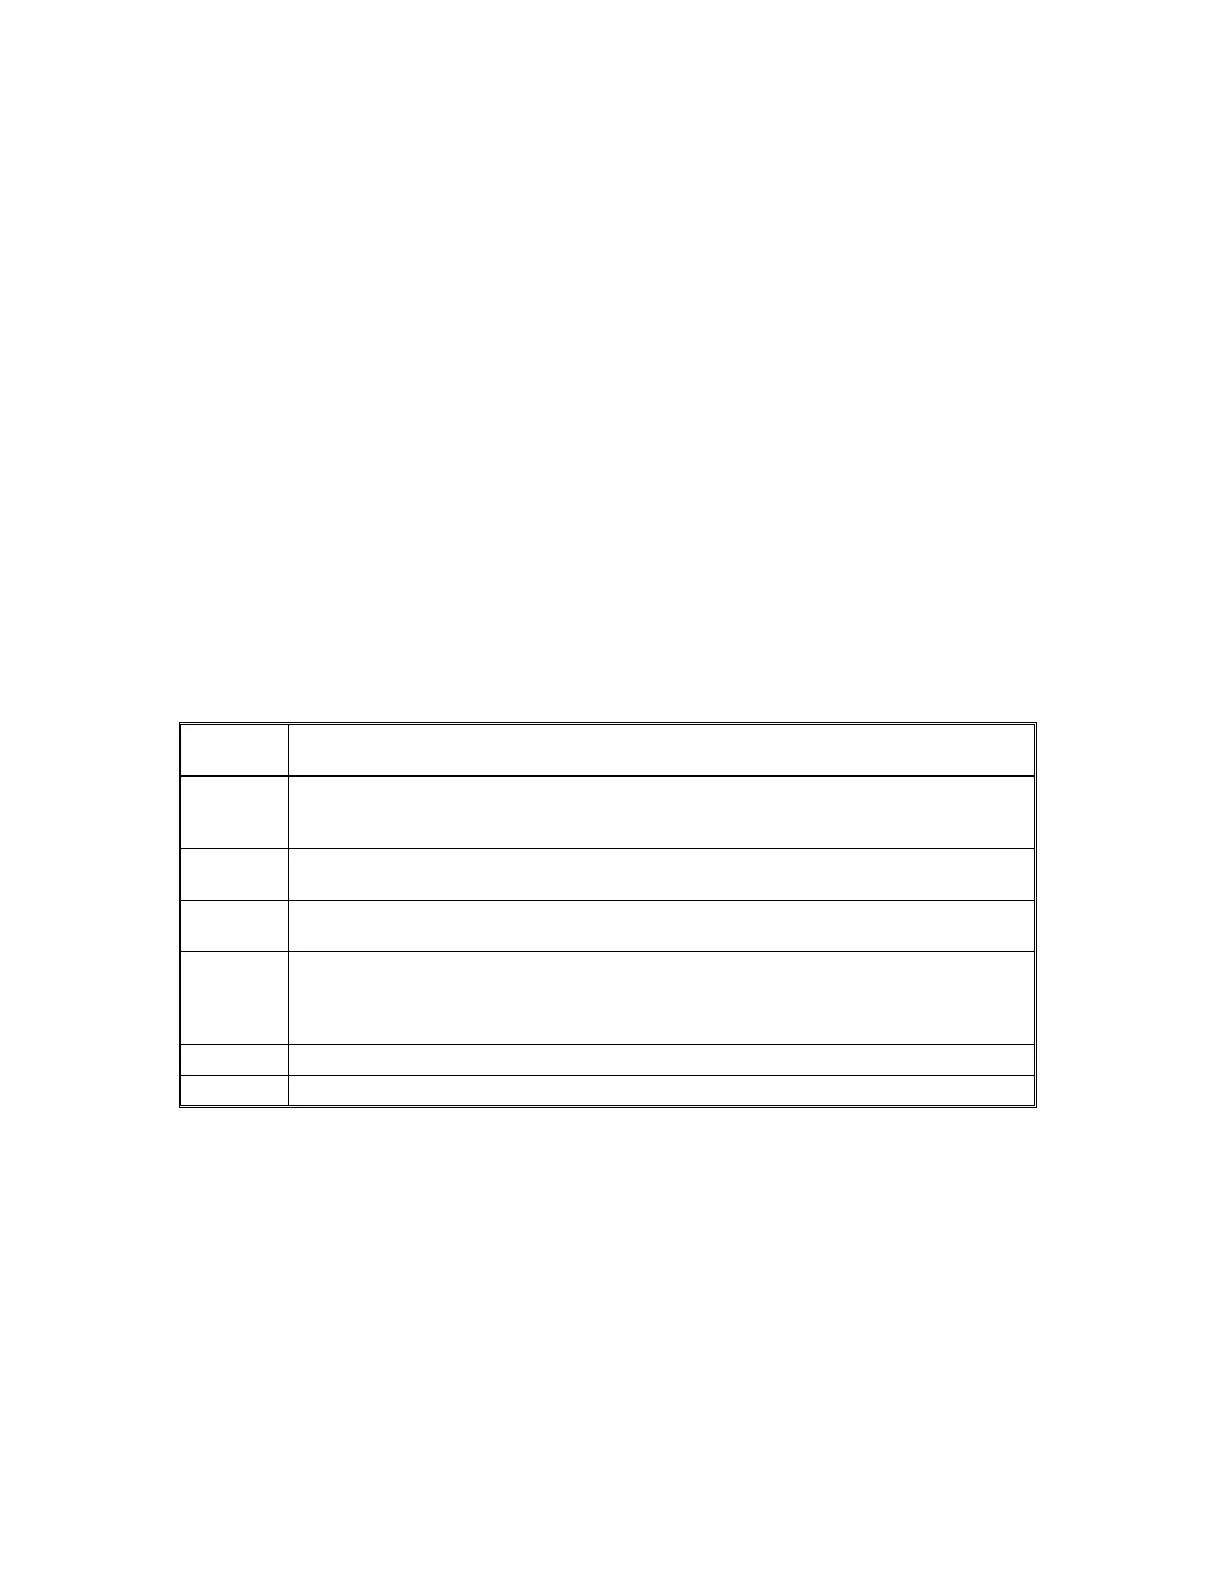
The 6030 tracks and can display five different altitudes as well as the QNH in hPa and InHg, as shown in the
table below. The MSL altitude is shown in Altimeter 1 (Alt 1) and appears to the right of the analog variometer.
All of the other altitudes and the QNH can be displayed in the user-fields. See Section 2.7, User-Fields.
Altitude above sea level (QNH). Can be manually set with !", F1, F2 keys or auto-set
from GPS (see below).
Altitude with respect to a reference height. This can be adjusted at any time by calling up
“Mod A2
!"
” with a 3-second press of the F1 key and then setting the desire value using
the !" keys – or press the F2 key to set A2 to 0.
The total height gained during a flight. If several pilots complete the same flight task, then
the one who climbed the least overall would have flown most efficiently.
Flight-Level is based on an air pressure of 29.92 inHg (1013 hPa) at mean sea level and
cannot be adjusted by the user.
Altitude from the internal GPS module. May be useful in competition where there is a
ceiling and the scorekeeper will be checking compliance with scoring programs that use
GPS altitudes. In this case, the pilot should monitor Alt GPS to be sure a declared ceiling
is not broken.
The barometric pressure at sea level in hecto-Pascals (millibars)
The barometric pressure at sea level in inches of mercury
With the exception of GPS altitude, all of the altimeters in the 6030 measure altitude from atmospheric pressure.
When you turn on the 6030 it has no way of knowing to what extent the current barometric pressure is having on
the measured air pressure. For this reason, Alt 1 should be adjusted to display the actual height above sea level
prior to each flight.
3.3 Setting Altimeter 1
When the 6030 enters the run mode after switch-on, Alt 1 will be blinking to indicate that the altitude has not yet
been set and the Information Field will show “Mod Alt1
!"
” to prompt that the !" keys can be used to set Alt
1. If the user does not set Alt 1 with the !" keys the 6030 will auto-set Alt 1 to GPS altitude as soon as the
GPS gets a 3D fix. After Alt 1 is auto-set, it will continue to blink to show that the altitude was not manually set
by the user, however, it will stop blinking when the 6030 recognizes that a flight has begun. Alt 1 can be
manually set to a value that corresponds to the default QNH pressure of 29.92 inHg (1013.25 hPa) with a short
press of the F1 key. Alt 1 can be manually set to GPS altitude by pressing the F2 key (provided the internal