2 Overview
While it is possible to turn on the 6030 and immediately go flying, we recommend that you study these operating
instructions and make yourself familiar with the various functions. We have kept the operating instructions as
brief as possible. Users who would like to freshen up on the basics, or those who want to learn more about the
individual functions and their uses, we have included in-depth explanations in the Appendix. These appendices
are referred to in the basic instructions. Please first review the diagrams of the 6030 display and keypad and
their descriptions so that after scanning the index briefly you will have an basic understanding of the 6030’s
functions.
The firmware of the 6030 is stored in “flash” memory. Upgrading your unit’s firmware to the most recent version
can be done with the help of a PC, and does not necessitate sending the unit to us for service. The cable
required to connect the unit to your PC is included. To update your 6030, all you need to do is download the
update from our web site and transfer it to your 6030 using the supplied installation software.
The 6030 has a Simulation mode that helps you better understand the numerous functions of the instrument,
and to practice using the 6030 by simulating an actual flight. With this feature you can simulate almost any
situation encountered during flight. You can change several flight parameters such as: altitude, climb rate, air
speed, ground speed, wind speed, and flight direction. You can also observe the effects of these on best glide
speed, the McCready indicator, arrival altitude at destination, distance from the destination, etc. All
accompanying sounds are simulated, as well.
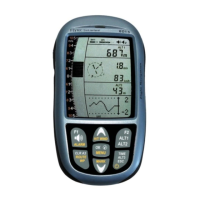
2.1 Turning the 6030 On/Off
To switch the 6030 on, short-press the On/Off key. The instrument will beep
once, and the display will show a list of possible languages. Select the desired
language with the !" keys and press the OK key to continue. The selected
language will now be in effect and will become the default; in subsequent start-
ups you will only need to press the OK key to confirm start-up. If after pressing
the OK key, the 6030 powers down without advancing to the next screen, it is
most likely an indication that the batteries are critically low. In this case the
6030 should be charged or the rechargeable batteries should be temporarily
replaced with alkaline cells before attempting to start the instrument.
Repeatedly attempting to power-up the instrument with weak batteries can
cause corruption of the EEPROM and/or loss of factory settings. Please see
Section 2.6.
After you press the OK key, the display will show the Start-Up screen for 15
seconds with the following information shown:
• Instrument Manufacturer
• Instrument model and serial number
• Pilots Name (if set)
• Glider type (if set)
• Glider ID – Call sign/Pilot license/etc. (if set)
• Firmware version and date
• Time and date
• Battery status for Banks 1 and 2
When the battery test is complete the 6030 will enter run-mode and the display
will appear as shown in section 2.2.