20
2 HARDWARE OVERVIEW
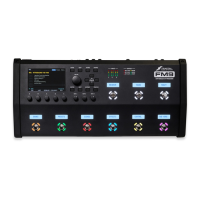
TEMPO Button — Tap this button once to show the Tempo menu page, or tap two or more times to set a new
tempo. After setting the tempo, press EXIT to return to wherever you were.
TIP: The tempo can also be entered using a footswitch and by various other means. See Section 11: Tempo
i
VALUE Knob — The VALUE knob performs different functions on different menu pages.
In the Home menu, it cycles through presets.
In the Layout grid, it is used to add or change which blocks are on the grid.
In Edit and SETUP menus, it changes parameter values, selects from lists, and more.
The Value knob also has a push function of opening the Layout Grid.
o
NAV Buttons — The four NAV buttons perform different functions on different pages. On the preset page of
the Home menu, they select and load Presets (Left/Right) and Scenes (Up/Down). In other menu pages, they
select between on-screen parameters or options, moving the “focus” of the VALUE knob, as indicated by a
blue highlight and brighter blue text.
a
ENTER and EXIT Buttons — The ENTER button executes commands, commits changes, accesses sub-menus,
and more. EXIT works for cancel, escape, and various other functions.
TIP: From the home page, ENTER is a shortcut to open the layout grid.
s
PAGE LEFT and PAGE RIGHT — These step through menu pages, shown as “tabs” at the top of the display.
d
Output Level Knobs 1, 2 and 3 — These knobs independently control the volume of each of the
corresponding rear panel outputs. As discussed in various setup diagrams in this manual, Output 3 is at unity
gain when set fully clockwise.
f
Meter Bridge — Three LED meters — one mono and two stereo — show the levels at Inputs 1, 2, and 3.
The red LED indicates -6dB. Adjust input levels as discussed in “Setting Levels” on p. 5
g
Status LEDs — Six LEDs show important information.
The OUT CLIP LEDs (1, 2, and 3) indicate that internal signal levels are too high, which can be corrected by
turning down the corresponding output knob or by lowering the level of your presets.
The Edited LED lights whenever the current preset has been altered but not saved.
The MIDI In LED lights while MIDI data is being received at the MIDI Input or via USB.
The Tempo LED flashes to show the current Tempo.
TIP: You can also nd on-screen meters on the Meters pages of the Home menu and the Layout.
h
Footswitches — The switches of the FM9 use our proprietary Solid State Switching (SSS™) technology,
featuring extremely smooth, quiet, action, and no mechanical contacts to fail. Each footswitch can be
assigned your choice of one “Tap” and/or one press-and-hold (“Hold”) function. These can be different in
different ways in different “Layouts”. Learn more in Section 10: Layouts & Switches.