129
• Any evidence of corrosion: Replace the entire valve.
NOTE
Bottom screws must be removed from the plate to take out a valve. These valves
are disassembled by removing the coils and the valve guide (housing with the
plunger inside). If you replace the coil or the entire valve, install an amp connector
on the coil wire lead.
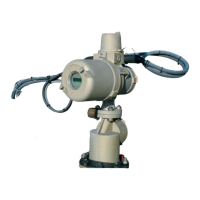
10.5.2. Backup vacuum pump
Turn off the main power switch. You need the service kit for the Gas vacuum pump. If the
kit includes instructions with diagrams, do not use them. Instead, refer to Figure 84 and
Table 7 Use the following procedure:
1. Let the pump cool until it is no longer too hot to handle.
2. Disconnect the inlet and outlet sample tubes from the pump, noting the location of
each tube so that they are reconnected to the correct fitting.
3. Remove the bolts on the pump plate (below the pump).
4. Slide the pump to the front of the cabinet. Then, lift and rotate it so the pump head
faces you and the motor is to the rear.
NOTE
Expect a release of carbon dust when this pump is disassembled. If this
might create a problem where the ACM 150 monitor is installed, disconnect
the power cord and move the pump to an acceptable work area before
continuing.
5. Remove the two End Caps and their O-rings.
6. Remove the five bolts on the Muffler Box and tap them lightly with a small hammer
to loosen them.
7. Scrap off the Gasket between the Muffler Box and the End Plate.
8. Remove the six bolts that hold the End Plate to the Body.
9. Remove the End Plate and the 4 Vanes.
10. Use steel wool to clean dirt and dust made by the old Vanes off surfaces.
11. Install the four new Vanes from the kit so that the beveled end slides into the slots
in the same orientation as the old vanes.
12. Hold the End Plate to the Body and install the six bolts using a torque sequence.
13. Install a new Gasket from the kit between the End Plate and Muffler Box.
14. Get five new Bolt Gaskets from the kit and replace the old ones before bolting the
Muffler Box to the End Plate. Screw in the bolts but leave them loose.
15. Using the two new O-Rings from the kit, screw in and tighten both End Caps. Throw
away the Felt Filters in the kit. No filters are used in the ACM 150 monitor pump.
16. Tighten the bolts attaching the Muffler Box to the End Plate.
17. Restore power and restart it while the pump is still pulled out. Assure that you have
a strong suction and that there are no irregular noises or other problems.
18. Slide the pump back in place and reconnect the tubes and pump plate bolts.

 Loading...