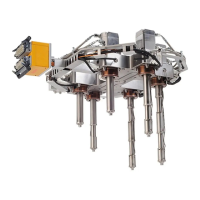
4. Disconnect the overhead lifting device and remove the hoist rings from the manifold.
5. Install the screws that secure the manifold to the plate. Each drop has four screws
surrounding it.
IMPORTANT!
Torque the screws that secure the manifold to the plate as specied in the assembly drawings. Do
not over-torque the screws.
6. Starting from the drop closest to the center of the manifold, use a cross-pattern to hand
tighten the screws, then repeat the same cross-pattern to torque the screws to half the
torque value listed in the assembly drawing. Refer to Figure 4-5.
7. Repeat the same cross-pattern used in step 6 to torque the screws to the full torque value
listed in the assembly drawing. Make sure all screws are tightened to a uniform torque value.
NOTE:
It is recommended to go around the cross-pattern two to three times, torquing each drop screw,
to make sure all of the screws are at the specied torque value. Keep going around the cross-
pattern until there is no longer any rotation of the screws at the specied torque value.
v 2.2 — March 2021 Unify Manifold System
50 Installing and Removing the Manifold Assembly