Do you have a question about the Kidde AEGIS 84-732001-001 and is the answer not in the manual?
Provides contact details for Kidde-Fenwal, Inc. for inquiries about the manual.
Explains the meaning of CAUTION and WARNING symbols used in the manual.
Guidelines for problem-free installation and long-term reliability of the control unit.
Specifies recommended operating temperature and humidity for the system.
Instructions for handling static-sensitive components to prevent damage.
Discusses the limitations of fire alarm systems and potential failure reasons.
Supplements specific warnings and cautions, emphasizing understanding and application.
Guidance on immediate action for any injury, regardless of severity.
General safety precautions to be observed at all times during installation and operation.
Details the various configurable modes for the abort switch operation.
Overview of the Kidde AEGIS™ as a versatile fire control unit.
Lists agencies and standards for which the Kidde AEGIS is listed/approved.
Lists suppression system and other relevant standards for designers and installers.
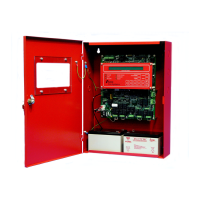
Details the enclosure, its door options, and the optional dead-front panel.
Details the power supply unit's function, charging capability, and monitoring circuits.
Lists the interfaces and terminals provided by the printed circuit board.
Describes the components of the operator interface: LEDs, switches, display, and buzzer.
Lists control unit indicators and their corresponding LED display colors.
Details the function of the four control switches on the operator interface.
Explains the uses of the three-digit digital display on the control unit.
Describes when the buzzer will sound on the control unit.
Details the three detection input circuits and their wiring capabilities.
Describes the manual release input, its activation, and wiring suitability.
Explains the abort input function, its effect on release, and configurable modes.
Describes supervisory circuits and their use with monitoring devices.
Details the three NAC circuits, their configuration, and compatible appliances.
Describes the two ARC circuits, programming options, and compatibility.
Details the three programmable relays and the dedicated trouble relay.
Describes the auxiliary power output and its intended use.
Explains when programmable relays energize and their latching behavior.
Describes the normally energized trouble relay and its de-energization on trouble.
Details the auxiliary power output rating and its interruption by system reset.
Lists the components included in the Kidde AEGIS control unit shipment.
Lists materials not supplied with the system but needed for installation.
Guidelines for proper electrical connections, including AC voltage and wiring practices.
Details grounding requirements and lightning protection measures for the system.
Instructions for stripping and terminating wiring conductors for connection.
Provides wiring gauge recommendations, resistance, and maximum lengths.
Guidance on calculating DC load and determining battery capacity.
Advice on selecting an appropriate and accessible location for the enclosure.
Steps for mounting the control unit enclosure, including height and initial door removal.
Detailed steps for surface mounting the control unit enclosure.
Steps for cutting and plumbing wall openings for semi-flush mounting.
Details on using a trim ring to enhance the appearance of semi-flush installations.
Procedure for installing the power supply unit, including wiring connections.
Instructions for installing the PCB, including standoffs and grounding.
Steps for connecting the AC power cable to the control unit.
Procedure for calculating battery size and connecting batteries to the unit.
Overview of terminal blocks and their functions on the printed circuit board.
Wiring diagrams for smoke/electronic heat detectors and contact devices.
Wiring diagrams for notification appliance circuits (NACs).
Wiring diagrams for agent release circuits (solenoids, initiators).
Procedure for aligning and attaching the bezel to the PCB.
Steps for installing the optional dead-front panel.
Procedure for installing the standard enclosure door.
Procedure for installing the enclosure door with mounted switches.
Steps for installing manual release and abort switches onto the enclosure door.
Final steps for powering up, configuration, and testing the installed system.
Overview of how to configure inputs and outputs via the operator interface.
Procedure for entering the factory default password to access configuration settings.
Guidance for handling lost, forgotten, or incorrect passwords, including temporary passwords.
Describes how to navigate configuration settings and lists initial settings.
Covers password characters and application mode for Release Circuit 1.
Configuration options for Release Circuit 2 application mode.
Settings for aborting both release circuits or Release Circuit 1.
Defines the configurable modes for the abort function.
Configuration options for Input Circuit 3 (Detector or Waterflow).
Configuration options for Programmable Relay 1 based on alarm conditions.
Configuration options for Programmable Relay 2 based on alarm conditions.
Configuration options for Programmable Relay 3 based on alarm conditions.
Configuration options for the Trouble Relay's response to AC failure.
Configures the time delay for manual release activation on Release Circuit 1.
Configures the time delay for manual release activation on Release Circuit 2.
Configures the automatic time delay for Release Circuit 1.
Configures the automatic time delay for Release Circuit 2.
Configures the on-time duration for Release Circuit 1.
Configures power-limited settings for Release Circuit 1.
Configures the on-time duration for Release Circuit 2.
Configures power-limited settings for Release Circuit 2.
Configures whether troubles are latching or non-latching.
Configures latching behavior for Supervisory Input 1.
Configures latching behavior for Supervisory Input 2.
Configures which outputs are disabled by the isolate button.
Defines how NAC 1 relates to Agent Release Circuits (ARC).
Defines how NAC 2 relates to Agent Release Circuits (ARC).
Defines how NAC 3 relates to Agent Release Circuits (ARC).
Configures the audible tone and behavior for NAC 1 on first alarm.
Configures the audible tone and behavior for NAC 1 during pre-release.
Configures the audible tone and behavior for NAC 1 during release.
Configures the audible tone and behavior for NAC 2 on first alarm.
Configures the audible tone and behavior for NAC 2 during pre-release.
Configures the audible tone and behavior for NAC 2 during release.
Configures the audible tone and behavior for NAC 3 on first alarm.
Configures the audible tone and behavior for NAC 3 during pre-release.
Configures the audible tone and behavior for NAC 3 during release.
Specifies which NACs are used for general alarm notification.
Configures the audible tone and behavior for NAC 1 during general alarm.
Configures the audible tone and behavior for NAC 2 during general alarm.
Configures the audible tone and behavior for NAC 3 during general alarm.
Explains how to read the control unit display, interpret LEDs, and reset the unit.
Describes the control unit's continuous monitoring and status in normal mode.
Details the different states of alarm: First Alarm, Pre-Release, Releasing, Post-Release.
Describes the supervisory state, LED indications, and acknowledgment.
Details the trouble state, indicators, buzzer, and acknowledgment.
Explains how the Acknowledge switch silences the buzzer and stabilizes LEDs.
Describes how the Signal Silence switch silences NAC circuits.
Explains how the System Reset switch resets outputs and interrupts power.
Disables agent release and other outputs for maintenance, creating a supervisory condition.
Details inspection, testing, and maintenance requirements per NFPA 72 and AHJ.
Specifies the required frequency for testing as per NFPA 72 and local AHJ.
Procedure to check battery status by disconnecting AC and measuring voltages.
Sequence to display battery open circuit voltage and charge current.
Guidelines for replacing batteries, including frequency and voltage checks.
Procedure to test LEDs and the buzzer by holding the Acknowledge switch.
Provides diagnostic information and methods to return the AEGIS to proper operating conditions.
Steps to access the diagnostic function and display trouble codes.
Lists trouble codes, their descriptions, and recommended corrective actions.
Lists part numbers for the Kidde AEGIS control unit and associated components.
Table for selecting required standby and alarm durations for battery backup.
Lists power consumption (mA) for system components in standby and alarm modes.
Procedure and guide for calculating total standby and alarm power requirements.
Table and notes for calculating required battery capacity in Ampere-Hours (AH).
Lists agency-listed smoke, heat, and duct detectors and their bases.
Lists releasing solenoids with electrical specifications and agency approvals.
Lists initiator-based releasing devices with specifications and agency approvals.
Lists miscellaneous compatible devices, such as central station receiving units.
Details AC main input, current consumption, breakers, power supply, and battery specs.
Details specifications for Detection, Manual Release, Abort, and Supervisory input circuits.
Specifies voltage, current, and type for Notification Appliance Circuits.
Details the type and contact rating for output relays.
Details specifications for releasing circuits, including compatible devices and circuit type.
Details enclosure protection, material, dimensions, and weight.
Specifies temperature and relative humidity ranges for operation.
Guidelines for FM approved Pre-Action and Deluge Systems using Kidde AEGIS.
Configuration guidelines for Central Station operation with AEGIS and DACT.
Guidelines for physically separating and routing power-limited and non-power-limited wiring.
| Brand | Kidde |
|---|---|
| Model | AEGIS 84-732001-001 |
| Category | Control Unit |
| Language | English |