S
ection
2
MAKING SETTINGS CHANGES
The following paragraphs describe how the HMI is used to make setting changes.
Front Panel Operation
The LEDs indicate control mode and status conditions and are also used when adjusting settings at the front
panel. Repeatedly pressing the “SELECT” button steps through the various adjustments, starting with the “Course
Voltage” adjustment and progressing through to the “Fine Voltage” adjustment. The next press of the “SELECT”
button exits the adjustment mode.
When in the adjustment mode, only the adjustment LEDs will be lit. All mode status LEDs will be turned off.
Adjustment LEDs are of two types. The rst type is the LED that indicates the function being adjusted. This LED
blinks slowly (approximately once per second). The second type is the LED that indicates the level of adjustment.
This LED is on steady. The level of adjustment is changed by pressing the “UP” or “DOWN” button. When an
adjustment level LED (on steady) overlaps the function LED (slow blinking), the LED will remain in the slow
blinking mode. If no button is pressed for a period of one minute, the regulator saves the settings and exits the
adjustment mode. If regulator power is interrupted before the automatic save feature is commanded, that level of
adjustment will be lost.
When the regulator is not in the adjustment mode and either the “UP” or “DOWN” button is pressed, the regulator
enters the “Fine Voltage” adjustment mode and changes the generator ne voltage set point by 0.1V. Successive
presses of the “UP” or “DOWN” button shall continue to adjust the ne voltage setting. Pressing the “SELECT”
button causes the regulator to exit the adjustment mode. Mode status LEDs blink approximately twice per
second.
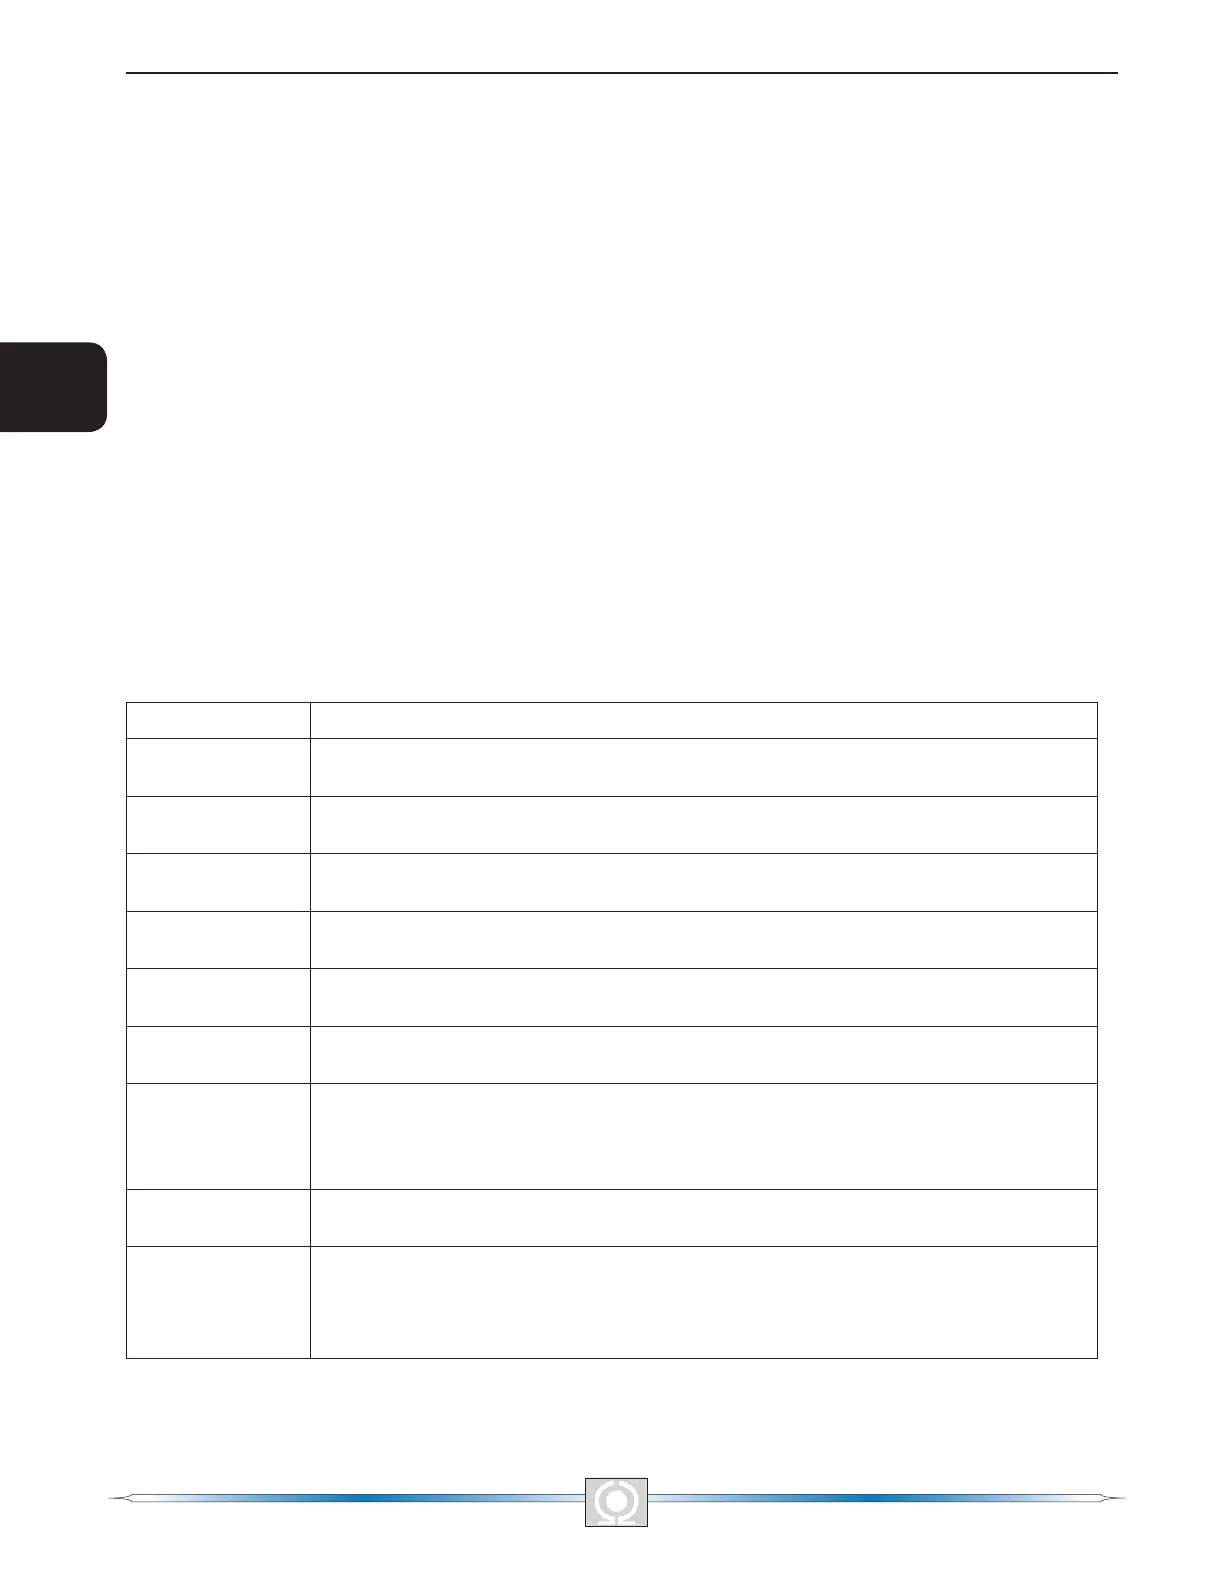
Table 2-3. DVR2000E Front Panel Adjustment Indicator Descriptions
Indicator Description
Fine Voltage
LED #11
This LED blinks slowly when the “Fine Voltage” level is selected for adjustment via the
front panel push buttons.
Gain
LED #10
This LED blinks slowly when the “Gain” adjustment is selected for ne tuning of loop gain
via the front panel push buttons.
Stability Range
LED #9
This LED blinks slowly when selecting the desired “Stability Range” via the front panel
push buttons.
Droop
LED #8
This LED blinks slowly when the “Droop” percentage level is selected for adjustment via
the front panel push buttons.
Under Frequency
LED #7
This LED blinks slowly when the “Under Frequency” knee point is selected for adjustment
via the front panel push buttons.
VAR/PF Adjust
LED #6
This LED blinks slowly when the level of the programmed mode (VAR or Power Factor) is
selected for adjustment via the front panel push buttons (DVR2000EC only).
VAR/PF Select
LED #5
This LED blinks slowly when selecting the programmed mode (VAR, Power Factor, or
none(AVR)) via the front panel push buttons. When in this adjustment mode, LED #1 is
on solid for none(AVR), LED #2 is on solid for Power Factor mode, and LED #3 is on solid
for VAR mode (DVR2000EC only).
Manual Mode Adj.
LED #4
This LED blinks slowly when the “Manual Mode” (eld current) regulation set point is
selected for adjustment via the front panel push buttons.
Manual Mode On/
Off LED #3
This LED blinks slowly when selecting or deselecting “Manual Mode” (eld current
regulation) as the active operating mode via the front panel pushbuttons. When in this
adjustment mode, LED #1 is on if Manual Mode is off, LED #2 is on if Manual Mode is
on.
10
5
Section 2 Index
3
Main Index
11
3
Main Index
5
Section 2 Index