NewSonic SonoDur2 Issue 04 09/2016 Page 15
Please note:
All connectors are polarized and can only connect to the device plug in one position. When
plugging the cable, it must be ensured that the cable plug is in the correct position towards the
device plug (if necessary, determine by gently rotating it). In this position, the plug can be effortlessly
slid by a few mm into the device plug. Only then, the plug can be clicked into place by pressing it
down firmly - but without using any force. Otherwise, the plug connection may be damaged or
destroyed!
Please make sure that the instructions for connecting the plug connector are definitely observed!
(Connecting and Disconnecting of the probe, Page 21)
Attention:
If the plug is forcibly pushed into the connector socket, the entire connector system may be
damaged, resulting in an unusable measurement system.
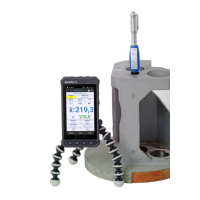
3.2 Initial Commissioning
Each of our products is thoroughly inspected and carefully packed prior to delivery. However, please
check that the shipment is complete and has not been damaged during transportation. (Please see
also section Safety Information, page12 and Scope of Delivery and Accessories, page 61).
Before the first use, check the battery status and charge the instrument, if necessary. Insert the
adapter into the SONO-NG plug-in power supply unit, as described in section “Power Supply Unit“,
page 16. Connect the micro USB plug with the device (be careful!) and the bigger rectangular USB
plug with the power supply unit.
Attention:
All connectors can only be inserted one way into the jack. Do not, under any circumstances, use force
since the connector system may get damaged.
Plug in the power supply unit into the mains. Switch on the instrument as described in chapter
Turning On and Off, page 20. Start the SonoDur program by pressing the start button (see
Description of Control Elements, page 24). The instrument is ready for taking measurements.
Your Complete Source for
Testing Equipment. Since 1969!
www.BergEng.com
Berg Engineering & Sales Company, Inc.
Tel 847-577-3980
info@bergeng.com