Next Sheet
Turning the Power On
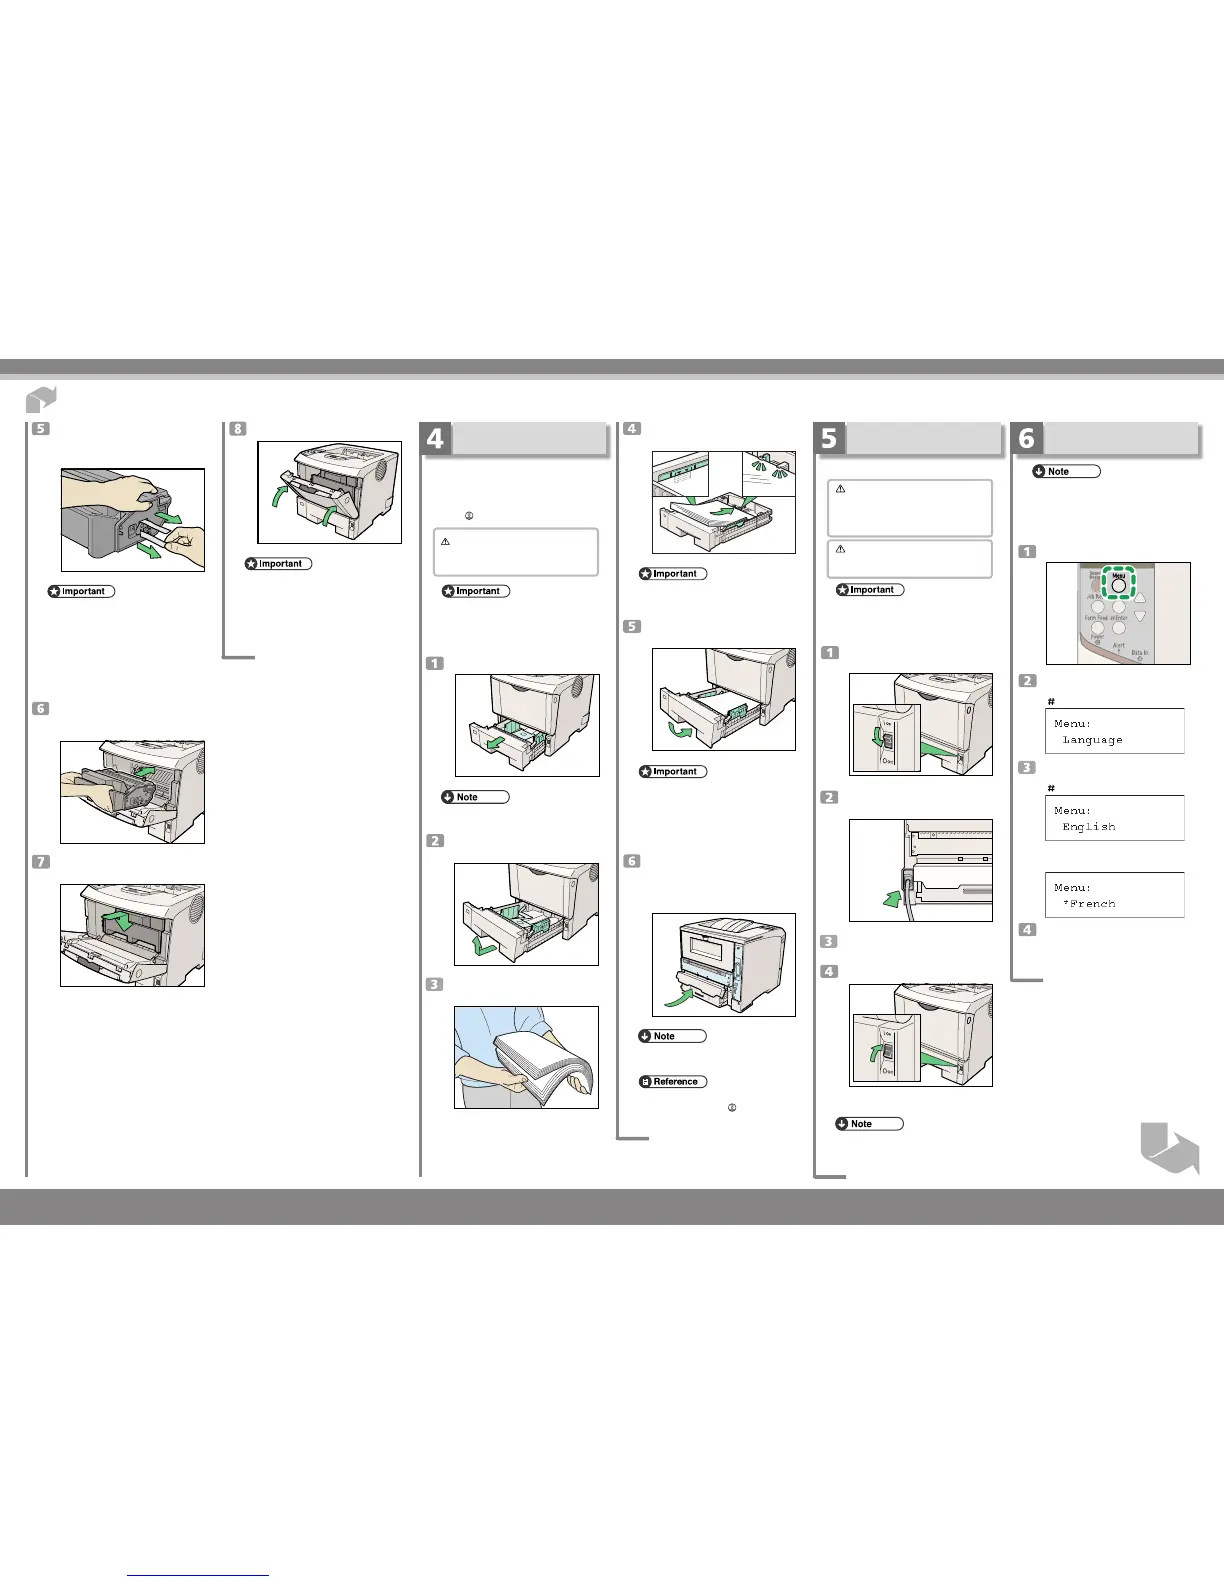
Follow the procedure below to turn the power on.
Warning
•
The supplied power cord is for use with this
equipment only. Do not use with other appli-
ances. Doing so may result in fire, electric shock,
or injury.
Caution
•
Do not handle the plug with wet hands. Doing
this might cause an electric shock.
• Make sure the power cable is plugged securely into
the wall outlet.
• Turn the power off when plugging and unplugging
the power plug.
Confirm that the printer power is turned
off. If it is on, turn it off.
Connect the power cable to the connec-
tor on the back of the printer.
Insert the plug of the power cord securely
into the wall outlet.
Turn on the printer power.
After the printer warms up, the ready message appears
on the panel display.
• The first time you turn the printer on after installa-
tion or after replacing the fusing unit, it will make
several loud noises. This is due to the fusing unit ini-
tializing and is perfectly normal.
Close the front cover.
• Do not close the front cover with force. If you can-
not close the cover easily, pull out the toner cartridge
from the printer and insert it again. After that, close
the front cover again.
• Dispose of removed fixing material and tape in the
same manner as ordinary plastic waste.
Quick Installation Guide
Pull out the tape inside the unit horizon-
tally while holding the cartridge with one
hand as shown in the illustration.
• Be sure to remove the tape completely before install-
ing the toner cartridge. Otherwise, the printer might
be damaged.
• If you pull out the strips when the toner cartridge is
slant or standing on its side, the cartridge might cause
trouble with the printer.
• Be sure to pull the tape horizontally. Pulling it up-
ward or downward may cause the toner to scatter.
• After pulling the tape out of the cartridge, toner scat-
ters easily. Do not shake the cartridge.
Hold the grips of the toner cartridge, and
then insert it into the printer until it
stops.
Lower the toner cartridge when it
touches the back.
Quick Installation Guide 1/2
Selecting the Display
Language
• You can select one of the following languages:
English, German, French, Italian, Dutch, Swedish,
Norwegian, Danish, Spanish, Finnish, Portuguese,
Czech, Polish, or Hungarian.
• The default setting is English.
• If you want to use the English panel display, the fol-
lowing procedure is not necessary.
Press the
{{
{{
{
Menu
}}
}}
} key.
Press the
{{
{{
{▼
}}
}}
} or
{{
{{
{▲
}}
}}
} key to display
[Language], and then press the
{{
{{
{
Enter
}}
}}
} key.
Press the
{{
{{
{▼
}}
}}
} or
{{
{{
{▲
}}
}}
} key to select the
language, and then press the
{{
{{
{
Enter
}}
}}
} key.
The following message appears on the panel display
for two seconds, and the panel display automatically
returns to the previous menu .
Press the
{{
{{
{
Menu
}}
}}
} key to return to the
initial screen.
Load the new paper into paper tray with
print side up.
• Confirm that the top of the stack is not higher than
the limit mark inside the tray.
• Confirm that the paper fits under the rear guide.
Carefully slide the paper tray into the
printer until it stops.
• Confirm that the setting of the paper size dial matches
the size and feed direction of the paper in the tray.
Otherwise, the printer might be damaged or a print-
ing problem might occur.
• Do not slide the paper tray in and out with force. If
you do, the front and side paper guides will move
out of the place.
I
nsert the paper tray aligning the ▼mark
on the back of the printer with the ▲ mark
on the paper tray cover, and then push in
the paper tray cover in the direction shown
by the arrow in the illustration.
• Do not install the paper tray cover if the duplex unit
is installed.
• For details about usable types of paper, see “Loading
Paper”, Hardware Guide (
).
Loading Paper
The following describes how to load paper into the stan-
dard paper tray (Tray 1).
For settings other than the default paper size, and in-
formation about the paper sizes that can be set in the
paper tray, see “Paper and Other Media”, Hardware
Guide (
).
Caution
•
Do not pull out the paper tray forcefully. If you
do, the tray might fall and cause an injury.
• To avoid paper jams, make sure paper is not stacked
higher than the upper limit mark inside the paper tray.
Paper misfeeds might occur.
• Do not mix different types of paper in the same
paper tray.
Pull out the paper tray until it stops.
• Do not touch the three white pins on the left front
side of the printer.
Lift the front side of the tray, and then
pull it out of the printer.
Fan the paper before loading paper in the
paper tray.
 Loading...


