11.6 Programming steps
1. Access to program mode (see chapter 11.1)
2. Select the desired programming step by pressing KEY1 "Silence Re-sound
Horn" (to work backwards from programming step 16) or KEY2 "Mode select" (to
work forwards from programming step 1)
3. Select the option within the programming step by pressing keys 13 to 16
"ZONES Disable/Enable", "ZONES det. test/Enable", "Silence buzzer", "Reset"
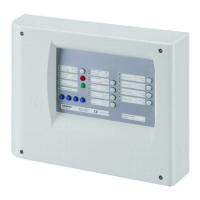
Select Step Function Activated indicator State
1 Change activated time and function of control lines 4/5 LED11 Disabled lit
2 Change the flooding time of control lines 4/5 LED12 Detector test lit
3 Change the function of the remote transmission LED13 Fault lit
4 Change the function of the monitored inputs 1 and 2 LED14 Loss of agent lit
5 Change the active mode of control lines 1 and 3 LED15 Earth fault lit
6 Enable the "Alarm verification" function LED16 Power fault lit
7 Define the function of the yellow key 8 LED17 Peripheral fault lit
8 Change the function of the monitored Input 3 LED18 System fault lit
9 Change the parameters to the "Reset" function LED19 System test lit
10 Change the indication mode on the operator interface LED20 Horn/actuator lit
11 Change of function of detector zones 1 to 3 LED21 Disabled/fault lit
12 Change the code for Access level 2 LED22 Fire control lit
13 Change the parameters on the operator interface LED23 RT-fault lit
14 Change of the fault delay upon "Mains failure" LED24 Disabled/fault lit
15 Change of function of control inputs 2 to 4 LED25 RT-alarm lit
KEY1
▲
▲
▼
▼
KEY2
16 Change of the function of the driver outputs 2, 8 and 1 LED26 Emergency hold/abort lit
PU1
SW2
SW1
KEY 2
LD1
LD2
LD3
LD4
LD5
LD6
LD7
LD8
LD9
KEY 8KEY 9KEY 10KEY 11KEY 12
KEY 1
KEY14
KEY15
KEY16
KEY13
Fig. 46 Operating and indicator elements, XCM1001-2 upper main board view
 Loading...