69
OPTIONAL OPERATIONS
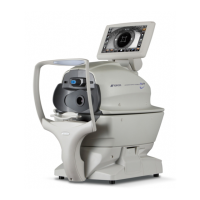
ALIGNMENT AND MEASUREMENT
Alignment is operated on the control panel.
1 Select the right/left eye by tapping the button/ button.
2 When the pupil is displayed, tap the display around the pupil. For adjusting Z direction distance,
the measuring head moves to display the pupil image and alignment dot on the center of the
screen.
NOTE
• Depending on the alignment condition, the alignment mark is displayed
differently:
: When alignment is insufficient/out of the measuring range
: When alignment is within the measuring range in all directions
(front/rear, right/left, top/bottom)
• If the pupil is not displayed on the control panel, move the measuring
head by pressing the control panel, checking the eye height mark on the
measurement window as a guide (See page 37).
• When the measuring head has reached the limit of movement (vertical/lat-
eral directions), a yellow-colored limit mark appears on the control panel
corner, showing it is the movement limit in that direction. Tap the display
to move the measuring head to a position that aligning is possible.
PatientID
1
OPCON
ARO
TOPCONTAROU
Focusand
Touchameasurepoint
T/P
MANUAL
MODE
PatientID
OPCON
ARO
Focusand
Touchameasurepoint
T/P
MANUAL
MODE
PatientID
PatientID
1
OPCON
ARO
TOPCONTAROU
T/P
MANUAL
MODE
PatientID
PatientID
OPCON
ARO
TOPCONTAROU
T/P
MANUAL
Focusand
Touchameasurepoint
MODE