EasyManua.ls Logo

Arduino uno User Manual

Arduino uno
311 pages
To Next Page IconTo Next Page
To Previous Page IconTo Previous Page
Page #168 background imageLoading...
Page #168 background image
After including all of the libraries we need, we define the
NUNCHUK_DEVICE_ID
constant. I
2
C is a master/slave protocol; in our case, the Arduino will be the
master, and the Nunchuk will be the slave. The Nunchuk registers itself at
the data bus using a certain ID (0x52), so we can address it when we need
something.
In
initialize
, we establish the connection between the Arduino and the Nunchuk
by sending a handshake. In line 7, we call
Wire
’s
begin
method, so the Arduino
joins the I
2
C bus as a master. (If you pass
begin
an ID, it joins the bus as a
slave having this ID.) Then we’ll begin a new transmission to the device
identified by
NUNCHUCK_DEVICE_ID
: our Nunchuk.
We send two bytes (0x40 and 0x00) to the Nunchuk, and then we end the
transmission. This is the whole handshake procedure, and now we can ask
the Nunchuk for its current status by calling
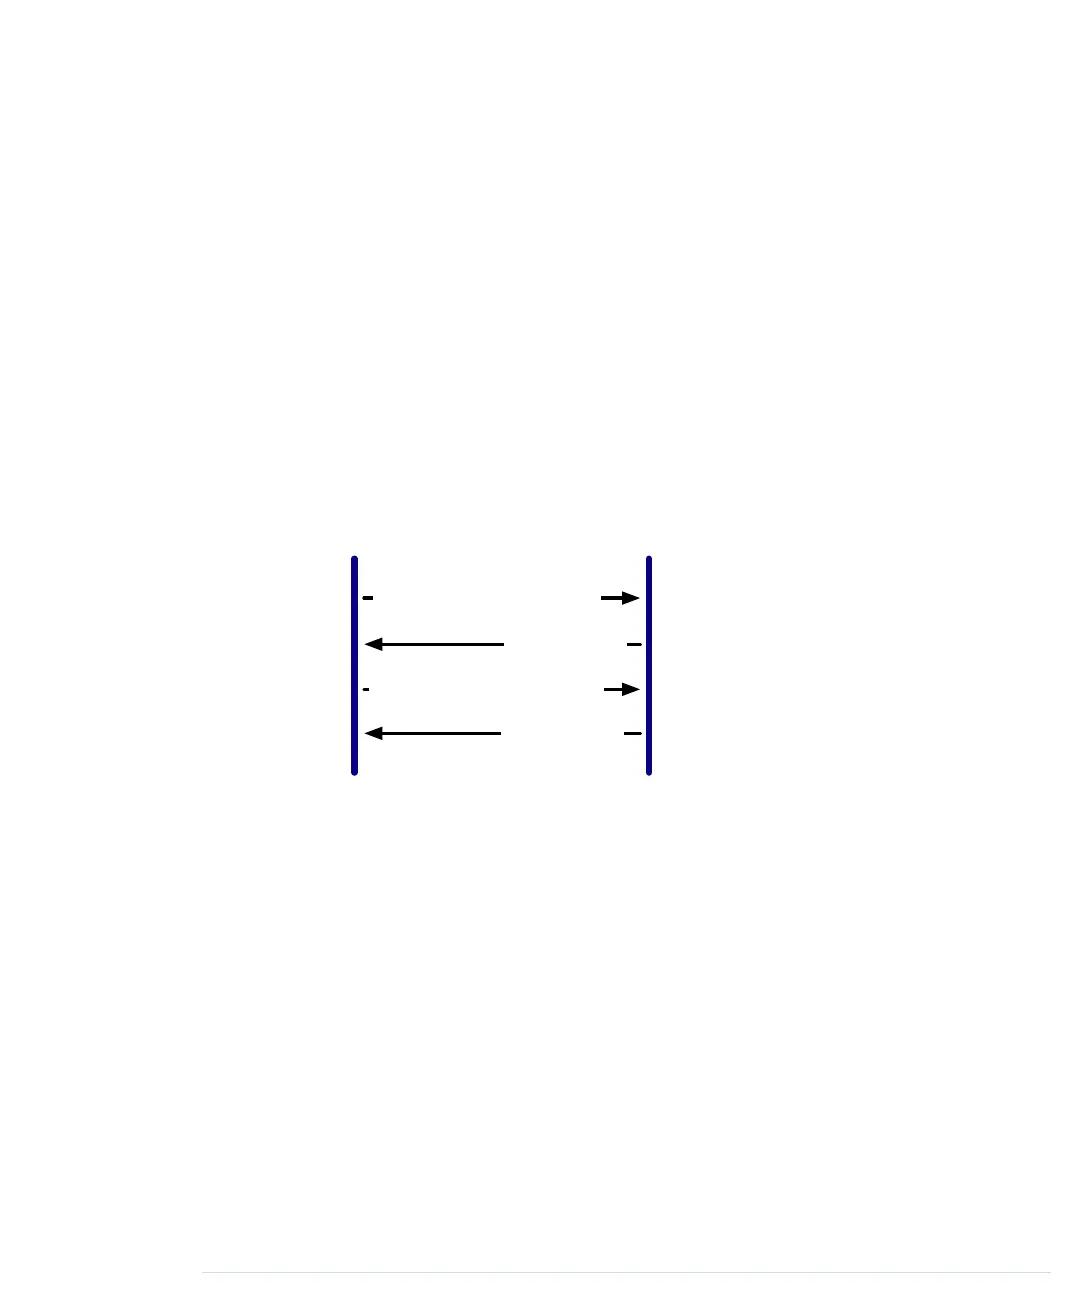
update
. In the following figure,
we see the message flow between an Arduino and a Nunchuk.
Arduino Nunchuk
6 data bytes
Handshake (0x40, 0x00)
Request new data (0x00)
6 data bytes
}
repeat
update
first pauses for a millisecond to let things settle. Then we request six
bytes from the Nunchuk, calling
Wire.requestFrom
. This doesn’t actually return
the bytes, but we have to read them in a loop and fill our buffer.
Wire.available
returns the number of bytes available on the data bus, and
Wire.read
returns
the current byte. We cannot use the bytes we get from the Nunchuk directly,
because the controller obfuscates them. “Decrypting” them is easy, as you
can see in
decode_byte
.
Finally, we call
request_data
to tell the Nunchuk to prepare new data. It transmits
a single zero byte to the Nunchuk, which means “prepare the next six bytes.”
Before we actually use our
Nunchuk
class in the next section, take a look at the
documentation of the Wire library. In the Arduino IDE’s menu, choose Help
> Reference and click the Libraries link.
report erratum • discuss
Building a Nunchuk Class • 151
www.it-ebooks.info

Table of Contents

Other manuals for Arduino uno

Question and Answer IconNeed help?

Do you have a question about the Arduino uno and is the answer not in the manual?

Arduino uno Specifications

General IconGeneral
Form factorArduino
CertificationRoHS, FC, CE
Processor model-
Processor frequency- MHz
Microcontroller modelATmega328
Microcontroller frequency16 MHz
DC input voltage7-12 V
Operating voltage5 V
DC current per I/O pin40 mA
Flash memory0.032 MB
Maximum internal memory- GB
SRAM (Static Random Access Memory)2 KB
EEPROM (Electrically Erasable Programmable Read-Only Memory)1 KB
Wi-FiNo
Number of analog I/O pins6
Number of digital I/O pins14
Weight and Dimensions IconWeight and Dimensions
Board dimensions53.4 x 68.6 mm

Summary

Arduino Uno and the Arduino Platform

The Parts You Need

Chapter 1: Welcome to the Arduino

Installing the Arduino IDE

Provides step-by-step instructions for installing the Arduino Integrated Development Environment.

Hello, World!

Introduces the first project: making an LED blink using the Arduino.

Compiling and Uploading Programs

Explains how to compile and upload sketches to the Arduino board.

Chapter 2: Creating Bigger Projects with the Arduino

Changing Preferences

Explains how to customize Arduino IDE settings for better workflow.

Using Serial Ports

Explains serial communication for data exchange between Arduino and computer.

Chapter 3: Building Binary Dice

Working with Breadboards

Explains how breadboards work and how to connect components.

First Version of a Binary Die

Implements the first version of a binary die using three LEDs.

Working with Buttons

Details how pushbuttons work and how to connect them to the Arduino.

Building a Dice Game

Completes the dice project by adding a guess button and game logic.

Chapter 4: Building a Morse Code Generator Library

Building a Morse Code Generator

Starts the implementation of the Telegraph C++ class.

Fleshing Out the Morse Code Generator’s Interface

Defines the Telegraph class interface and Morse code data arrays.

Installing and Using the Telegraph Class

Guides on integrating the custom Telegraph library into Arduino IDE.

Chapter 5: Sensing the World Around Us

Measuring Distances with an Ultrasonic Sensor

Introduces ultrasonic sensors and builds a distance measuring device.

Increasing Precision Using a Temperature Sensor

Integrates a temperature sensor to refine distance measurements.

Chapter 6: Building a Motion-Sensing Game Controller

Wiring Up the Accelerometer

Details connecting the ADXL335 accelerometer to the Arduino.

Bringing Your Accelerometer to Life

Reads and outputs raw accelerometer data for three axes.

Building Your Own Game Controller

Integrates a pushbutton and refined accelerometer data for a game controller.

Chapter 7: Writing a Game for the Motion-Sensing Game Controller

Writing a GameController Class

Creates a JavaScript class for convenient access to Arduino motion data.

Creating the Game

Implements a Breakout clone using JavaScript and the motion controller.

Chapter 8: Generating Video Signals with an Arduino

Building a Digital-to-Analog Converter (DAC)

Details building a binary-weighted DAC for video signal generation.

Connecting the Arduino to Your TV Set

Describes modifying an RCA cable to connect to the Arduino.

Using the TVout Library

Introduces the TVout library for generating video signals on a TV.

Building a TV Thermometer

Creates a graphical thermometer display on a TV screen using sensors.

Chapter 9: Tinkering with the Wii Nunchuk

Wiring a Wii Nunchuk

Details wiring the Nunchuk controller to Arduino analog pins.

Building a Nunchuk Class

Creates a C++ class for interfacing with the Nunchuk controller.

Using Our Nunchuk Class

Demonstrates reading Nunchuk data (joystick, accelerometer, buttons).

Chapter 10: Networking with Arduino

Chapter 11: Creating a Burglar Alarm with Email Notification

Chapter 12: Creating Your Own Universal Remote Control

Chapter 13: Controlling Motors with Arduino

What You Need

Lists components for motor control: servo motor, wires, Arduino.

What If It Doesn’t Work?

Troubleshooting motor control: power consumption, weight, adjustments.

APPENDIX 1: Electronics and Soldering Basics

APPENDIX 2: Advanced Arduino Programming

APPENDIX 3: Advanced Serial Programming

APPENDIX 4: Controlling the Arduino with a Browser

Related product manuals