Maintenance
5-8 P/N M/97-520
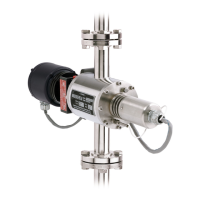
2. Remove the drive motor bracket mounting screws and spacers (if
applicable) from the measuring chamber as shown in Figure 5-1.
NOTE: Inspect the weep holes for signs of process fluid leakage. If
leakage has occurred, the mechanical seal and bearings should be
replaced. Refer to Section 6 - Service for more information.
3. Separate the drive shaft coupling between the measuring chamber
and the drive motor. Retain the isolator for later use.
4. Remove the drive endcap mounting screws and remove the drive
endcap from the measuring chamber as shown in Figure 5-1.
5. Using solvent, clean the inside of the measuring chamber and the
inlet and outlet tubes.
CAUTION
If the rotor is coated with Teflon (blue/green color), make sure the solvent
being used does not harm Teflon. Do not scrape surfaces coated with
Teflon.
6. Clean the inside and outside diameter of the rotor.
7. Make sure the rotor spins freely and the rotor is not asymmetrical.
NOTE: If the rotor does not spin freely, or is asymmetrical, refer to
Appendix A and contact Brookfield Engineering Laboratories for
assistance.
Reassembly
1. Install the O-ring and drive endcap on the measuring chamber
as shown in Figure 5-1 using the mounting screws. Tighten the
mounting screws in a rotational pattern.
2. Install the isolator on the drive shaft coupling shown in Figure 5-1.
3. Connect the drive motor shaft to the drive shaft coupling and rotate
the drive motor and bracket into the correct position.
4. Install the drive motor and bracket as shown in Figure 5-1 using the
mounting screws. Tighten the mounting screws in a rotational
pattern.
5. Turn power to the motor controller enclosure ON and allow the
motor to operate for a few revolutions to ensure the drive shaft
coupling is properly aligned.