TT100 In-Line Viscometer Installation, Operation, Maintenance and Service Instructions
P/N M/97-520 6-29
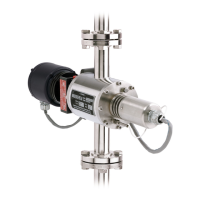
3. Remove the drive motor bracket mounting screws and spacers (if
applicable) from the measuring chamber as shown in Figure 6-9.
4. Separate the drive shaft coupling between the measuring chamber
and the drive motor. Retain the isolator for later use.
CAUTION
Do not damage the torsion element when removing the drive endcap.
5. Remove the drive endcap mounting screws and remove the drive
endcap from the measuring chamber.
6. Remove the rotor mounting screws and washers as shown in
Figure 6-14.
7. Remove the rotor as shown in Figure 6-14.
8. Remove the double mechanical seal assembly mounting screws
from the drive endcap as shown in Figure 6-14.
9. Separate the drive endcap from the double mechanical seal
assembly.
NOTE: Refer to Appendix A and contact Brookfield Engineering
Laboratories, Inc. to make arrangements to return the used double
mechanical seal assembly for repair.
10. Install a new O-ring on the replacement double mechanical seal
assembly.
11. Install the replacement double mechanical seal assembly into the
drive endcap.
CAUTION
Make sure the O-ring is in the correct position before tightening the
mechanical seal mounting screws.
12. Install and tighten the double mechanical seal mounting screws.
13. Install the rotor mounting screws and washers as shown in Figure
6-14.
14. Install the drive shaft coupling and isolator on the end of the drive
shaft.
15. Install the O-ring on the drive endcap assembly and carefully install
the drive endcap assembly into the measuring chamber.