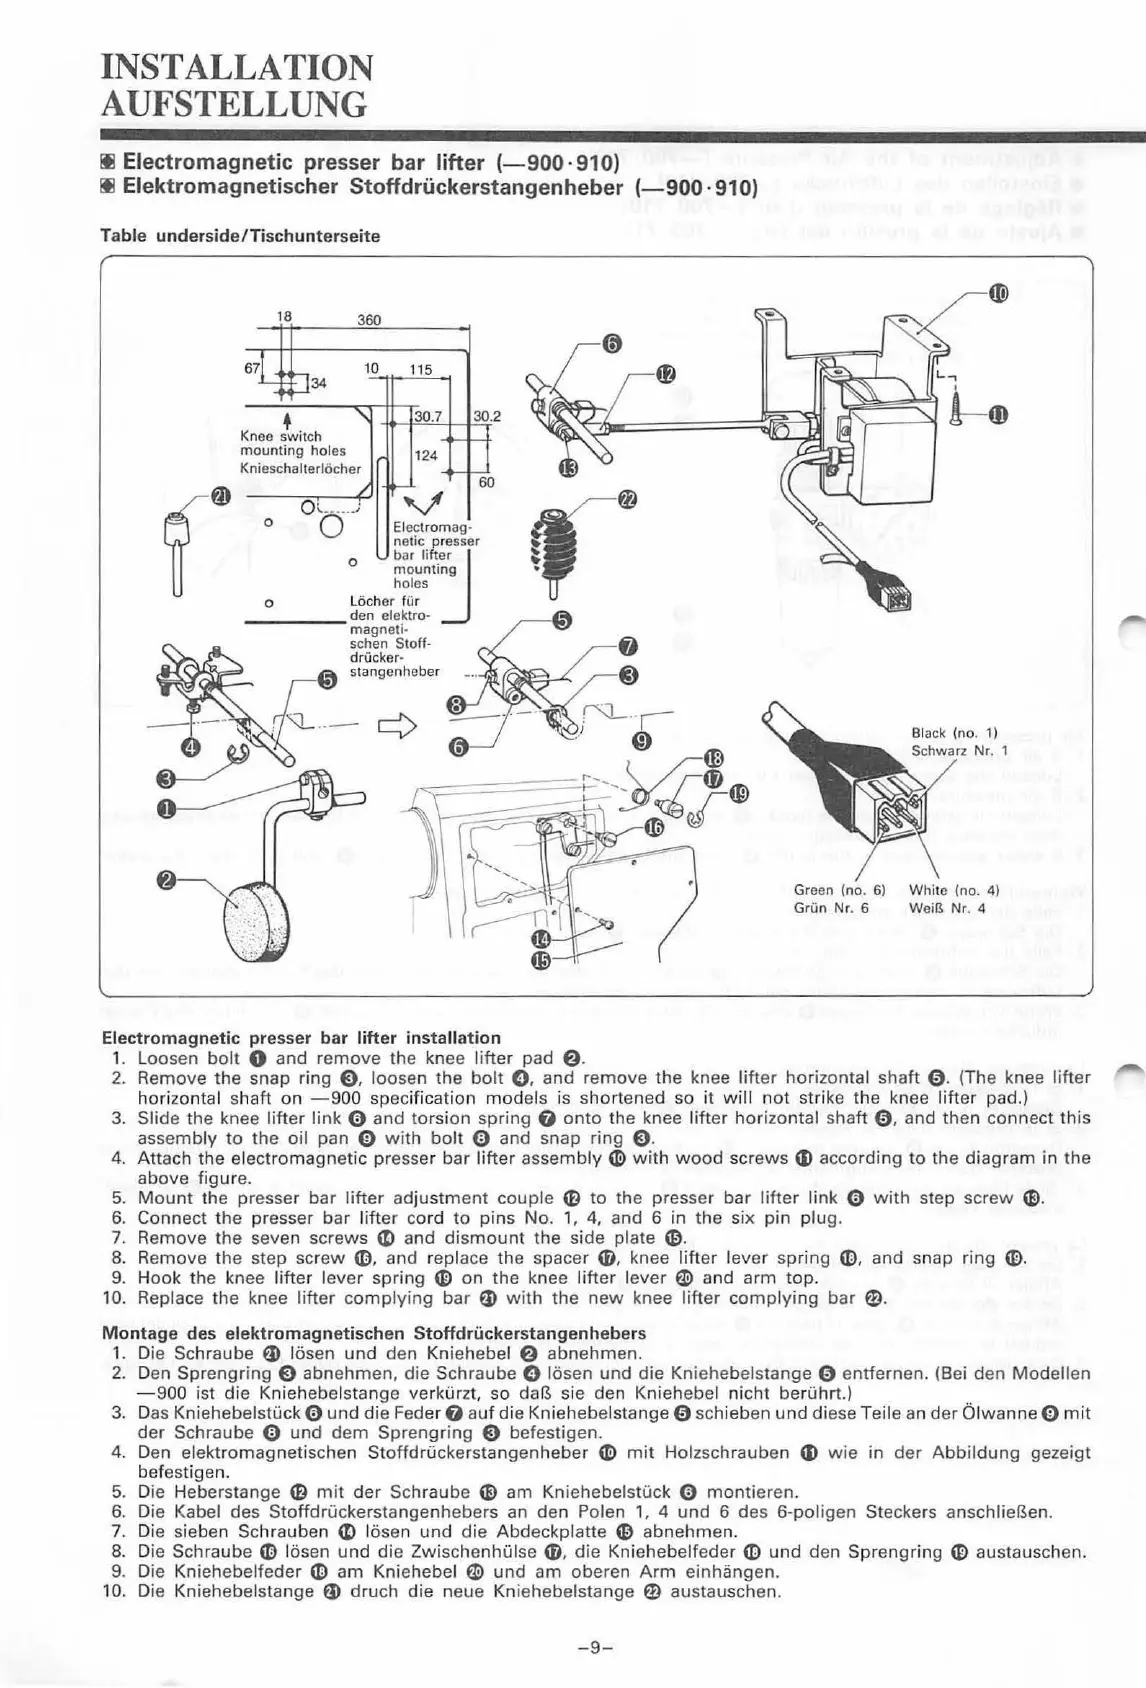
INSTALLATION
AUFSTELLUNG
Ill
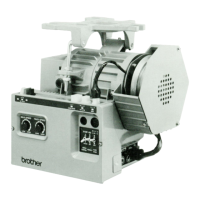
Electromagnetic
presser
bar
lifter
(-900
· 910)
Ill
Elektromagnetischer
Stoffdruckerstangenheber
(-900
· 910)
Table
undersid
e
/Tischunterseite
18
360
67L
tJ34
•
n
ee
sw
it
ch K
m ounting holes
10
"
K nieschalterlocher
115
30.7
30
. 2
>--
124
>--
/
.....
v
~
0
0
oo
.J
Electromag-
netic presser
bar
lifter
holes
0
Locher
fUr
0
mo
unti]
n
-----d
en elektro-
magneti-
schen Stoff-
drucker·
stangen
he
ber
Electromagnetic
pre
sser
bar
lifter
installation
1.
Loosen
bolt
0 and remove the knee lifter pad
f)
.
Bl
ack
(no. 1)
Green (no.
6)
White (no.
4)
Grun
Nr
. 6 WeiB
Nr
. 4
2. Remove the snap ring
E)
, loosen the
bolt
0 , and re
mov
e the knee
lift
er
horizontal shaft
0.
(The knee
lift
er
horizontal shaft
on
-9
00 specification
models
is s
hort
ened so
it
will
not s
tri
ke
the knee
lift
er
pad.)
3. Slide the knee
lifter
link 0 and torsion spring G
onto
the kn
ee
lift
er
hori
zo
nt
al shaft 0 , and
th
en co
nn
ect
this
asse
mbly
to
the oil pan 0 w ith
bolt
0 and snap ring E).
4.
Att
ach the electromagnetic presser bar
lifter
assembly
~with
wood
screws
~
according to the diag
ra
m in the
above figure.
5.
Mount
the
pr
esser bar l
ifter
adj
ustm
e
nt
couple
CD
to
the presser
bar
lifte
r
lin
k 0
with
st
ep
scr
ew
(E)
.
6.
Connect the
pre
sser bar
lift
er
cord to
pin
s No. 1,
4,
a
nd
6 in the six pin plug.
7. Rem
ove
the seven screws
~
and dis
mount
the s
id
e plate
m.
8. Re
mov
e
th
e step screw
(0
, and repla
ce
th
e spacer
~
.
knee lifter l
ever
spr
in
g
~
.
a
nd
snap ring
CD.
9. H
ook
the
kn
ee
lift
er lever spring
CD
on
th
e knee
lift
er lever
~
and
arm
top.
10. Replace the knee lifter co
mpl
ying
bar
G)
with
th
e
new
knee
lift
er
complying
bar fl).
Montage
des
elektromagnetischen
Stoffdruckerstangenhebers
1.
Di
e Schraube
G)
li:isen
und
den Kniehebel
f)
abne
hm
en.
2. Den
Sprengring
E) abnehmen, die Schraube 0 li:isen
und
die Kniehebelstange 0 entfernen. (Bei den Modellen
-9
00 ist die Kniehebelstange verkurzt, so
dar?.
sie den Kniehebel
nicht
b
er
uhrt
.)
3. Das
Kniehebelstlick 0
und
die Fe
der
G auf
di
e Kniehebelstange 0 schieben
und
di
ese
Teile an
der
Olwanne 0
mit
der Sc
hr
aube 0 und
dem
Sprengring 9 befestigen.
4.
Den elektromagnetischen Stoffdruckerstangenheber
~
mit
Holzsc
hr
auben
~
wie
in
der
Abb
ildung
gezeigt
befestigen.
5.
Di
e Heberstange 0
mit
der
Schraube
(E)
am
Kniehebelstuck 0 montieren.
6. Die Kabel des Stoffdruckerstangenhebers an
den
Po
len 1, 4
und
6
de
s 6-poligen Steckers ansch
lier?.en
.
7.
Di
e sieben Sc
hr
a
ub
en
~
li:isen
und
die Abdeckplatte
~
a
bn
ehme
n.
8.
Di
e Schraube (D li:i
se
n
und
di
e Z
wi
sche
nhul
se
~
.
die Kniehebelfeder
~
und den S
pr
engri
ng
CD
austau
sc
hen.
9.
Di
e Kniehebe
lf
eder
~
am Kniehebel
~
und
am
oberen A
rm
einhangen.
10.
Di
e Kniehebelstange
G)
dru
ch die neue
Kn
iehebelstange fl) austauschen.
-9
-
From the library of: Superior Sewing Machine & Supply LLC
 Loading...