• Auto-Disconnect is selected (checked).
• Download File Area has User Area selected (checked).
• The Download File radio button is selected.
6) Select ‘…’ for the User area and select the appropriate MVX code file from the
Eclipse HX v9.1 software USB. According to your requirements, select one of the
following:
• Drivers USB > ECLIPSE DRIVERS > PiCo-HX_PiCo_E-32 > xxxxxx-
MVX Boot
Where xxxxxx represents the product number. The folder contains the
*.mot file and a Read Me file (*.txt) with version information.
• Drivers USB > ECLIPSE DRIVERS > PiCo-HX_PiCo_E-32 > xxxxxx-
MVX Combined Boot & App
Where xxxxxx represents the product number. The folder contains the
*.mot file and a Read Me file (*.txt) with version information.
7) Upgrade / program the first of the two H8 devices:
a. Connect the MVX serial cable (CAB-MVX-48Z) between the COM port on the
PC and J9 (H8FP1) on the MVX card.
Note:
The MVX connection is polarized to ensure correct connection.
b. On the MVX card, ensure that jumper H8 Boot1 (JP8) is made.
c. Select Program Flash from the Flash Development Toolkit (FDT) program.
d. Confirm that FDT reports the image has been written successfully.
e. Remove the serial cable.
f. Remove jumper JP8.
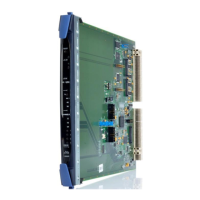
For the location of connectors, jumpers and reset switch positions on the Eclipse
HX-PiCo, see Figure 6-14: Eclipse HX-PiCo main board.
Note: If the MVX card fails to upgrade, press the Reset button, located near the J9 (H8FP1)
connector and select Program Flash from the FDT again.
If you are using a USB-to-serial adaptor, the adaptor may have to be unplugged
and re-plugged to enable the upgrade to start on some computers. If you are
running the EHX application, ensure that EHX is configured for Ethernet and not
serial connection.
8) Upgrade / program the second of the two H8 devices:
a. Connect the MVX serial cable (CAB-MVX-48Z) between the COM port on the
PC and J11 (H8FP2) on the MVX card.
Note: The MVX connection is polarized to ensure correct connection.
b. On the MVX card, ensure that jumper H8 Boot2 (JP10) is made.