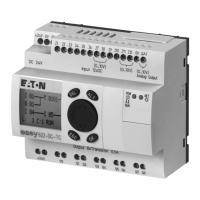
2. Installation
2.3 Mounting
4. Connect the expansions to each other using the matching connector.
5. Repeat for all additional expansions – up to 11 EASY-E4-...-...E1(P)
Installing the easy communication module (optional)
1. Position the easy communication module to the left of the base device against
the mounting rail's upper lip in an inclined position.
2. Slide the easy communication module until it is resting flush against the base
device.
3. Lightly push the device down and against the mounting rail until it snaps into
place over the mounting rail's lower lip.
4. Remove the end cover from the base device and store it in a safe place.
5. Connect the base device to the easy communication module with the match-
ing connector.
Finish assembly
1. Take the base device's end cover and install it on the right side of the last
expansion.
2. Take the base device's end cover and install it on the left side of the easy com-
munication module.
There will be the following electrical isolation at the local expansion connection
between the base device and the expansion device:
l
Basic isolation, 400 V
AC
(+10%).
l
Safe isolation, 240 V
AC
(+10%).
The base device, expansion device, and easy communication module can be
powered with different power supplies.
easyE402/24 MN050009ENEaton.com
63