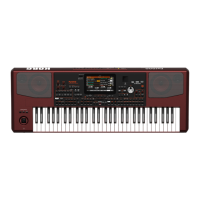
5. REAR PANEL
1 AC CABLE CONNECTOR
Plug the supplied AC cable into this connector.
2 POWER switch
Use this switch to turn the instrument on or off.
3 FLASH CARD slot
Insert a Pa80-compatible Flash Card into this socket. As you
insert a card, all the Programs it contains are automatically
loaded under the CARD banks in the PROGRAM/PERFOR-
MANCE section (see “PROGRAM/PERFORMANCE sec-
tion” on page 3-7).
When you insert a Flash Card, the WRITE/DISK IN USE
LED flashes for some seconds.
4 VIDEO INTERFACE (optional)
If fitted, this is the video output, to connect the Pa80 to a TV
or monitor. See “Video Interface (VIF1)” on page 26-1 for
more information.
5 PC TO HOST
Use this connector to directly connect a PC or Mac to the
Pa80, without any MIDI interface. Your PC or Mac should
include a serial interface, or a USB-to-serial adapter suitable
for MIDI applications.
6 MIDI INTERFACE
The MIDI interface allows your Pa80 to be connected to an
external controller (master keyboard, MIDI guitar, wind con-
troller, MIDI accordion…), to an expander, or to a computer
running a sequencer or an editor. For more information on
how to use the MIDI interface, see the MIDI chapter.
IN This connector receives MIDI data from a
computer or a controller. Connect it to an
external controller’s or computer’s MIDI OUT.
OUT This connector sends MIDI data generated by
Pa80’s keyboard, controllers, and/or the inter-
nal sequencer. Connect it to an expander’s or
computer’s MIDI IN.
THRU This connector sends an exact copy of the data
received on the IN connector. Use it to cascade
the Pa80 with other MIDI instruments.
7 EC5
This connects to a KORG EC5 multiswitch, to control many
functions in realtime. To program the EC5, see “EC5-A…E”
on page 16-3.
8 ASSIGNABLE PEDAL/FOOTSWITCH
Use this to connect a continuous or footswitch pedal, like the
KORG EXP2 or XVP10. To program it, see “P/S (Pedal/
Switch)” on page 16-3.
9 DAMPER
Use this to connect a Damper pedal, like the KORG PS1, PS
or DS1H. To change its polarity, see “Damper Pol. (Damper
Polarity)” on page 16-3.
0 OUTPUTS
Use these unbalanced connectors to send the audio signal
(sound) to a mixer, a PA system, a set of powered monitors,
or your hi-fi system.
To set the output for each track of the Style or the Song, see
“Physical output” on page 16-7.
L/MONO, RIGHT
These are the main stereo outputs. Use them to
send the final stereo mix to an external device.
Set the output level with the MASTER VOL-
UME slider.
1, 2 These are the sub outputs. Use them to create a
stereo sub-mix of just some tracks, or to out-
put just a single instrument to be mixed alone,
or to be processed or amplified externally.