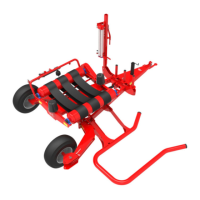
3.6 Move the Attis to the working position
Make sure there are no persons in the area when you move the Attis to
the working position.
Procedure
1. Remove the transport lock pin from the working position hole.
2. Install the transport lock pin into the transport position hole
3. Switch on the E-link manual controller.
rotate
4. Lower the loading arm to the ground until the transport wheel
is clear from the ground
down
5. Remove the R-clip from the wheel pin.
6. Remove the wheel pin.
7. Turn the transport wheel 180º counterclockwise to the outer
position.
8. Install the wheel pin and lock it with the R-clip
9 Move the loading arm to the working position
up
10. If the bale end-tripper is available:
a. Loosen the locking pins to release the transport lock
(Figure 17, page 3‑17) in the transport position.
b. Move the bale end-tripper from the transport position to
the working position.
c. Position the transport lock into the working position.
d. Lock the transport lock with the locking pins in the
storage position.
WARNING
3-18 Operation
W-H003.1403EN
 Loading...