- 35 -
Starting up HandyTIG 180 DC ControlPro
10.15
Job saving
 Set the welding machine as required.
 Press key pad „1” 31 or „2” 29 for at least 3 sec-
onds.
9 LED 28 or LED 30 will light up twice to conrm.
Job selection
 Shortly press key „1” 31 or „2” 29.
9 LED 28 or LED 30 will light up permanently to conrm
the selected job.
Job exit
 Turn knob 27 or press key 25 or 26 shortly.
14.4 Access secondary parameter en
 Press keys „1” 31 and „2” 29 shortly at the time.
9 The 7-segment-display shows alternating the param-
eter-code and the corresponding adjustment value.
 The adjustment value can be set by turning knob 27.
 By pressing key „1” 31 or „2” 29, the previous or sub-
sequent secondary parameter will be displayed.
Depending on selected mode and function, different
secondary parameter are available.
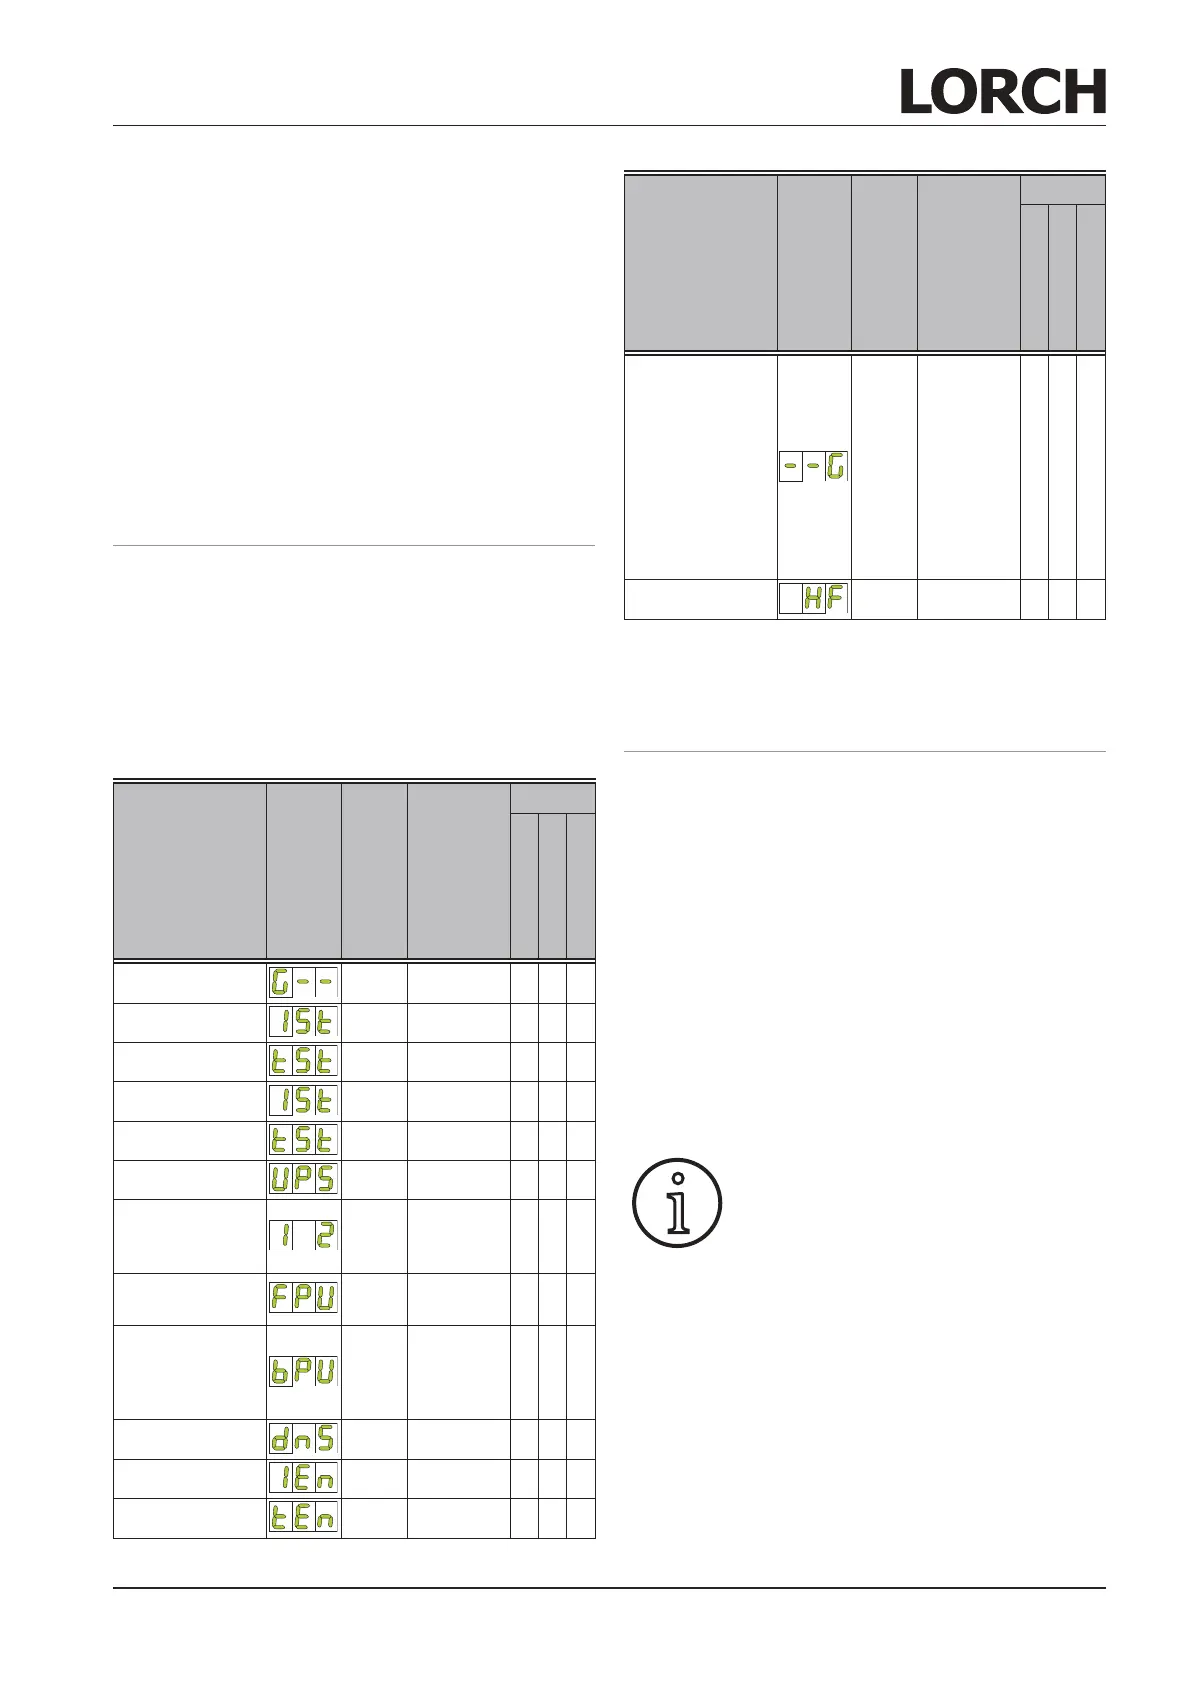
Parameter
Code
Factory setting
Adjustment
range
Mode
Electrode
TIG 2-stroke
TIG 4-stroke
Gas pre-ow time 0,1 s 0,1...10 s x x
Start current 50 % 5...200 % x x
Start current time 0,1 s 0,0...20 s x
Hotstart 125 % 5...200 % x
Hotstart time 1,0 s 0,0...20 s x
Upslope 5 % 0...99 % x x
Second current I
2
(% of welding
current I1)
50 % 1...200 % x x x
Pulse frequency 5,0 Hz
0,2...500
Hz
x x x
Pulse switch
frequency
(% part of weld-
ing current I1)
50 % 1...99 % x x x
Downslope 20 % 0...99 % x x
Final current 25 % 5...200 % x x
Final current time 0,2 s 0...20 s x
Parameter
Code
Factory setting
Adjustment
range
Mode
Electrode
TIG 2-stroke
TIG 4-stroke
Gas post-ow time
(in % depending on
welding current) at
100% correspond-
ingly
3 A --> 2 sec.
50 A --> 3,5 sec.
100 A --> 5,1 sec.
140 A --> 6,4 sec.
180 A --> 7,7 sec.
100 % 20...500 % x x
HF-ignition OFF OFF...On x
Tab. 3: Secondary parameters ControlPro
 Press keys „1” 31 and „2” 29 shortly and at the same
time to exit the secondary parameter.
14.5 Special functions
Gas test, control panel test
 Press keys 25 and 26 at the same time and for at
least 2 seconds.
9 For about 30 seconds the gas valve will interconnect,
all operation displays will light up and the 7-segment
display 15 displays „GAS”.
Gas and operation test can be stopped by pressing
key 25.
Software-Version
 Press keys 26 and 29 at the same time and for least
1 second.
9 Software-Version of operation panel and main board
will be displayed.(i.e. dsp 2.3, St 1.1).
Master reset
Attention! All personal settings will be
lost.
All welding and secondary parameters are
reset to their factory settings (master reset
function).
 Press keys 25 and 31 at the same time and for at
least 5 seconds.
9 The 7-segment-display and all operation displays
LED 28 or LED 30 will light up shortly to conrm.
 Loading...