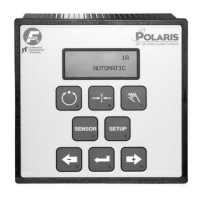
DP-20 PLUS Web Guide Controller 6-8
4th Quarter 2021 © 2021 Maxcess International. All rights reserved. Figure Sheet 2-320 A
8. Press the ENTER key. If the contrast is
sufficient, SUCCESSFUL will be displayed for a
few seconds on line 2, then the unit will
automatically exit the menus and return to the
Operator Level.
9. If the contrast is not sufficient, FAILED will be
displayed on line 2. Press the MANUAL key to
exit the setup menus and return to the Operator
Level. Repeat this procedure, as necessary.
Sensor Calibration should be performed prior to performing Auto Setup. If
a line sensor is being used, the icons and screen numbers will correspond
to the sensor mode that is selected.
1. Position the edge of the web, or the center or
edge of the line in the center of the sensor field
of view. (See the appropriate graphic at right).
The ARROW keys may be used.
Edge Guiding Line Center
Center Guiding Line Edge
2. Press the SETUP key to enter the Setup Menus.
The SELECT MENU screen will be displayed on
the LCD Panel.
3. Press the ENTER key to enter the BASIC
Menus. The GAIN menu will be displayed.
4. Use the ARROW keys to scroll until AUTO
SETUP is displayed on line 3.
5. If necessary, press the SENSOR key to select
the desired sensor mode as indicated on line 1
of the LCD Panel.
6. Press the ENTER key to begin the Auto Setup.
If the web is not positioned near the center of the
sensor field of view, the LCD Panel will display
POSITION WEB IN CENTER OF SENSOR.
Once the web is moved to near the center of the
sensor field of view, the Auto Setup procedure
will continue.
× 3B.1.5
SETUP (MAN)
AUTO SETUP
× 3A.1.1
SETUP (MAN)
GAIN
ãÜÜÜÜÜÜÜÜÜ 10.0%
× 3A.1.5
SETUP (MAN)
AUTO SETUP
× 3A.1
SETUP (MAN)
SELECT MENU
BASIC
× 3B.1.5.3
POSITION WEB IN
CENTER OF SENSOR
-ãããããÜÜÜÜÜ+
~ƒ 3F.1.4.4
SUCCESSFUL
-ãããããããããá+ 95%
~ƒ 3F.1.4.6
FAILED
-áÜÜÜÜÜÜÜÜÜ+ 3%