EasyManuals Logo

Panasonic Lumix S1H User Manual

Panasonic Lumix S1H
626 pages
To Next Page IconTo Next Page
To Previous Page IconTo Previous Page
Page #52 background imageLoading...
Page #52 background image
2. Getting Started
52
3
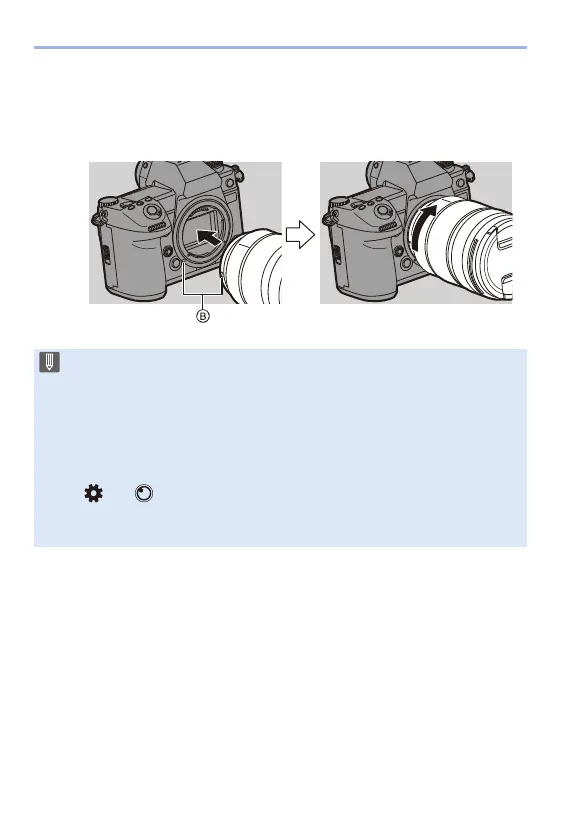
Align the lens fitting marks B on the lens and camera
and then rotate the lens in the direction of the arrow.
≥Attach the lens by rotating it until it clicks.
0 When you have attached a lens that does not have a communication function
with this camera, after turning on the camera, a message asking for
confirmation of the lens information is displayed. You can register items such
as the image circle and focal length for the lens when you select [Yes].
(l 183)
0 You can change the settings so that the confirmation message is not
displayed:
[] ¨ [ ] ¨ [Lens Info. Confirmation] (l 443)
0 Insert the lens straight in.
Inserting this at an angle to attach it may damage the camera lens mount.

Table of Contents

Other manuals for Panasonic Lumix S1H

Questions and Answers:

Question and Answer IconNeed help?

Do you have a question about the Panasonic Lumix S1H and is the answer not in the manual?

Panasonic Lumix S1H Specifications

General IconGeneral
Sensor TypeFull-frame CMOS
Resolution24.2MP
ISO Range100-51200 (expandable to 50-204800)
Viewfinder5.76 million-dot OLED
Sensor Size35.6 x 23.8 mm
Lens MountL-Mount
Video Recording6K/24p, 5.9K/30p, 4K/60p
Image Stabilization5-axis in-body image stabilization
LCD Screen3.2-inch, 2.33 million-dot touchscreen
Autofocus SystemContrast-detect DFD AF, 225-area
ConnectivityWi-Fi, Bluetooth
Battery LifeApprox. 400 shots (CIPA standard)
Continuous Shooting9 fps
Internal Recording10-bit 4:2:2
Shutter Speed1/8000 to 60 sec
Video Frame Rates24p, 30p, 60p
Storage MediaDual SD card slots (UHS-II compatible)
Weather SealingYes

Related product manuals