Connecting a Remote Printer
96
Installin
the Instrument
• within 100cm (40”) of either infrared port, and
• within 15° of the line perpendicular to the plane of the port.
Connecting a Remote Printer
For remote printing on a network printer, the Monitor must be connected to the M3 network.
The network cable is connected to the LAN socket on the back of the Monitor.
WARNING The Monitor must be connected to the dedicated M3 network only. The special network
cables supplied by Philips Medical Systems for this purpose must be used (see the
IntelliVue Clinical Network Service Manual for details).
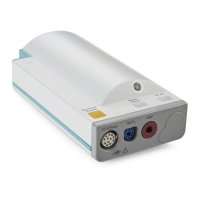
Connecting a Local Recorder
You can connect a standalone strip chart recorder (option M3080 #H20, GSI Lumonics XE-
50p) to your monitor via the serial recorder interface, available as option M3046A #J16. A
dedicated cable is supplied with the recorder. Details of how to set up, use and care for the
recorder are given in the Operator’s Manual that accompanies it. Additional information can
be found in the Monitor’s Instructions for Use.
Step 1 Connect the 9-pin female connector of the serial interface cable to the socket on the
rear of the recorder. Ensure that the DB9 connector is firmly fitted to the socket and
secure it by tightening the screw fasteners.
Step 2 Connect the 4-pin male connector of the serial interface cable to the serial interface
port on the monitor marked with the symbols.
Monitor
Record
Secure
screw fasteners
Connect 4-pin
male connector of
serial cable to monitor’s
serial interface port
Connect 9-pin female
connector of serial cable
to the socket on rear of
recorder