7. EXPLANATION OF PARAMETERS
7-15
● Tracing method
The alarm history can be seen by using or key.
Press the key to return to the initial screen.
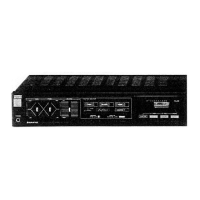
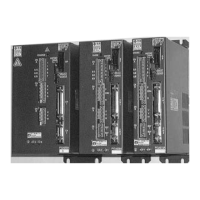
○ Viewing the alarm history on the amplifier 7-segment
LED.
• Set the GAIN/HISTORY selector switch located on
the front of the amplifier to HISTORY.
• Using a small screwdriver, rotate the switch on the
front of the amplifier.
• The numbers 1 and 2 on the switch correspond to the
last alarm and the second to the last alarm,
respectively.
• Selected alarm number is indicated on the
[7-segment LED]. Its abbreviated name will appear
in the adjacent [ALARM BLINK].
Fig. 7-8 Displaying the Alarm History
The following table lists the abbreviated alarm names and corresponding errors.
Table 7-12 Abbreviated Alarm Names
7-seg.
Abbre-viat
ion
How to read
7-seg.
Abbre-viat
ion
How to read
1 OC Power element error C SE Speed control error
2 OL Overload d OVF Excessive deviation
3 AOH Amplifier overheating E EXOH External overheating
5 OV Overvoltage F DSPE Servo processor failure
6 OS Over-speed H RGOH Built-in regenerative
resistor overheating
7 PE Control power supply error J RGOL Regenerative error
8 DE Sensor error P MEME Memory error
9 MPE Main power error U AEE Low battery
A FP Main power open-phase No light CPUE CPU error
Set the switch to HISTORY
to display the alarm history.
As long as the alarm history is present on the 7-segment LED, display of the battery warning
"." is not available.
When the selector switch is set to HISTORY, the rotary switch must be positioned at "0".
 Loading...