3. SERVO SYSTEM CONFIGURATION
3-3
CHARGE
POWER
CN
1
2
CNA
CNB
CND
CNC
CN
r
t
R
S
T
P
Y
U
V
W
RDY
1
2
RDY
PY2A015
1
2
3
4
5
6
7
8
9
10
11
12
13
OP
14
SELECT
POWER
N
11
13
12
10
OP
SELECT
POWER
RDY
2
RDY
1
PY2A015
CN
2
CNC
CNB
CND
CHA
W
V
U
N
CN
1
Y
P
T
S
R
r
t
CHARGE
POWER
6
5
4
3
2
1
9
8
7
14
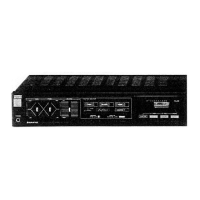
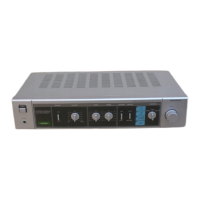
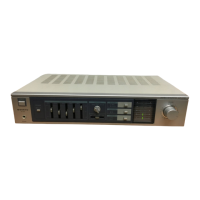
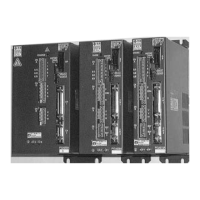
Fig. 3-3 Front View of Servo Amplifier
(PY2A015A0)
3.3 Names of Servo Amplifier Parts
3.3.1 PY2A015/030
1 Main circuit power supply charge (CHARGE)
Indicates the charge of the smoothing capacitor of the
main circuit power supply.
2 Control & main power supply inputs (CAN)
Connect the control power supply (AC 200 V, single
phase) to the r and t terminals and the main power
supply (AC 200 V, 3-phase) to the R, S and T terminals.
3 Regenerative resistor connector terminal (CND)
Connect a regenerative resistor between the P and Y (or
COM) terminals.
4 Main circuit connector terminal (CNB)
Connect a motor power cable to it.
5 AMP ready output terminal (CNC)
Outputs a-contact when the control power supply is set
up and no alarm occurs (250 VAC, 2 A/30 VDC, 2 A).
6 Protective earth terminal ( )
Grounds an earth cable for
class 3 earthing.
7 Remote operator connector
8 HISTORY/GAIN changeover switch
Sets the rotary switch to the alarm history or gain
changeover function.
9 Rotary switch (SELECT)
Used to check the alarm history and change the gain.
10 5 V power supply set-up (POWER)
Comes on when the control power (r or t) is supplied.
11 7-segment LED
Indicates the status of the amplifier and the type of alarm
issued.
12 Interface connector (CN1)
Connected to a host controller, etc.
13 Sensor signal connector (CN2)
Connected to the sensor signal line from the motor.
14 Maintenance mode switch
Used for maintenance by Sanyo operator. So, do not
change the setting during general operation.
When the Servo Amplifier is used, be sure to set the
switch to the left when viewed from the front of the
amplifier. (It is hard to view from the front since hidden
in the Servo Amplifier case.)
HISTORY GAIN
Optional
14 Maintenance mode switch
• Be sure to set this switch to the normal mode for
operation (set it to the left when viewed from the front of
the amplifier).
• Never change the setting of this switch. If it is set to
the maintenance mode, the system malfunctions.
The 15 A and 30 A capacity amplifiers have different
dimensions (width).
 Loading...