Home
Sun Microsystems
Speaker System
2500
Sun Microsystems 2500 User Manual
4
of 1
of 1 rating
168 pages
Give review
Manual
Specs
To Next Page
To Next Page
To Previous Page
To Previous Page
Loading...
112
Sun StorageTek 2500 Series Array Hardware Installation Guide
•
September 2009
▼
T
o
Configur
e
iSCSI
on
W
indows
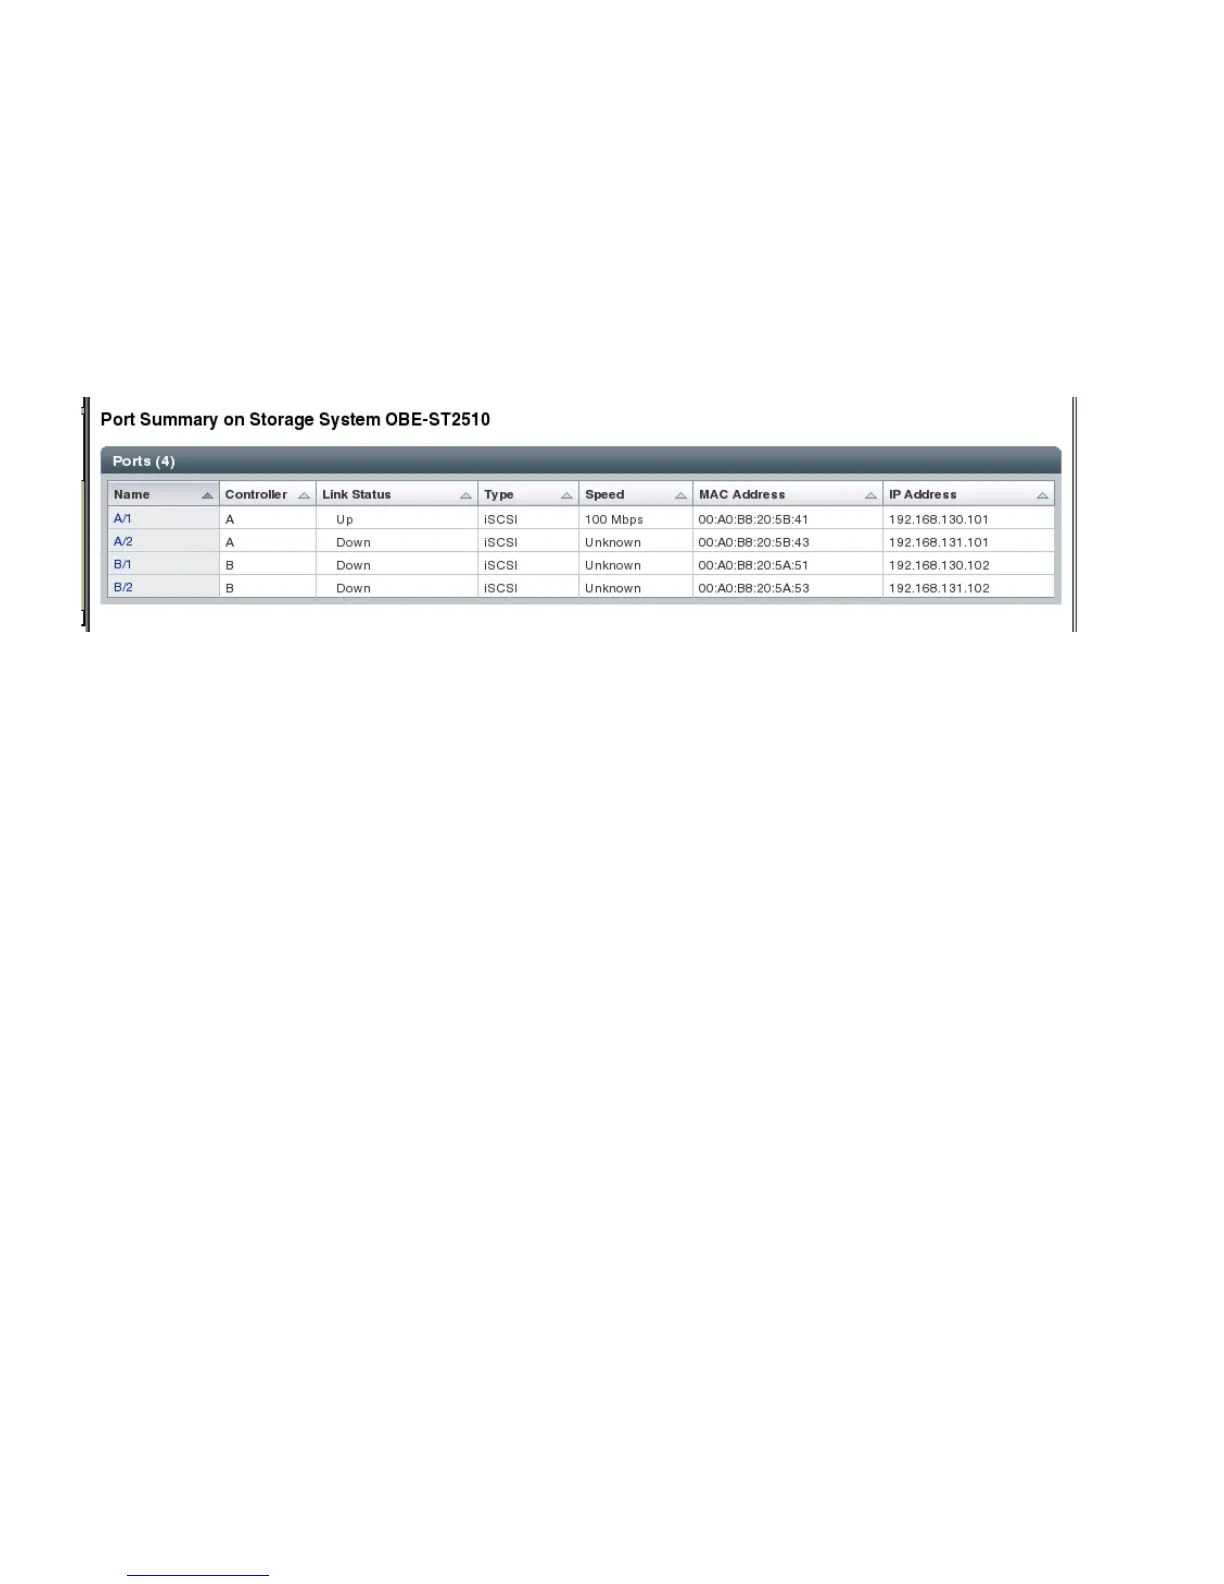
1.
Review
the
port
settings
in
the
Common
Array
Manager
software
and
change
the
IP
addresses
if
necessary
.
The
IP
address
are
on
the
Port
Summary
page.
The
addresses
can
be
changed
or
set
to
DHCP
on
the
Port
Details
Page.
123
125
Table of Contents
Table of Contents
3
Before You Begin
9
About this Guide
9
Related Documentation
10
Sun Welcomes Your Comments
11
Tray Overviews
13
Sun Storagetek 2500 Series Array Overview
14
Installation Tasks Checklist
16
Front-Access Components of the Trays
17
Leds on the Front of the Trays
18
Rear-Access Components of the Trays
20
Controllers
21
Sun Storagetek 2540 Array
22
SFP Transceivers
23
Sun Storagetek 2530 Array
24
Sun Storagetek 2510 Array
25
Controller Tray and Drive Expansion Tray Power-Fan Assembly
26
Expansion Tray IOM
26
Sun Storagetek 2501 Expansion Tray
26
Drive Expansion Tray IOM Ports
27
Leds on the Rear of the Trays
28
Controller Leds on the Sun Storagetek 2540 and Sun Storagetek 2510 Arrays
28
Controller Leds on the Sun Storagetek 2530 Array
29
Controller Tray and Drive Expansion Tray Power-Fan Assembly Leds
31
IOM Leds on the Sun Storagetek 2501 Expansion Tray
32
Disk Drives
34
Leds on the Disk Drives
36
Common Array Manager Software
37
Service Advisor and Customer-Replaceable Units
38
Installing Trays
39
Preparing for the Installation
40
Loosening the Rail Adjustment Screws
40
Preparing the Universal Rail Kit
40
Unpacking the Universal Rail Kit
40
Preparing the Tray
41
Planning the Order of the Tray Installation
42
Preparing the Cabinet
42
Attaching the Rails to a Cabinet
43
Attaching the Universal Rail Kit to a Standard
43
Attaching the Universal Rail Kit to a Standard Sun or 19-Inch Cabinet with Threaded Cabinet Rails
43
Attaching the Universal Rail Kit to a Standard 19-Inch Cabinet with Un-Threaded Cabinet Rails
46
19-Inch Cabinet with Un-Threaded Cabinet Rails
47
Installing a Tray in a Cabinet
51
Connecting the Power Cables
56
Inter-Tray Cabling
56
Array Configuration Naming Convention
57
Connecting Drive Expansion Trays
59
Cabling an Expansion Tray to a Controller Tray
60
Cabling a Third Drive Expansion Tray
61
Default Chapter
61
Cabling an Expansion Tray to Another Expansion Tray
61
1 Locate the Controller a and Controller B Expansion Ports at the Back of the
62
Cabling a Third Drive Expansion Tray
62
Connect One SAS Cable between the Controller a Expansion Port and the a
62
Connect One SAS Cable between the Controller B Expansion out Port and the B
62
Connect One SAS Cable between the Expansion Tray 1 out Port and the A-Side
62
Locate in and out Expansion Ports at the A-Side and B-Side Back of the Expansion Tray ( FIGURE 2-17 )
62
Connect One SAS Cable between the Expansion Tray 2 B-Side out Port and the
63
Tray Interconnect Cable Labeling
63
Example Label Abbreviation
63
Next Steps
64
Single-Controller Configurations
64
Connecting the Management Host
67
Figure
67
Attaching the Ethernet Ports to the LAN of the Management Host
68
Attaching the Ethernet Ports to the Management Host Using an Ethernet Hub
68
Attaching the Ethernet Ports Directly to the Management Host with a Cross-Over Cable
69
Next Steps
69
Connecting Data Hosts to the 2510 Array
71
To Connect Host Cables
73
Relocation Cautions
73
Next Steps
74
Connecting Data Hosts to the 2530 Array
75
To Connect Data Hosts to a 2530 Array
78
Next Steps
79
Connecting Data Hosts to the 2540 Array
81
2540 Array Data Host Connection Topologies
82
2540 Array Data Host Connections
85
Relocation Cautions
86
To Connect Data Hosts Using Fibre Channel
86
Next Steps
87
Powering on the Array
89
Before Powering on
89
Powering on the Storage Array
90
Powering off the Array
91
Next Steps
92
Data Host Software
93
Data Host Hbas and Software for the 2540 and 2530 Arrays
93
Data Host Software
93
Hbas and Drivers
94
Multipathing
94
Setting up a Data Host on a Solaris System
94
Data Host Software
94
To Obtain Sun Solaris 9 Data Host Software
95
To Install the SAN 4.4 Data Host Software
96
To Obtain Software for Operating Systems Other than Solaris
96
Installing Data Host Software for Operating Systems Other than Solaris
97
About Data Host Software for Non-Solaris Platforms
97
Downloading and Installing Sun RDAC Software
98
Enabling Solaris Multipathing Software
98
Enabling Multipathing Software for Solaris 10 os
99
Enabling Multipathing Software for Solaris 9 os
99
Next Steps
100
Configuring IP Addressing
101
About IP Addressing
101
Configuring the IP Address of the Controller Modules
101
Configuring Dynamic (DHCP) IP Addressing
102
Configuring Static IP Addressing
103
To Connect a Terminal to the Serial Port
103
Using the Serial Port Interface to Assign IP Addresses
103
To Establish a Connection with the Serial Port
104
To Set up the Terminal Emulation Program
104
To Configure the IP Addresses
106
Configuring Iscsi on the Sun Storagetek 2510 Array
109
Configuring Iscsi Overview
109
Iscsi Concepts
110
Configuring Iscsi - Detailed
111
Preparing for Iscsi and Installing Hardware
111
Configuring Iscsi Tasks
112
Default Chapter
113
Identifying the Target Port IP Address
113
Table
113
Step
113
Adding Initiator Information
115
Configuring Other Iscsi Features
116
Additional Iscsi Topics in the Online Help
116
Configuring Mutual Authentication for an Iscsi Session
117
To Configure Mutual Authentication
117
Iscsi Configuration Example Using Solaris
119
To Prepare for the Iscsi Configuration
119
To Configure Iscsi
120
Iscsi Configuration Example Using Windows
123
To Prepare for the Iscsi Configuration
123
To Configure Iscsi on Windows
124
Connecting to the 2510 Array with Other Topologies
133
Host Cabling Configurations - Single Controller
134
Host Cabling Configurations – Dual Controller
136
DC Power Overview
139
Using DC Power
139
Installation Notes for DC Power
140
DC Power Leds
141
Ship Kit Changes
141
Connecting Power Cables
142
Connecting the Cables
142
Turning off the DC Power During an Emergency
143
Before You Begin
145
Configuring a Dhcp Server
145
Setting up a Solaris Dhcp Server
145
Setting up a Windows 2000 Advanced Server
150
Configuring the Dhcp Server
151
Installing the DHCP Server
151
Glossary
155
Index
163
4
Based on 1 rating
Ask a question
Give review
Questions and Answers:
Need help?
Do you have a question about the Sun Microsystems 2500 and is the answer not in the manual?
Ask a question
Sun Microsystems 2500 Specifications
General
Brand
Sun Microsystems
Model
2500
Category
Speaker System
Language
English
Related product manuals
StorageTek 2500 Series
128 pages
Sun Microsystems Sun Blade 2500
56 pages
Sun Storage J4400
36 pages
Sun Microsystems Ultra 25
198 pages
Sun Microsystems Ultra 20 M2
136 pages
Sun Microsystems MCS 2000 SL
84 pages
Sun Microsystems SPARCstation 20
266 pages