Chapter 3 Quick Set Up
Preparation - Before you Set Up your UltraSync ONE 44
44
Getting Started - Master TX Mode 45
Getting Started - RF Slave Mode 45
Getting Started - EXT LTC Input 46
Master to RF Slaves and Wired Devices 47
Master to Wired Device Only, No RF Slaves 50
Run UltraSync ONE as an RF Slave 52
How does an RF Slave Synchronise with a Master? 54
Set UltraSync ONE to use LTC as an Input 56
Send Timecode from a Standalone UltraSync ONE 59
Jam UltraSync ONE to a Signal 61
Chapter 4 Configuration Settings
Set the RF Country/Area 64
Set the Timecode Mode 65
Set the RF Channel 68
Set the Timecode for the Master 72
Set the Frame Rate Per Second 73
Set the User Bits 74
Set the SYNC Output 76
Set the LTC Level 78
Change the Status Indicator LED Brightness 79
Change the Screen Brightness 80
Change the Screen Saver Time 81
Flip the Display 82
Button Lock 83
Chapter 5 Status Information
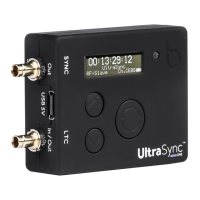
Main Screen 86
Version Number and Serial Number 87
Power and Battery Status 88
Synchronisation Status 89
SYNC Output Status 90
LTC Output Status 91
iv UltraSync ONE User Guide