Vertiv™ NetSure™ 5100 Series -48 VDC Power System Installation Manual
Proprietary and Confidential © 2023 Vertiv Group Corp.
Configuring the NCU Identification of Rectifiers and
Assigning which Input Feed is Connected to the Rectifiers
When rectifiers are all installed prior to applying power and starting the system, the order in which the NCU identifies the rectifiers is
by serial number (lowest serial number is Rect 1, next lowest is Rect 2, etc.). If you prefer the NCU to identify the rectifiers by position
in the system, perform the following procedure.
Upon power up, the NCU arbitrarily assigns Feed AC1, AC2, or AC3 to each rectifier. This assignment is used to display rectifier AC
input feed voltage(s). The User may reassign the feed to each rectifier per your specific installation by following the procedure below.
Local Menu Navigation:
None.
Web Menu Navigation:
Refer to the NCU Instructions (UM1M830BNA) for detailed instructions.
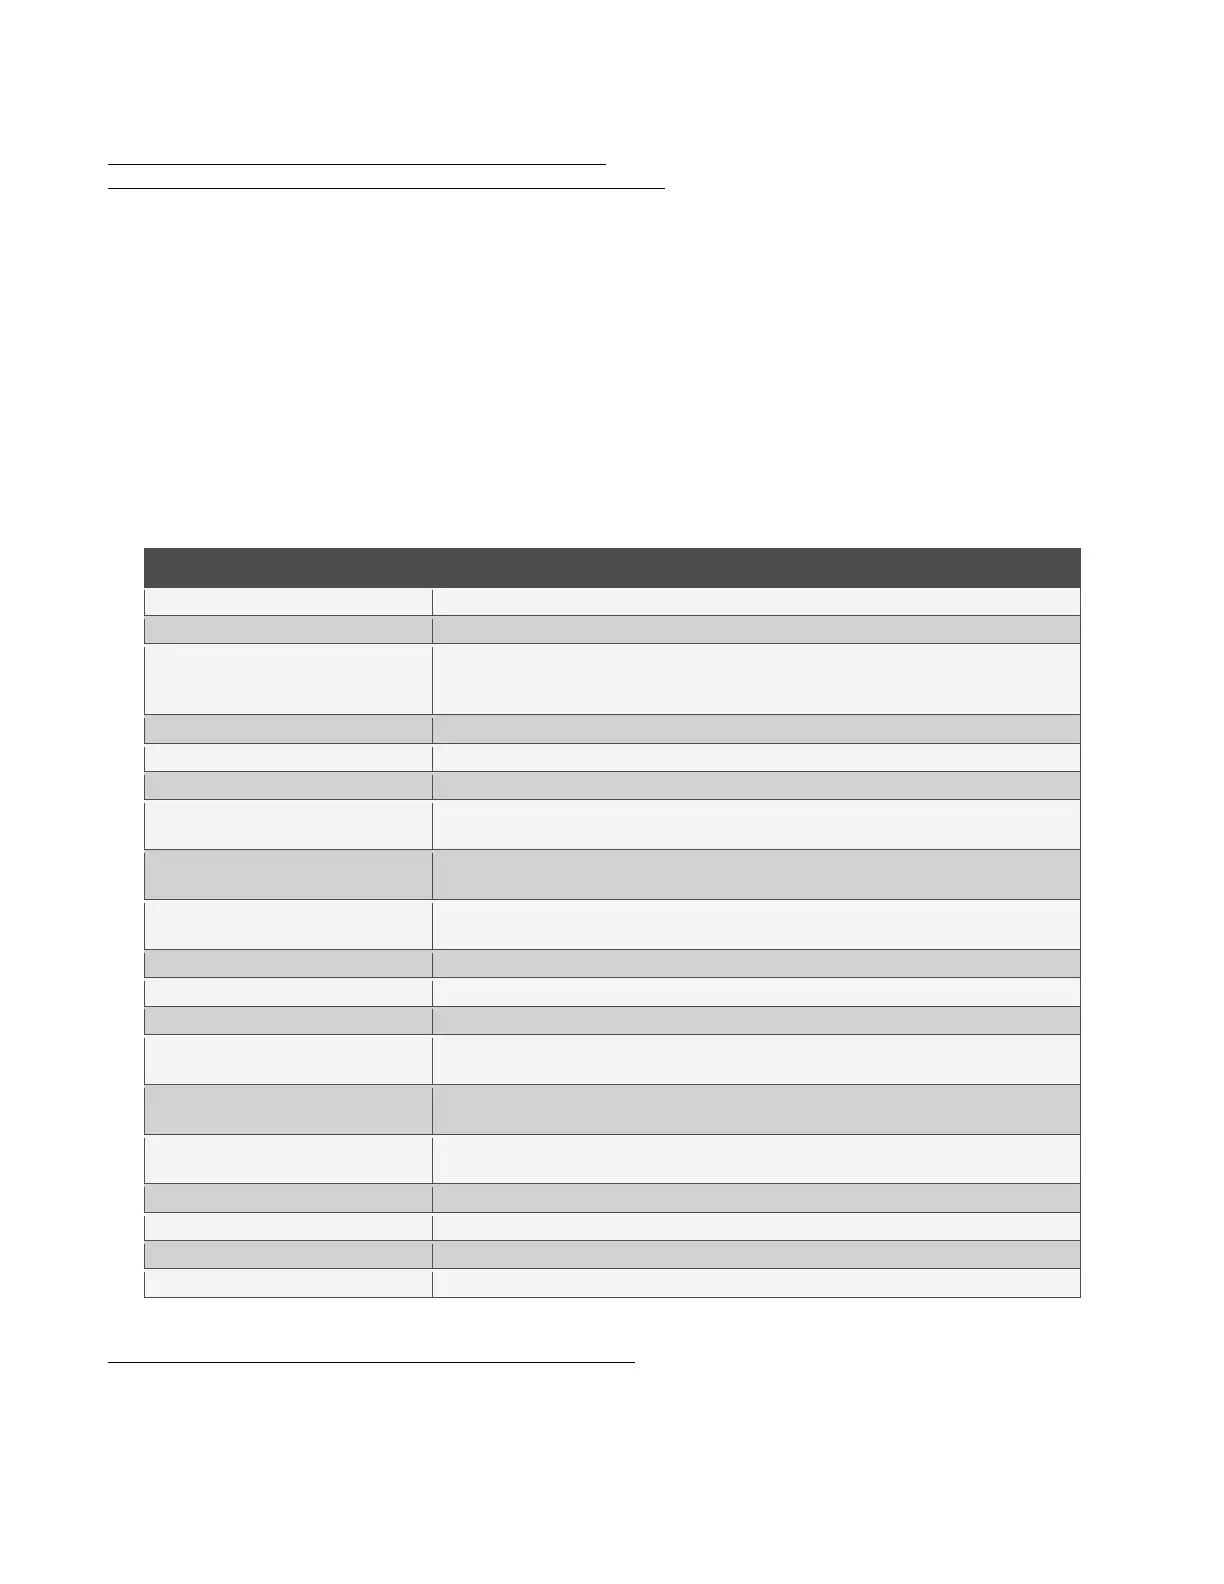
Table 7.1 NCU Basic Settings Menu Navigation
Parameter Menu Navigation
Main Menu / Settings Icon / Sys Settings / Date.
Main Menu / Settings Icon / Sys Settings / Time.
IP Communications Parameters
(IP address, subnet mask address,
Main Menu / Settings Icon / Comm Settings / enter parameters.
Main Menu / Settings Icon / Batt Settings / Charge / Float Volt(R).
Main Menu / Settings Icon / Batt Settings / Charge / EQ Voltage(R).
Main Menu / Settings Icon / Other Settings / Conv Volt Set.
Converter Current Limit
Web Menu Navigation Only: Settings Menu / “DC/DC” Converter Tab / Current
Limit and Current Limit Point.
Solar Converter Output Voltage
Main Menu / Settings Icon / Batt Settings / Charge / Float Volt(S) and EQ
Voltage(S).
Solar Converter Current Limit
Web Menu Navigation Only: Settings Menu / Solar Tab / Solar Converter Current
Limit.
Main Menu / Settings Icon / Batt Settings / Curr Limit Mode and Batt Curr Limit.
Main Menu / Settings Icon / Batt Settings / Batt1 Settings / Rated Capacity.
Web Menu Navigation Only: Settings Menu / Battery Tab.
Battery Charge Temperature
Compensation
Main Menu / Settings Icon / Batt Settings / Temp Comp (enter parameters).
HVSD Limit
Web Menu Navigation Only: Settings Menu / Rectifiers Tab / HVSD (set to
enabled) then set HVSD Limit.
Rectifier Current Limit
Main Menu / Settings Icon / Rect Settings / Current Limit (set to enabled) then set
Curr Limit Pt.
Main Menu / Settings Icon / Other Settings / Over Voltage 1.
Main Menu / Settings Icon / Other Settings / Over Voltage 2.
Main Menu / Settings Icon / Other Settings / Under Voltage 1.
Main Menu / Settings Icon / Other Settings / Under Voltage 2.
Configuring the NCU Identification of Solar Converters
When solar converters are all installed prior to applying power and starting the system, the order in which the NCU identifies the solar
converters is by serial number (lowest serial number is Solar Conv 1, next lowest is Solar Conv 2, etc.). If you prefer the NCU to identify
the solar converters by position in the system, perform the following procedure.

 Loading...


