Instrument Overview 2-7 GUI Overview
MS2090A UG PN: 10580-00444 Rev. U 2-15
Data Entry
User input can be in the form of numeric values for instrument or measurement settings, selected values from
a preset list, or alphanumeric text when entering file names, for example. To view or change a parameter
value, access the appropriate menu or control, then enter data using the data entry control or attached
physical keyboard. Some items can be accessed directly on the annotated display by selecting their value.
Invalid Entries
When setting parameters or entering other types of data, if an entry is out of range or is otherwise invalid,
Field Master Pro will shade the background display and may provide a message indicating a valid range. In
this case, clear or cancel the entry and enter a valid value or change the units by using either the drop-down
selection next to the data entry window, or with the unit terminators to the left of the keypad.
Numeric Values
To modify a numeric parameter setting that is displayed on a menu or annotated field, select the item to make
it active and to display the numeric keypad data entry control. Use the touch screen to enter or change the
value.
Select the padlock icon next to center frequency on the graticule to change the
frequency by dragging, when using a touch-screen enabled PC. Select the padlock
icon next to SPAN to change the span by pinching, when using a touch-screen
enabled PC. You can toggle on DRAG and PINCH options by selecting
GESTURES in Frequency menu. Refer to GESTURES menu in the Field Master
Series spectrum analyzer measurement guide (10580-00447).
Reference Level padlock icon by default, locks the reference level that is
accidentally prone to swiping when using a touch-screen enabled PC.
Shortcut icon used to create a shortcut of a desired application from current
settings or an existing setup file.
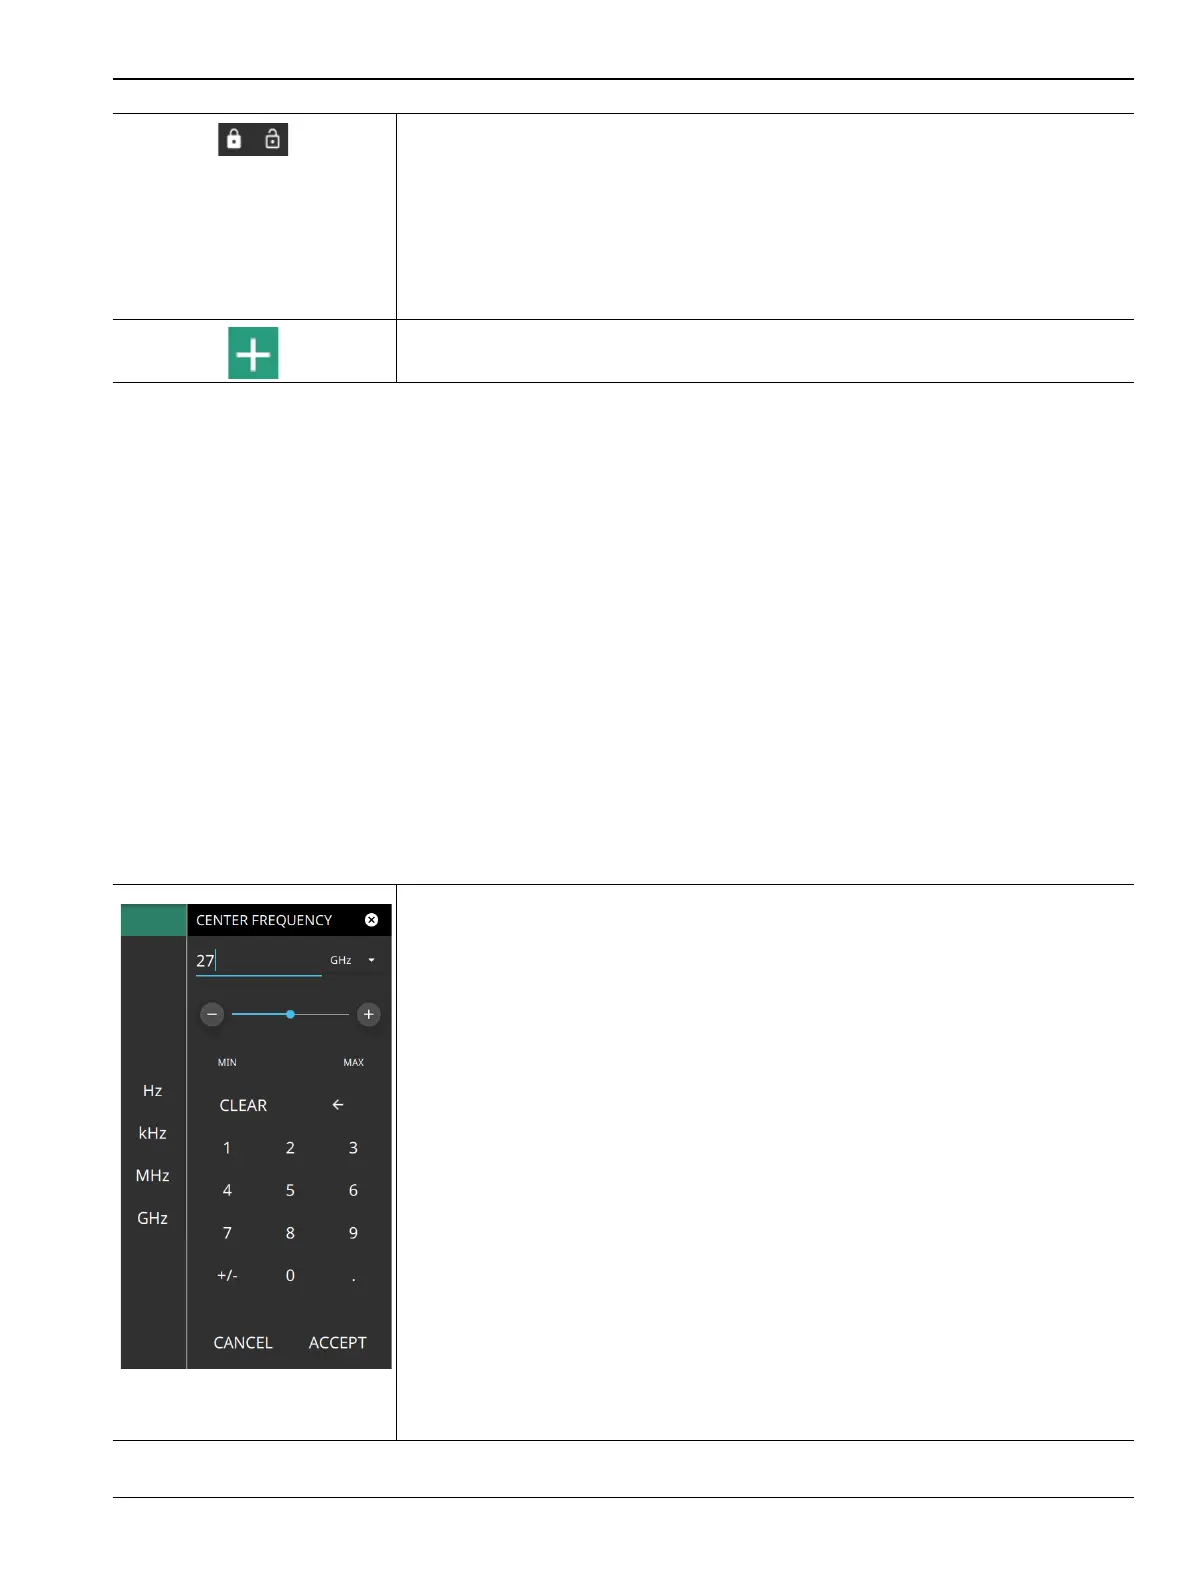
The keypad typically provides controls to:
• Enter new values directly, such as frequency entries in Hz, kHz, MHz, or
GHz. There are two places on the keypad to enter unit terminators when
applicable, on left side pop-out that occurs as frequency keypad entries are
selected, or on the top right corner drop-down of the entry field.
• Drag a parameter value within its settable range using a sliding control.
• Increment the parameter value up or down. At each end of the slider are plus
(+) and minus (–) controls that increment the parameter value. Most
parameters have a fixed increment, such as bandwidth that follows a 1:3:10
sequence and span that follows a 1:2:5:10 sequence. In the case of
frequency, you can set a custom frequency step increment value. Once the
entry is complete, select the desired unit or select ACCEPT to complete the
entry.
• Set the parameter to the maximum or minimum possible value.
• CLEAR the entire entry.
• Left arrow to backspace and delete the entry
• CANCEL to terminate any entries made for that particular setting. Note that
selecting the "X" to close the keypad is the same as selecting cancel.
Selecting CANCEL will restore settings back to the state they were in before
the keypad opened, even if changes from the +/- controls are already
reflected in the data display.
• ACCEPT to operate with the settings displayed on the keypad.
Figure 2-10. Touchscreen Keypad
Figure 2-9. Common GUI Controls