EasyManua.ls Logo

Arduino uno User Manual

Arduino uno
311 pages
To Next Page IconTo Next Page
To Previous Page IconTo Previous Page
Page #29 background imageLoading...
Page #29 background image
Analog and Digital Signals
Nearly all physical processes are analog. Whenever you observe a natural phenomenon,
such as electricity or sound, you’re actually receiving an analog signal. One of the
most important properties of these analog signals is that they are continuous. For
every given point in time, you can measure the strength of the signal, and in principle
you could register even the tiniest variation of the signal.
But although we live in an analog world, we are also living in the digital age. When
the first computers were built a few decades ago, people quickly realized that it’s
much easier to work with real-world information when it’s represented as numbers
and not as an analog signal, such as voltage or volume. For example, it’s much easier
to manipulate sounds using a computer when the sound waves are stored as a
sequence of numbers. Every number in this sequence could represent the signal’s
loudness at a certain point in time.
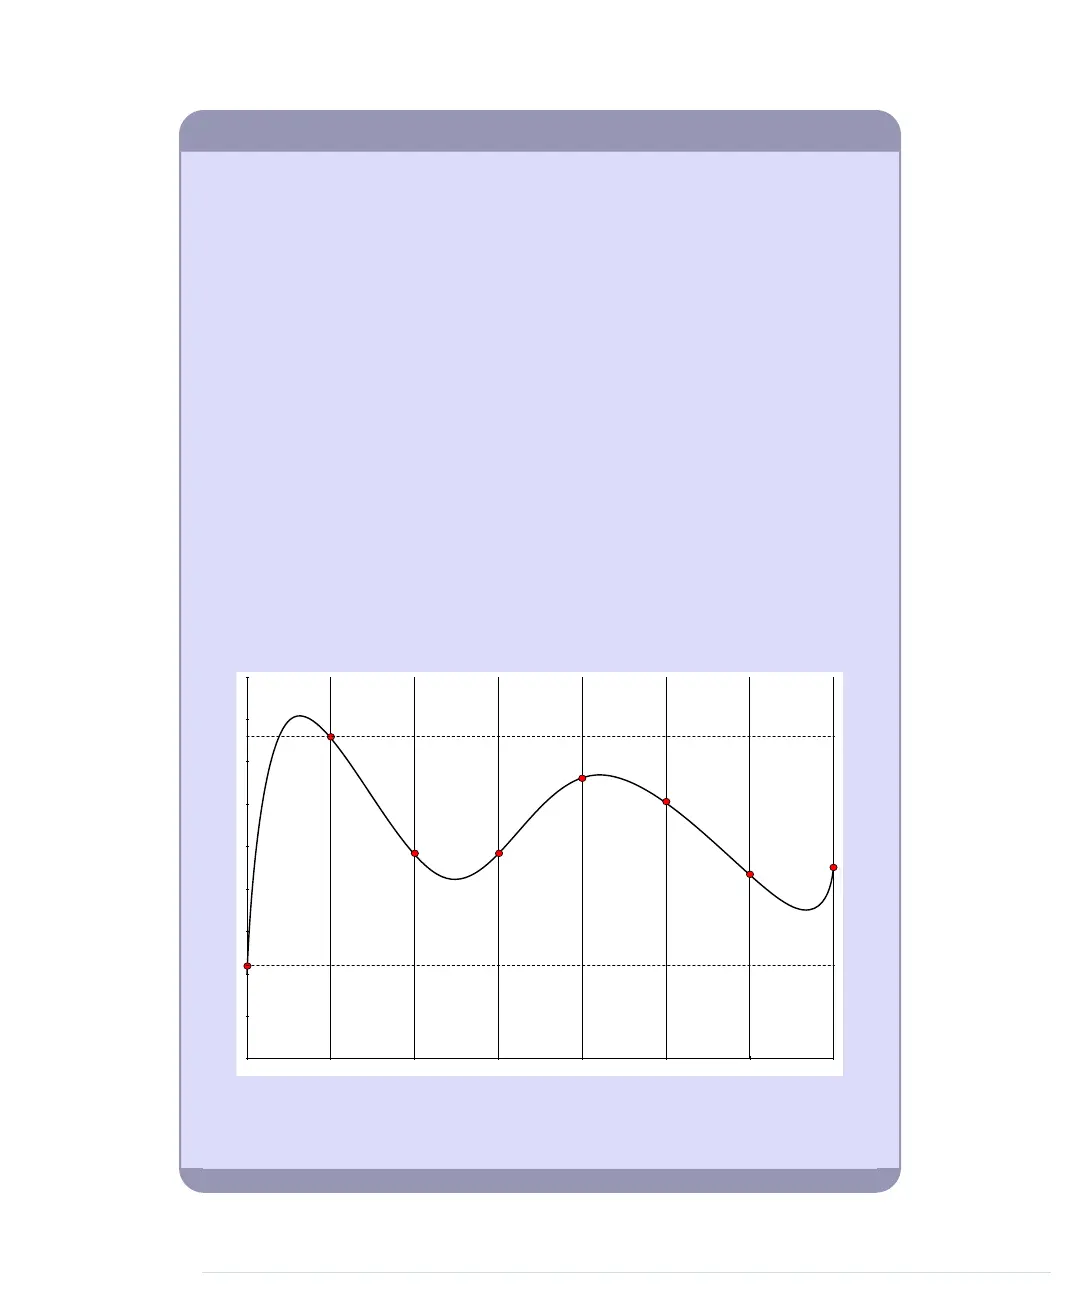
So instead of storing the complete analog signal (as is done on records), we measure
the signal only at certain points in time (see the following figure). We call this process
sampling, and the values we store are called samples. The frequency we use to
determine new samples is called the sampling rate. For an audio CD, the sampling
rate is 44.1 kHz: we gather 44,100 samples per second.
We also have to limit the samples to a certain range. On an audio CD, every sample
uses 16 bits. In the following figure, the range is denoted by two dashed lines, and
we had to cut off a peak at the beginning of the signal.
70 1 2 3 4 5 6
Although you can connect both analog and digital devices to the Arduino, you usually
don’t have to think much about it. The Arduino automatically performs the conversion
from analog to digital for you.
report erratum • discuss
Exploring the Arduino Board • 9
www.it-ebooks.info

Table of Contents

Other manuals for Arduino uno

Question and Answer IconNeed help?

Do you have a question about the Arduino uno and is the answer not in the manual?

Arduino uno Specifications

General IconGeneral
Form factorArduino
CertificationRoHS, FC, CE
Processor model-
Processor frequency- MHz
Microcontroller modelATmega328
Microcontroller frequency16 MHz
DC input voltage7-12 V
Operating voltage5 V
DC current per I/O pin40 mA
Flash memory0.032 MB
Maximum internal memory- GB
SRAM (Static Random Access Memory)2 KB
EEPROM (Electrically Erasable Programmable Read-Only Memory)1 KB
Wi-FiNo
Number of analog I/O pins6
Number of digital I/O pins14
Weight and Dimensions IconWeight and Dimensions
Board dimensions53.4 x 68.6 mm

Summary

Arduino Uno and the Arduino Platform

The Parts You Need

Chapter 1: Welcome to the Arduino

Installing the Arduino IDE

Provides step-by-step instructions for installing the Arduino Integrated Development Environment.

Hello, World!

Introduces the first project: making an LED blink using the Arduino.

Compiling and Uploading Programs

Explains how to compile and upload sketches to the Arduino board.

Chapter 2: Creating Bigger Projects with the Arduino

Changing Preferences

Explains how to customize Arduino IDE settings for better workflow.

Using Serial Ports

Explains serial communication for data exchange between Arduino and computer.

Chapter 3: Building Binary Dice

Working with Breadboards

Explains how breadboards work and how to connect components.

First Version of a Binary Die

Implements the first version of a binary die using three LEDs.

Working with Buttons

Details how pushbuttons work and how to connect them to the Arduino.

Building a Dice Game

Completes the dice project by adding a guess button and game logic.

Chapter 4: Building a Morse Code Generator Library

Building a Morse Code Generator

Starts the implementation of the Telegraph C++ class.

Fleshing Out the Morse Code Generator’s Interface

Defines the Telegraph class interface and Morse code data arrays.

Installing and Using the Telegraph Class

Guides on integrating the custom Telegraph library into Arduino IDE.

Chapter 5: Sensing the World Around Us

Measuring Distances with an Ultrasonic Sensor

Introduces ultrasonic sensors and builds a distance measuring device.

Increasing Precision Using a Temperature Sensor

Integrates a temperature sensor to refine distance measurements.

Chapter 6: Building a Motion-Sensing Game Controller

Wiring Up the Accelerometer

Details connecting the ADXL335 accelerometer to the Arduino.

Bringing Your Accelerometer to Life

Reads and outputs raw accelerometer data for three axes.

Building Your Own Game Controller

Integrates a pushbutton and refined accelerometer data for a game controller.

Chapter 7: Writing a Game for the Motion-Sensing Game Controller

Writing a GameController Class

Creates a JavaScript class for convenient access to Arduino motion data.

Creating the Game

Implements a Breakout clone using JavaScript and the motion controller.

Chapter 8: Generating Video Signals with an Arduino

Building a Digital-to-Analog Converter (DAC)

Details building a binary-weighted DAC for video signal generation.

Connecting the Arduino to Your TV Set

Describes modifying an RCA cable to connect to the Arduino.

Using the TVout Library

Introduces the TVout library for generating video signals on a TV.

Building a TV Thermometer

Creates a graphical thermometer display on a TV screen using sensors.

Chapter 9: Tinkering with the Wii Nunchuk

Wiring a Wii Nunchuk

Details wiring the Nunchuk controller to Arduino analog pins.

Building a Nunchuk Class

Creates a C++ class for interfacing with the Nunchuk controller.

Using Our Nunchuk Class

Demonstrates reading Nunchuk data (joystick, accelerometer, buttons).

Chapter 10: Networking with Arduino

Chapter 11: Creating a Burglar Alarm with Email Notification

Chapter 12: Creating Your Own Universal Remote Control

Chapter 13: Controlling Motors with Arduino

What You Need

Lists components for motor control: servo motor, wires, Arduino.

What If It Doesn’t Work?

Troubleshooting motor control: power consumption, weight, adjustments.

APPENDIX 1: Electronics and Soldering Basics

APPENDIX 2: Advanced Arduino Programming

APPENDIX 3: Advanced Serial Programming

APPENDIX 4: Controlling the Arduino with a Browser

Related product manuals