Do you have a question about the Avery Dennison SNAP 700 and is the answer not in the manual?
Covers AC power, location, and user safety requirements for printer setup.
Details electrical service needs and circuit recommendations for the printer.
Specifies space, weight, and environmental needs for printer placement.
Lists minimum PC specifications for software compatibility and connectivity.
Reinforces safety precautions, including pinch points and handling moving parts.
Instructions for receiving the printer carton and handling it safely.
Step-by-step guide for safely removing the printer from its shipping carton.
Details how to open the carton and extract the printer safely.
Inspect printer for damage and verify included items.
Instructions on accessing printer manuals, firmware, and instructional videos online.
Procedures for decommissioning and disposing of the printer according to regulations.
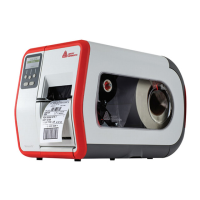
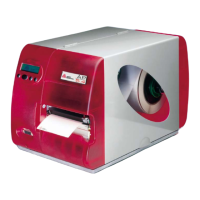
Identifies and describes the key components and physical features of the printer.
Detailed explanation of major printer parts and their functions.
Outlines the two available printer configurations: 1 over 1 and 1 over 0.
Steps for physically setting up the printer, including attaching accessories.
Instructions for mounting the stacker assembly onto the printer.
Guide for attaching the unwind assembly to the printer.
Procedures to verify and set the correct voltage fuses for printer operation.
Instructions on connecting the printer's power cord.
Details on connecting serial or USB cables for printer communication.
Steps to connect a serial cable for printer communication.
Guidance on using USB cables for printer connectivity.
Instructions for connecting the printer to a network via IP address.
Steps to configure BIOS settings for network connectivity on specific motherboards.
Visual guide and instructions for connecting network cables.
Procedures for obtaining and setting a static IP address for network access.
Mentions that PCMate Platinum software is covered in a separate manual.
Steps for loading supplies and printing test labels to verify printer function.
Instructions on loading tape and ink before printing.
Guide on powering on the printer and understanding its diagnostic lights.
Steps to select one of the four built-in test patterns using the Option Menu.
How to initiate printing of test labels and handle potential errors.
Detailed instructions on loading ink and stock for printing operations.
Guide on how to install ink rolls onto the upper ink rewind arbor.
Instructions for installing ink rolls onto the lower ink rewind arbor.
Step-by-step process for loading stock rolls onto the printer's stock arbor.
Caution against using butt splices for stock and recommends re-threading instead.
Visual diagrams illustrating the correct threading of stock and ink.
Explains how print jobs are sent to the printer based on company setup.
Covers printing labels, including control panel functions and status lights.
Explains the function of buttons and indicator lights on the printer's control panel.
Describes the printing process and how the stacker platform adjusts.
Instructions for managing the initial blank portion of stock printed.
Method for feeding stock tape through the printer using the Start/Stop button.
How to identify and resolve printer errors indicated by supply or error lights.
Procedure for finishing print jobs and preparing for the next day.
Steps to cancel or clear pending print jobs from the printer queue.
How to use stock with pre-printed sense marks for precise printing alignment.
Explains methods for selecting the appropriate sensor for pre-printed stock.
Procedure for aligning the stock with the sensor for accurate print placement.
Steps to adjust the sensor position relative to the stock's sense mark.
Overview of the Option Menu System for accessing printer functions.
Guides on running built-in test patterns for printer calibration.
Instructions for adjusting the volume of voice prompts from the printer.
Describes adjustments for print head pressure and density for optimal print quality.
Details on how to adjust the print head pressure using the designated knob.
Guide to adjust print density (darkness) using the contrast knob.
Explains the four adjustable aspects of the stacker for label collection.
How to adjust the stacker's position for proper label alignment.
Describes the function of the toggle switch for selecting stacker sensors.
Instructions for adjusting the stacker's angle based on label type.
How to adjust the stacker platform angle for label stacking.
Guidance on adjusting the static brush for label control.
Introduction to the PC-based Virtual Control Panel for printer adjustments.
How to access and modify printer settings via the PCMate software.
Using the Print/Cut Adjust tab for precise label cutting and print alignment.
Instructions for changing the printer's display and voice message language.
How to set or synchronize the printer's internal clock and calendar.
Procedure to enable or disable the printer's cutting function.
How to override format settings to select a specific print speed.
Options for controlling flagging behavior during printing.
How to select the type of sense mark for alignment with pre-printed stock.
Specifies the type of tape and ink used for printing.
How to view printer usage statistics like total labels and inches printed.
Information on checking and verifying the printer's installed firmware version.
Adjusting arbor tensions to improve print quality and prevent ink wrinkling.
Brief mentions of other VCP features like Print Test Designs and Files.
How to access and configure the printer remotely via its web server.
Steps to access the printer's web interface and modify settings.
Guide for changing the printer's network configuration from DHCP to a static IP.
Instructions to revert the printer's network settings back to DHCP.
Steps to diagnose and resolve issues with the printer's network connection.
Procedures and schedule for cleaning and properly handling printer heads.
Best practices for handling print heads to prevent static discharge damage.
Detailed steps for cleaning the printer heads using recommended kits.
Step-by-step guide for safely removing and installing new print heads.
Recommendations for lubricating essential printer components like bronze bushings.
Information on the rotary knife assembly, its lifespan, and lubrication.
Detailed instructions for safely removing and reinstalling the rotary knife assembly.
Procedure for adjusting the home position of the rotary knife.
Guidelines for replacing worn rubber rollers as part of preventative maintenance.
How to adjust the stock guide for proper centering of the printed image.
Adjusting the width of the web guides to match stock width without pinching.
Information on the stock feed assembly and troubleshooting feed issues.
Detailed steps for adjusting the knife shear for proper cutting.
Explains firmware updates using UPG files and available upgrade methods.
Guidance on choosing the correct UPG file based on the printer's motherboard.
Methods for acquiring the necessary firmware upgrade files.
Instructions for obtaining firmware files through the D2Comm system.
Steps to download firmware upgrade files directly from the Avery Dennison website.
Procedures for executing the firmware upgrade process.
How to extract the firmware upgrade file from a ZIP archive if necessary.
Troubleshooting common electrical issues related to power, startup, and communication.
Diagnosing and resolving issues where stock or ink does not advance.
Troubleshooting problems related to printing, such as stock advancement without printing.
Diagnosing and fixing issues with the label cutting and stacking functions.
Explains printer error messages indicated by lights and provides solutions.
Troubleshooting mechanical issues related to stock feeding and tracking.
Diagnosing and resolving problems with ink pulling smoothly or ink rolls.
Troubleshooting poor or uneven print quality issues.
Resolving issues where the knife does not cut properly or stock jams.
Troubleshooting mechanical problems with the stacker's movement and label collection.
Instructions for correctly configuring the printer's fuses for different voltage inputs.
Lists transfer types and their associated XT commands for ink and stock.
Technical specifications for the SNAP 700 printer, including speeds and label sizes.
Procedures for installing contrast and color contrast sensor assemblies.
Step-by-step guide for mechanically installing the top sensor assemblies.
How to teach and calibrate contrast sensors for accurate mark detection.
Detailed steps for programming the standard contrast sensor.
Instructions for programming the optional color contrast sensor.
Guides for installing the high-speed verifier assembly.
Mechanical installation steps for the high-speed verifier assembly.
Electrical connection procedures for the high-speed verifier assembly.
Instructions for fitting the rear cover after verifier installation.
Details Avery Dennison's warranty terms and conditions for the printer.
Contact information for ordering supplies, service, and technical support.
A flowchart illustrating the navigation within the printer's option menu system.
A diagram illustrating the printer's electrical system components and connections.
Visual representation of the printer's internal harness connections.
Exploded view and parts list for the unwind assembly.
Exploded view and parts list for the RFID version of the unwind assembly.
Exploded view of the unwind motor assembly.
Exploded view and parts list for the decurler assembly.
Exploded view and parts list for the web guide assembly.
Exploded view and parts list for the sensor tray assembly.
Exploded view and parts list for the RFID sensor tray assembly.
Exploded view of the top print head assembly.
Exploded view of the bottom print head assembly.
Exploded view of the print head assembly.
Exploded view and parts list for the platen roller assembly.
Exploded view and parts list for the ink arbor assembly.
Exploded view and parts list for the ink unwind/rewind motor assembly.
Exploded view and parts list for the drive assembly.
Exploded view and parts list for the knife assembly.
Exploded view and parts list for the nip roller assembly.
Exploded view and parts list for the knife/drive motors assembly.
Exploded view and parts list for the RFID knife drive motor assembly.
Exploded view and parts list for the RFID reader assembly.
Exploded view and parts list for the printer covers.
Exploded view and parts list for the cooling fans assembly.
Exploded view of the stacker assembly, part 1.
Exploded view of the stacker assembly, part 2.
Covers printer weight, location considerations, and operational guidelines.
Refers to user manual for print head cleaning and maintenance procedures.
Instructions for replacing worn O-rings on the short feed nip rollers.
Exploded view of the short feed assembly.
Parts list for the short feed assembly.
| label width minimum | 0.5‖ (12.7mm) |
|---|---|
| label width maximum | 5.125‖ (130mm) |
| label length minimum with rotary knife | 0.625‖ (16mm) |
| label length maximum no stack | 14‖ (355.6mm) |
| stacking max with standard down-stacker | 5.125‖ (130mm) x 5‖ (127mm) |
| stacking max with optional long tray | 8‖ (203 mm) |
| speed 1 | 3‖ (76.2mm)/sec |
|---|---|
| speed 2 | 4.5‖ (114mm)/sec |
| speed 3 | 6‖ (152mm)/sec |
| speed 4 | 7‖ (178mm)/sec |
| speed 5 | 8‖ (202mm)/sec |
| speed 6 | 10‖ (254mm)/sec |
| speed 7 | 12‖ (305mm)/sec |
| roll core | 3‖ (76mm) |
|---|---|
| ink core | 1.125‖ (29mm) |
| max roll O.D. | 11.5‖ (290mm) |
| max ink O.D. | 3.5‖ (89mm) |
| print area max | 5‖ (127mm) x 13.875‖ (352mm) |
|---|---|
| print head resolution | 305 dpi (12 dots per mm) |
| registration sensing min size | 0.33‖ (8.4mm) x 0.125‖ (3.2mm) |
| white space prior to mark | 0.4‖ (10mm) |
| voltage | 90-132/180-265 VAC |
|---|---|
| frequency | 50-60Hz |
| current | 10/6 Amp 1 phase |
| temperature range | 41°F (5°C) to 104°F (40°C) |
|---|---|
| humidity range | 5% to 90% non-condensing |
| height | 18.5‖ (470mm) |
|---|---|
| width | 25‖ (635mm) |
| depth | 20‖ (508mm) |
| weight | 80 lb (36.3 kg) |