
M
Maria ChavezSep 8, 2025
What causes a leak between chamber and sensing endcap in Brookfield TT100?
- TTammy WangSep 9, 2025
A leak between the chamber and sensing endcap in your Brookfield Measuring Instruments is caused by a damaged O-ring.
What causes a leak between chamber and sensing endcap in Brookfield TT100?
A leak between the chamber and sensing endcap in your Brookfield Measuring Instruments is caused by a damaged O-ring.
What causes a leak between sensing end-cap and torsion element in Brookfield TT100?
A leak between the sensing end-cap and torsion element in your Brookfield Measuring Instruments is caused by a damaged O-ring.
What causes a leak at Microsyn housing in Brookfield TT100?
A leak at the Microsyn housing in your Brookfield Measuring Instruments is caused by a damaged torsion element.
What causes a leak from drive shaft seal of single mechanical seal viscometer Brookfield TT100?
A leak from the drive shaft seal/bearing housing of a single mechanical seal viscometer Brookfield Measuring Instruments is due to damaged mechanical seals.
What causes a leak from drive shaft seal of double seal mechanical seal viscometer Brookfield TT100?
A leak from the drive shaft seal/bearing housing of a double seal mechanical seal viscometer Brookfield Measuring Instruments is caused by a damaged O-ring or double seal housing. You can replace the double seal assembly or O-ring.
Overview of the TT100 In-Line Viscometer and its capabilities.
Key features and advantages of the TT100 In-Line Viscometer for process control.
Explanation of how the TT100 In-Line Viscometer measures viscosity using fluid dynamics.
Guidance on correlating on-line viscometer readings with laboratory measurements.
Technical details and operating parameters for the TT100 In-Line Viscometer configurations.
Information on power, line frequency, and other utility connections needed for operation.
Details on the electrical power consumption of the TT100 viscometer.
Procedures and recommendations for cleaning the viscometer to ensure optimal performance.
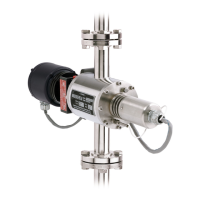
Description and location of the major components within the TT100 In-Line Viscometer.
Description of optional equipment available to enhance viscometer performance.
List of accessories for displaying, controlling, and recording data from the viscometer.
Instructions for unpacking the viscometer and checking for shipping damage.
Essential criteria and conditions for properly installing the TT100 In-Line Viscometer.
Guidance on determining the necessary straight pipe length for optimal installation.
Step-by-step procedures for installing the TT100 In-Line Viscometer.
Details on making flushing connections for cleaning and maintenance purposes.
Overview of calibration procedures for the TT100 In-Line Viscometer.
List of tools and materials necessary for performing viscometer calibration.
Procedure to ensure zero position alignment of Microsyn field coil and torque sensor electronics.
Checks to verify the torque sensor is undamaged before calibration.
Procedure to adjust span for single range measurements using a calibration bar.
Procedure to adjust span for dual range measurements using calibration bars.
Procedure for coarse zero calibration, critical before fine zero voltage calibration.
Procedure to ensure the zero voltage level of the viscometer is properly calibrated.
Guidance on operating the TT100 In-Line Viscometer after installation and calibration.
Information on the proper functioning and lubrication of mechanical seals.
Conditions considered normal during the operation of the TT100 In-Line Viscometer.
Description of safety interlocks that protect the viscometer from damage.
Steps for safely starting up and energizing the TT100 In-Line Viscometer.
Procedure for safely shutting down the TT100 In-Line Viscometer.
Procedure for cleaning the viscometer internally with minimal downtime.
Method for introducing cleaning fluid to internal components for enhanced cleaning.
Detailed steps for disassembling, cleaning, and reassembling viscometer components.
Specific handling and installation guidelines for the optional elliptical baffle.
Overview of component replacement and maintenance for the TT100 Viscometer.
List of specialized tools needed for viscometer service and component replacement.
Instructions for disassembling, identifying, and replacing sensing endcap components.
Procedure for replacing the Microsyn field coil assembly.
Steps for replacing the torque sensor electronics circuit board.
Procedure for replacing the torsion element, the primary viscosity sensing device.
Maintenance and troubleshooting for the drive endcap, motor, and gearbox.
Procedure for replacing the motor capacitor.
Procedure for replacing the Oriental motor.
Procedure for replacing the gearbox associated with the Oriental motor.
Procedure for replacing the Groschopp motor.
Instructions for installing new bearings into the bearing support.
Steps for reassembling the drive endcap after service or replacement.
Procedure for replacing the double mechanical seal assembly.
Guide to identifying and resolving common problems with the TT100 Viscometer.
Contact information for technical assistance from Brookfield Engineering Laboratories.
Information on how to contact Brookfield Engineering Laboratories for support.
Overview of how to change viscosity range and shear rate for the TT100 Viscometer.
Reasons and methods for adjusting the viscometer's viscosity range or shear rate.
How altering rotation speed affects measured viscosity range and shear rate.
How changing the stator affects viscosity range and shear rate.
Procedure for changing the torsion element to alter viscosity range.
Adjusting resistors on the electronics board to change calibration or ranges.
Methods for achieving viscosity range changes in order of practicality.
List of agencies that have approved the TT100 Viscometer for specific operating areas.
Details of the warranty provided for the Brookfield Viscometer.
| Model | TT100 |
|---|---|
| Repeatability | ±0.2% |
| Power Supply | 24 VDC |
| Manufacturer | Brookfield |
| Accuracy | ±1% of range |
| Spindle Set | Various spindle geometries available |


