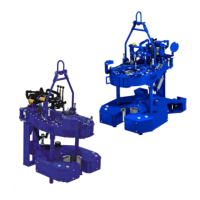
KT5500 5-
1
/
2
” Tong & CLInCHER® BaCKup
SECTIon ConTEnTS
3.19
TECHnICaL ManuaL
MaInTEnanCE
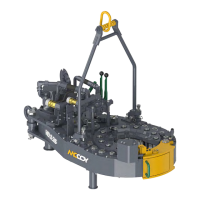
Mechanical Assembly Procedure (Continued):
71. Useacraneandtemporaryslingtohoistthebackupassemblyontoasupportstructurenexttotheassemblylocationofthe
tong.Minimumheightforthebackupsupportsmustbe36”inordertoallowclearanceforinstallingthefrontlegs.
72. 80-0420-16 assembly (uses 85-0408 backup) only:installtherearbackupsupportspringassemblyintherearleg(seePp.
5.40-5.41):
a. Placetwosprings(PN991-13)overthenubsononeofthetwospringplateweldments(PN101-4495).Placethesecond
springplateweldmentoverthespringsandusefour1/2”UNCx6”hexbolts,1/2”narrowflatwashers,and1/2”UNC
hexnylocknutstofastentheassemblytogether.
b. Installthespringsupportweldmentintherearlegusingtwo3/8”UNCx9-1/2”hexbolts,3/8”narrowflatwashers,and
3/8”UNChexnylocknuts.Thelocationofthesupportcanbechangedasrequiredwhenlevelingthebackup.
73. 85-0404 and 85-0506 backup assemblies only:ifusingeitherofthesebackupsensuretheyareproperlypreparedformat-
ingwiththetongandrearlegassembly.RefertoPp.5.40-5.41.
a. Threada1-1/4”UNCheavyhexnutontothe1-1/4”UNCx8”threadedrod(PN101-1993).
b. Coatatleast2”ofthreadonthethreadedrodwithredLoctite.Screwthethreadedrodintotheheavyhexboltweldedto
thetopplateofthebackupuntiltherodbottomsout.Lockthethreadedrodinplaceusingtheheavyhexnutthreaded
ontotherodinthepreviousstep.
c. Coatatleast4”ofthreadatthetopofthethreadedrodwithredLoctite.Threadona1-1/4”UNCheavyhexnut,ensuring
enoughthreadisexposedtoallowinstallationofthesuspensionspringv-bracketandanother1-1/4”UNCheavyhexnut.
d. Installthesuspension springv-bracket(PN1483-500-00-04)onto thethreaded rod,andsecure with another 1-1/4”
UNCheavyhexnut.
74. Removethesidepanelsfromthebackup.
75. Useacranetohoistthetongandrearlegassemblyandplaceinpositionoverthebackup.Ifusingthe85-0604or85-0607-1
compressionloadcell-stylebackupstherearlegmustbeguidedsothatthe“paddle”onthebackupsitsbetweenthevertical
platesoftherearlegwhenthetongandrearlegassemblyisinpositionoverthebackup.
76. Holdatopspringcap(PN1302-905-03B)underthetopplateofthebackup,andinsertafrontlegtube(PN1302-904-905C)
fromthebottomofthebackup,throughthespringcap,andintothelegmountweldmentonthetong.Securethelegtube
witha7/16”UNCx4”hexbolt,7/16”narrowflatwasher,anda7/16”UNCnylocknut.Repeatfortheotherlegtube.
77. Slidealegspring(PN1391-905-02B)overthebottomofeachlegtube,followedbyabottomspringcap(PN1302-905-03C).
Secureeachlegspringandbottomspringcaptothelegtubeusinga7/16”UNCx3”hexbolt,7/16”narrowflatwasher,and
a7/16”UNCnylocknut.
78. 85-0604 and 85-0606 backup assemblies only:
a. Threada3/8”NCshoulderpattern2-Aeyeboltintothetongbodyfromthebottomofthetopplateoftherearlegweld-
ment,nearthefrontoftherearleg(seePp.5.42-5.43).
b. Connectoneendofarearbackupsupportspring(PN1391-905-03)tooneoftheeyeboltsinstalledinthepreviousstep,
andtheotherendofthespringtothev-bracketinstalledinstep71d.Securetheendofthespringtothev-bracketusing
aspringretainer(PN1480-500-00-04B)andacotterpin.Repeatforthesecondspring.
79. Useacranetohoisttongandbackupassemblyoffthebackupsupports,andlowerassemblysothatitsitsonitslegs.
80. Installgreasefittings:
a) Installone1/4”straightthreadgreasefitting(PN02-0097)intothetopsideofeachsupportrollershaft,includingthe
doorpivotrollers(10locationstotal).
b) Installone1/4”straightthreadgreasefitting(PN02-0097)intothetopsideofthelatchadjustmentcam.
c) Installone1/8”NPTgreasefitting(PN02-0005)intothetopofeachidlershaftorhalf-shaft(threelocationstotal).
d) Installone1/8”NPTgreasefitting(PN02-0005)intotheendoftheclutchshaft,inthecentreoftheclutchbearingcap.
e) Installtwo1/8”NPT90
o
greasefittings(PN02-0093)ineachpinionbearingcap(fourlocationstotal).
f) Installtwo1/8”NPT90
o
greasefittings(PN02-0093)inclutchbearingcap(twolocationstotal).
g) Installone1/8”NPT90
o
greasefitting(PN02-0093)orone1/8”NPT45
o
greasefitting(PN02-0006)inthetopofthe
motormount.
h) Install two 1/8” NPT 90
o
grease fittings (PN 02-0093) into the top plate of the backup directly above each clamping
cylinder,andtwointothebottombackupplatedirectlybeneatheachoftheclampingcylinders(eightlocationstotal).
i) Installdrive-ingreasefittings(PN02-0012)intotheendsofeachcageplatecamfollower(26locationstotal).
81. Installhydraulicinletsupportbase(PN101-1138)tothetopplatedirectlyadjacenttotheRHrotaryidler,usingtwo3/8”NCx
1”hexboltsand3/8”lockwashers.Attachtheadjustmentplate(PN101-0022)tothesupportbaseusingtwo3/8”NCx1”hex
bolts,3/8”narrowflatwashers,and3/8”UNChexnylocknuts.
82. Attachtheoutletcouplingsupportmountingbase(PN101-0021)tothetopplatetotheRHsideofthemotormountusingfour
3/8”UNCx2”hexsocketheadcapscrews.