22 Removing and Installing Pressure Booster
Removing and Installing Pressure Booster
Observe safety and environmental information!
Wear safety goggles!
The device must be disconnected from the power and compressed air
supply!
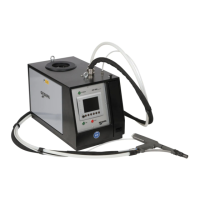
Large pressure booster
- Remove cover on left and right and detach spent man-
drel container from housing.
- Remove screw plug (see figure on right) from housing
and extract hydraulic oil through the opening.
- Release the two plug connections of the two displace-
ment sensors (WS1 + WS2) and of the pressure sensor
(DS3), paying attention to the identification marking and
mark if necessary.
- Detach air supply line from valve terminal to pressure
booster.
- Position GAV riveting gun with hose assembly lower
than the supply unit.
- Holding a rag under the connection, detach hydraulic
hose from pressure booster, to drain off and collect the
oil still in the hose.
- Unscrew the mounting screws from baseplate in base of
housing.
- Slightly raise the pressure booster and tilt such that it
can be removed from the housing baseplate first to-
wards the right.
- Install in reverse order of removal. (For basic setting
see Section 9.3 "GAV Settings" - "Large Pressure
Booster".)
- The hydraulic system for blind rivet setting must then be
bled
- (see Section 24 "Filling Hydraulic Systems".)