Maintenance 7-5
D-I012.1109EN
innovators in agriculture
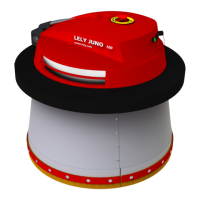
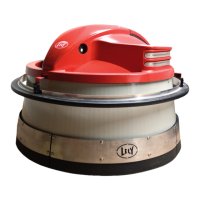
7.4.2 Replace the Rubber Skirt
Preparation
1. Manually drive the JUNO 150 to a clean and quiet location (page
6-4).
2. Remove the cover (page 7-2).
3. Switch OFF the JUNO 150 (page 7-3, page 6-3).
4. Break the power circuit (page 7-2).
Note:
Repeat the procedure if more than one rubber skirt needs to be replaced.
Removal
1. Remove the eight bolts, nuts and washers (4, fig. 46, page 7-6) that
attaches the rubber skirt (6) and the clamping strip (5) to the frame
(3).
2. Remove the clamping strip and the rubber skirt.
3. Remove the rubber skirt from the clamping strip.
Installation
1. Install the new rubber skirt on the clamping strip, the carved side
on the outside, with four bolts.
2. Loosely install the clamping strip with the new rubber skirt on the
frame with the four bolts and four washers and nuts.
3. Loosely install the remaining four bolts, washers and nuts.
4. Make sure the rubber skirt is installed level.
5. Tighten the four nuts in the middle of the skirt.
6. Tighten the four remaining bolts.
Close-up
1. Close the power circuit (page 7-2).
2. Put the JUNO 150 in operation (page 7-3, page 6-3).
3. Install the cover (page 7-2).
4. Get the E-Link manual controller (page 6-2).
Note:
During the calibration process you must not move the JUNO 150.
5. Push soft button [Yes] to start the gyroscope calibration process.
6. Wait until a beep is heard (about 5 minutes) to confirm that the
calibration is complete.
7. Manually drive the JUNO 150 to the charging station (page 6-4).