248
Installation Section 5-2
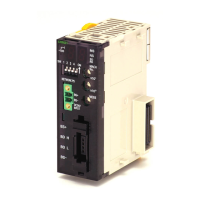
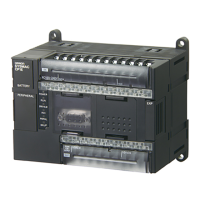
1,2,3... 1. The following diagram shows the connection of two Units that make up a
CJ-series PLC. Join the Units so that the connectors fit exactly.
2. The yellow sliders at the top and bottom of each Unit lock the Units togeth-
er. Move the sliders toward the back of the Units as shown below until they
click into place.
Note If the locking tabs are not secured properly, the CJ-series may not
function properly. Be sure to slide the locking tabs until they are se-
curely in place.
3. Attach the End Cover to the Unit on the far right side of the Rack.
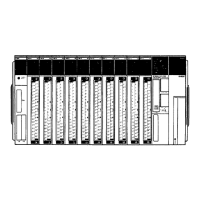
CPU Rack
Note Connect the I/O Control Unit directly to the CPU Unit to enable connecting
Expansion Racks.
PA205R
P
O
W
E
R
IN
P
U
T
A
C
1
0
0
-2
4
0
V
L2/N
L1
D
C
2
4
V
A
C
2
4
0
V
O
U
T
P
U
T
R
U
N
PERIPHERAL
ERR/ALM
RUN
INH
COMM
PRPHL
C
O
N
T
R
O
L
L
ER
C
J
1
G
-
C
P
U
4
4
S
Y
S
M
A
C
P
R
O
G
R
A
M
M
A
B
L
E
PO
R
T
OPEN
BU
S
Y
M
C
P
W
R
Connector
Hook
Hook holes
PA205R
P
O
W
E
R
IN
P
U
T
A
C
1
0
0
-2
4
0
V
L2/N
L1
D
C
2
4
V
A
C
2
4
0
V
O
U
T
P
U
T
R
U
N
PERIPHERAL
ERR/ALM
RUN
INH
COMM
PRPHL
C
O
N
T
R
O
L
L
ER
C
J
1
G
-
C
P
U
4
4
S
Y
S
M
A
C
P
R
O
G
R
A
M
M
A
B
L
E
PO
RT
OPEN
B
U
S
Y
M
C
P
W
R
Lock
Release
Slider
Move the sliders toward the back
until they lock into place.
Power Supply
Unit
CPU Unit
(I/O Control Unit)
I/O Units (10 max.)
End Cover
(included with CPU Unit)
 Loading...