Home
Raymarine
Monitor
E-Series
Reference Manual
Page 171
Raymarine E-Series - Page 171
360 pages
Manual
Save Page as PDF
To Next Page
To Next Page
To Previous Page
To Previous Page
Loading...
Chapter 6: T
he F
ishfind
er
147
Ping Enable
Normally enabled, you c
an disable the ping when appropri
ate: to test othe
r
equipment, or if there is a diver benea
th the vessel, for example
.
81244_4.book Page 147 Th
ursday, January 31, 2008 1:53 PM
170
172
Table of Contents
Main Page
Default Chapter
3
Table of Contents
3
Chapter 1 Overview
25
What will My E-Series Integrate with
25
What Can the E-Series Display Do
26
The Simulator
29
Chapter 2 General Operation
31
Introduction
31
Powering the Display ON/OFF
31
Using the Controls
32
The Control Panel
32
Buttons and Soft Keys
33
The Cursor
34
Displaying Applications
34
Additional Screen Information
35
Initial Setup Procedures
40
Selecting the Data Master (Networked E-Series Only)
40
Setting the Language, Date/Time Format and Units of Measurement
40
Selecting a Page Set
41
Selecting an Application Page
41
Selecting an Application Window
42
Adjusting the Display Lighting
43
Using Compactflash Cards
44
Cautions
44
What Are Compactflash Cards Used for
44
Inserting a Card
45
Removing a Card
45
Managing Data
46
Writing/Retrieving Data to a Compactflash Card
46
Sending and Receiving Information Using a PC
50
Password Protecting Your Waypoints
50
Operating a Networked E-Series Display
54
What Does a Networked System Do
54
Controlling a Network
54
Functions Only Affecting the Display in Use
55
Emergencies and Warnings
56
Man Overboard (MOB)
56
Alarms
57
Chapter 3 Working with Waypoints
59
What Is a Waypoint
59
How Are Waypoints Represented
60
Placing a Waypoint
61
Navigating to a Waypoint
62
Start Navigating to a Waypoint
62
Stop Navigating to a Waypoint
63
Viewing Waypoint Information
63
Editing a Waypoint
64
Changing Waypoint Details
65
Moving a Waypoint
65
Erasing a Waypoint(S)
66
Changing the Default Symbol or Group
67
Sorting the Waypoint List
68
Organizing Waypoints into Groups
68
Displaying the Waypoint Group List
68
Making a New Waypoint Group
69
Moving Waypoints between Groups
69
Renaming an Existing Group
70
Erasing a Group
71
Controlling Waypoint Display
71
Show/Hide Waypoint Names
71
Showing/Hiding Waypoint Symbols
72
Showing/Hiding Waypoint Groups
72
Chapter 4 Using the Chart
73
Important
73
Navionics Support
73
Safety
73
Chart Functionality
73
Chart Cards
74
Uses of the Chart Application
74
Viewing the Chart
76
The Chart Display
76
Where am I on the Chart
77
Moving Around the Chart
77
Additional Information on the Chart
78
Displaying Details of Objects and Features
79
Finding Nearby Features and Services
79
Animated Tides and Currents
80
Displaying Details of Tides
83
Displaying Details of Currents
83
Displaying Details of Port Services
84
Pilot Book Information
86
Displaying Panoramic Photos
88
Displaying Details of Business Services & Points of Interest
89
Displaying an Aerial Photo Overlay
90
Displaying Vessel Identity (AIS)
92
Measuring Distances and Bearings
93
From Your Boat
93
Between Two Points on Your Chart
93
Navigating to a Specific Point
94
Go to an Existing Waypoint
95
Resetting Cross Track Error (XTE)
95
Arriving at Your Target Waypoint
95
Stop Navigating to Your Target Waypoint
96
Maintaining a View of Your Navigation
96
Building and Following a Route
96
What Is a Route
97
What Can I Do with a Route
97
Building a Route
98
Following a Route
102
Resetting Cross Track Error (XTE)
104
Viewing Details of Routes
105
Editing Routes
106
Selecting a Route for Editing
106
Editing the Selected Route
107
Monitoring Where You Are Going
112
Using Chart Vectors
112
Using the Course Deviation Indicator (CDI)
113
Warnings of Potential Dangers
113
Using the Radar with the Chart
114
Synchronizing the Chart with Radar Range
114
Viewing MARPA Targets on the Chart
114
Distinguishing between Fixed and Moving Objects
116
Recording Where You Have Been
118
What Is a Track
118
How Can I Use Tracks
119
Creating a Track
119
Creating a Route from a Track
120
Editing Tracks
121
Selecting a Track for Editing
121
Editing the Selected Track
122
Defining How the Chart Windows Are Presented
123
Working with Multiple Chart Views
123
Setting the Orientation of the Chart
124
Setting the Motion Mode
125
Altering the Level of Chart Detail Displayed
126
Range Rings
127
Navionics Combined Data Cards
127
To Display Bathymetric Information (Fish 'N' Chip)
127
Showing or Hiding Waypoints/Waypoint Information
127
Showing or Hiding a Route or a Track
129
Showing or Hiding Cartographic Features
130
Setting up Your Chart and Its Cartography
131
Chart Setup
131
Cartography Setup
134
Chart Layers
135
Radar Overlay
136
Synchronizing Chart Scale with Radar Range
136
Viewing MARPA Targets on the Chart
137
Ais
137
Range Rings
138
Chapter 5: 3D Chart
139
Important
139
Chart Functionality
139
Safety
139
An Introduction
139
What Can I Use the 3D Chart Application for
140
The 3D Chart Display
140
Where am I on the 3D Chart
141
Moving Around the 3D Chart
141
Other 3D Controls
142
Soft Keys
142
Changing the Mode
143
Active Motion Mode
143
Planning Mode
143
Changing the View
144
View Options
144
Multiple Views
144
Vessel Offset
145
Aerial Photo Overlay
146
Making the View Clearer
146
Exaggeration
146
Declutter
147
Using 2D and 3D Charts Together
148
View Locator
148
Chart Synchronization
149
Using the 3D Chart with a Fishfinder
150
Navigating with 3D Charts
151
Setting up the 3D Chart
151
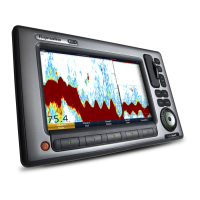
Chapter 6 The Fishfinder
153
The Fishfinder Display
153
Background Information
153
Operating the Fishfinder
154
Explaining the Readout
154
Factors Influencing the Readout
154
Display Mode Settings
155
Adjusting the Position of the Zoomed Area
157
Bottom Lock and Bottom Shift
158
Using A-Scope to View a Live Image
158
A-SCOPE' Modes
159
Range Control
159
Changing the Range
159
Range Shift
160
Presentation Toolbar
160
Adjusting Gain and Power
160
Auto Gain Settings
161
Manually-Set Gain Levels
161
Power Setting
162
Measuring Depth and Distance
162
Measuring Depth and Distance with VRM
163
Adjusting the Scroll Mode and Speed
164
Pausing Scroll
164
Viewing Frequencies Within a Preset
165
Placing Waypoints
165
Fishfinder Alarms
165
Editing Presets
165
Manual Frequency Selection
166
Automatic Frequency Selection
166
Fishfinder Configuration
167
DSM and Transducer Setup
167
Chapter 7 Using the Radar (Analog)
173
Introduction
173
What Is Radar
173
Detecting Targets
173
Maximum Radar Range
174
Factors Impairing a Radar Picture
174
Powering On/Off the Various Scanner Operating Modes
178
The Radar Picture
179
Marking a Position on the Radar Screen
180
Changing What You See in the Radar Window
180
Setting the Orientation of the Radar
180
Setting the Motion Mode
182
Showing or Hiding the Range Rings
184
Changing the Bearing Mode for Ebls
184
Getting the Best Picture
184
Using the GAIN Functions
184
Using the Enhance Echoes Softkey Functions
187
Changing the Displayed Range
189
Radar Range and Chart Scale Synchronization
190
Measuring Distances, Ranges and Bearings
191
Using the Range Rings
191
Using the Cursor
191
Using Vrms and Ebls
192
Using Floating Vrms/Ebls
194
Using Radar to Avoid a Collision
195
Guard Zones
195
Marpa
198
Setting up MARPA
201
Acquiring a Target to Track
202
Cancelling Targets
202
Displaying Vessel Identity (AIS)
203
Setting up Your Radar
203
Warnings of Potential Dangers
205
Chapter 8 Using the Radar (Digital)
207
Radar Setup
207
Select Scanner
207
Scanner Setup
207
Radar Alarms
209
Powering On/Off the Various Scanner Operating Modes
210
Radar Status
210
Radar Range and Image Quality
211
Range
211
Image Quality
211
Radar Window Overview
215
Your Position
215
Operation Modes
215
Other Vessels or Objects
215
Factors Affecting Echo Strength
216
Using Waypoints with the Radar
216
Radar Display Options
216
Orientation
216
Setting the Motion Mode
218
Changing the Bearing Mode for Ebls
220
Dual Range
220
Tuning the Radar Display
221
Gain
221
Gain
222
Color Gain
222
Rain Clutter
222
Sea Clutter
222
Super HD Adjustments
223
Tuning the Radar Display: ENHANCE ECHOES
223
Interference Rejection
223
Expansion
224
Wakes
224
Radar Range
224
Synchronizing Radar Range and Chart Scale
225
Measuring Distance, Range and Bearing
225
Range Rings
226
Bearing and Range
226
The Variable Range Marker (VRM) and Electronic Bearing Line (EBL)
227
Variable Range Marker
227
Electronic Bearing Marker
227
Combined Range and Bearing
228
Tracking a Target with a VRM or EBL
228
Floating VRM and EBL
229
Using Radar to Track Objects
230
Guard Zones
230
Marpa
231
Displaying Vessel Identity (AIS)
236
Chapter 9 Using the Data Application
237
Introduction
237
Selecting a Data Application
237
Selecting the Data for Display
238
Pre-Configured Data Panels
238
Customize the Panels
239
Chapter 10 Autopilot Control
243
Emergency Disengage
243
Enabling and Engaging the Autopilot
243
To Enable Autopilot Control
243
To Engage the Autopilot in Normal Operation
243
To Engage the Autopilot from the Setup Menu
244
To Disengage the Autopilot in Normal Operation
244
Emergency Disengage
244
Autopilot Status Indicator
245
The Autopilot Control Screen
245
Waypoint Arrival
246
When There Are more Waypoints in Your Route
246
When You Reach the Last Waypoint in Your Route
247
Chapter 11:Video
249
Introduction
249
Setting up the Video Application
249
Displaying a Video Application
249
Customizing the Video Application
250
Adjusting the Image
253
Chapter 12:Engine Monitoring
255
Introduction
255
Displaying and Setting up the Engine Monitor
255
The Engine Monitor Display
257
Configuring the Engine Panels
257
What Should I Do When an Alarm Is Triggered
257
Graphical Engine Data
258
Chapter 13:Using The Course Deviation Indicator
259
Introduction
259
The CDI Screen
259
Steering Instructions
260
Selecting the CDI Application
260
Modifying the CDI Application
260
Chapter 14:Weather (US Only)
261
Overview
261
Important Information
261
Disclaimer
261
Setting up the Weather Application
261
Pre-Requisites for Using the Weather Application
262
Adding a Weather Application
262
Specifying the Weather Elements
262
The Weather Display
263
Moving Around the Weather Map
263
Placing Waypoints
263
Weather Graphics
264
Precipitation (Nowrad)
265
Storm Cast
265
Sea Surface Temperature (SST)
266
Canadian Radar
266
Tracking Storms
266
Lightning
267
Surface Observation Stations
267
City Forecasts
268
Wind
268
Waves
269
Surface Pressure
270
Viewing Data at a Particular Location
270
Animated Weather Graphics
270
Setting up Animation
271
Running Animation
271
Viewing Weather Reports
271
Tropical Statements
272
Marine Warnings
272
Marine Zone Forecasts
272
Watchbox Warnings
273
Watchbox Warning Alerts
273
Displaying Marine Watchboxes
274
Displaying Watchbox Data
274
Weather Application Setup
275
Selecting the Weather Setup Menu
275
Weather Setup Options
275
Showing/Hiding Marine Watchboxes and Zone Boundaries
276
Troubleshooting
276
Chapter 15 Sirius Audio (US Only)
277
To Start Using Sirius Radio
277
Tuning to a Channel
278
Browsing Channels
278
Filtering Categories from the Browse
279
To Filter Categories
279
Scanning Channels
279
To Scan Channels
279
Hiding or Showing Channels and Categories
279
To Hide or Show a Channel or Category
279
Presets
280
To Assign a Channel to a Preset
280
To Delete a Channel from a Preset
280
To Move a Channel to a New Preset
280
Parental Locking
280
To Enable Blocking
281
To Set up a Password
281
To Change an Existing Password
281
To Block a Channel
281
To Enter a Password
282
Favorite Song Alerts
282
To Enable Favorite Alerts
282
To Set up a Song or Artist Alert
282
Chapter 16 Navtex
283
Overview
283
Setting up Navtex Weather
283
Incoming Message Alerts
283
Viewing Messages
284
Displaying the Navtex Message List
284
Displaying and Scrolling through a Message
284
Managing Navtex Messages
284
Selecting Message Alert Categories
284
Sorting the Message List
285
Chapter 17 Automatic Identification System (AIS)
287
Introduction
287
What Is AIS
287
Classes of AIS Data
287
What Do I Need to Run AIS
289
Selecting the AIS Function
289
AIS Status
289
How Is AIS Data Displayed
290
AIS Target Symbols
290
Viewing Target Information
291
Using AIS for Collision Avoidance
294
Safe Zones
294
MARPA and AIS Options
295
Safety Messages
295
AIS Alarms
296
Local AIS Alarms
296
Active Alarm List
297
Simulator
298
AIS Layer Setup Menu
298
Chapter 18 System Setup and Customizing
299
Changing the Data Master
299
Customizing the
299
Re Configuring the Application and Page Layout
300
Rename a Page Set
300
Return to Default Setting
301
Changing the Databar
301
Databar Position
301
Data Bar Size
303
Compass Bar
303
Turning the Compass Bar on and off
304
Compass Bar Setup
304
Customizing the Contents of the Data Bar
305
Changing the Set up Menu Options
308
Application Specific
308
External Equipment Menus
308
System-Wide Menus
308
Chapter 19 Maintenance & Troubleshooting
319
Introduction
319
Maintenance Procedures
319
Servicing and Safety
319
Routine Checks
319
Cleaning the Display
320
Resetting the Display
321
Settings Reset
321
Settings and Data Reset
321
Troubleshooting Your Display
323
Common Problems and How to Solve Them
323
Getting Technical Support
326
Help Us to Help You
327
World Wide Web
328
Contacting Raymarine in the US
328
Contacting Raymarine in Europe
329
For Navionics Cartography
329
For Sirius Weather
329
Other manuals for Raymarine E-Series
User Reference Handbook
260 pages
Installation Manual
54 pages
Installation Instructions
112 pages
Operating Guide
18 pages
Brochure
112 pages
Related product manuals
Raymarine e7
320 pages
Raymarine E70235
20 pages
Raymarine E70368
84 pages
Raymarine E70634
84 pages
Raymarine E70639
84 pages
Raymarine E70636
84 pages
Raymarine E70364
84 pages
Raymarine E70234
20 pages
Raymarine E70638
84 pages
Raymarine E70141
70 pages
Raymarine E70367
84 pages
Raymarine E70236
20 pages