Electrics Section T
General electrics system
The general electrics
include
battery, fuses, coil,
starter solenoid, sparking plugs, horn, windscreen
wiper
motor, instruments and switches
as
shown
in
Figure
17.
Battery
The battery is a
12
volt, negative earth,
wet
cell
type
and is housed in a
well
in the L.H. side
of
the
engine compartment. A metal strap,
connected
to
two
hook
bolts and secured
by
wing
nuts,
holds
the
battery
firmly
in position
(see
Figure
18).
General
maintenance
Keep
the
battery terminals clean and tight.
A smear
of
petroleum
jelly
will
protect the
battery posts and terminals from corrosion.
Regularly examine the level
of
the electrolyte in
the
cells and,
if
necessary, add distilled
water
to
bring the level
to
the
top
of
the
separator
plates.
If
the
battery is
found
to
need frequent
topping
up, steps
should
be taken
to
determine
the
reason. For example,
the
battery may be
receiving an excessive charge, in
which
case,
the
alternator regulator should be checked.
See pages
7-9.
If
one cell needs
topping
up
more
than
the
others, check the
condition
of
the
battery case.
If
there are any signs
of
an electrolyte
leak,
the
battery should be replaced. The
efficency
of
the
battery should occasionally be
checked
by
means
of
a hydrometer. The specific
gravity
readings and their indications are
as
follows:
1·280-1
·30
Fully charged
Approx. 1
·20
Half
discharged
Approx. 1
·150
Fully discharged
If
electrolyte has been spilled at any time from
any
of
the cells, check the specific gravity
of
the remaining electrolyte and
top
up
the battery
with
sulphuric acid
solution
to
the
same value.
Always
add acid
to
the
water
when
preparing
the electrolyte.
It
is
dangerous
to
add
water
to
acid.
Never
use a naked
light
when
examining
the
battery. The mixture given
off
by
the battery is
highly
explosive.
18
To
remove
the
battery
(see
Figure
18)
1 Disconnect the positive and negative leads,
secured
to
the battery terminals
by
a
1
7
6
UNC
nut
and bolt.
2
Unscrew
the
two
wing
nuts securing the
battery retaining strap
to
the hooked bolts.
Remove retaining strap and rubber insulation.
3 Lift the battery from the
well,
ensuring
it
is
kept horizontal
to
avoid spilling the electrolyte.
4 Replace in reverse order and ensure
that
the
negative terminal
is
earthed on reconnection.
High
rate
discharge
test
The
high
rate
or
heavy discharge test is a
timed
on-load
voltage check applied separately
to
each cell
of
the battery. Before testing, a battery
should have been
off
charge
for
some hours
and each cell must be at least
70% charged,
having a
minimum
electrolyte density
of
1
·230
SG. The correct size
of
tester
for
use on
car batteries is one having an element rated at
150
to
160
amps.
It
is
important
to
use
only
a
suitably
rated
tester.
A cell in good,
condition
will
maintain a constant
1·2-1·5
volt
reading on the test meter
for
1 0 seconds,
when
the prongs
of
the tester are
pressed
onto
adjacent terminals. A
weak
cell
will
show
a rapidly falling voltage.
If
all the cells
appear weak, this may indicate
that
the battery
is merely discharged
but
otherwise healthy.
Battery
voltage
By
means
of
the
two
tests already described,
the
condition
of
the battery has been
ascertained and also its state
of
charge. The
working
voltage should then be checked.
Connect a voltmeter between the positive and
negative battery terminals and note the reading.
The
minimum
reading
for
the
12-volt
system
should
not
fall
below
1
0·5
volts.
If
the voltage
does
drop
rapidly
below
the
minimum
reading
the
battery
will
need replacing.
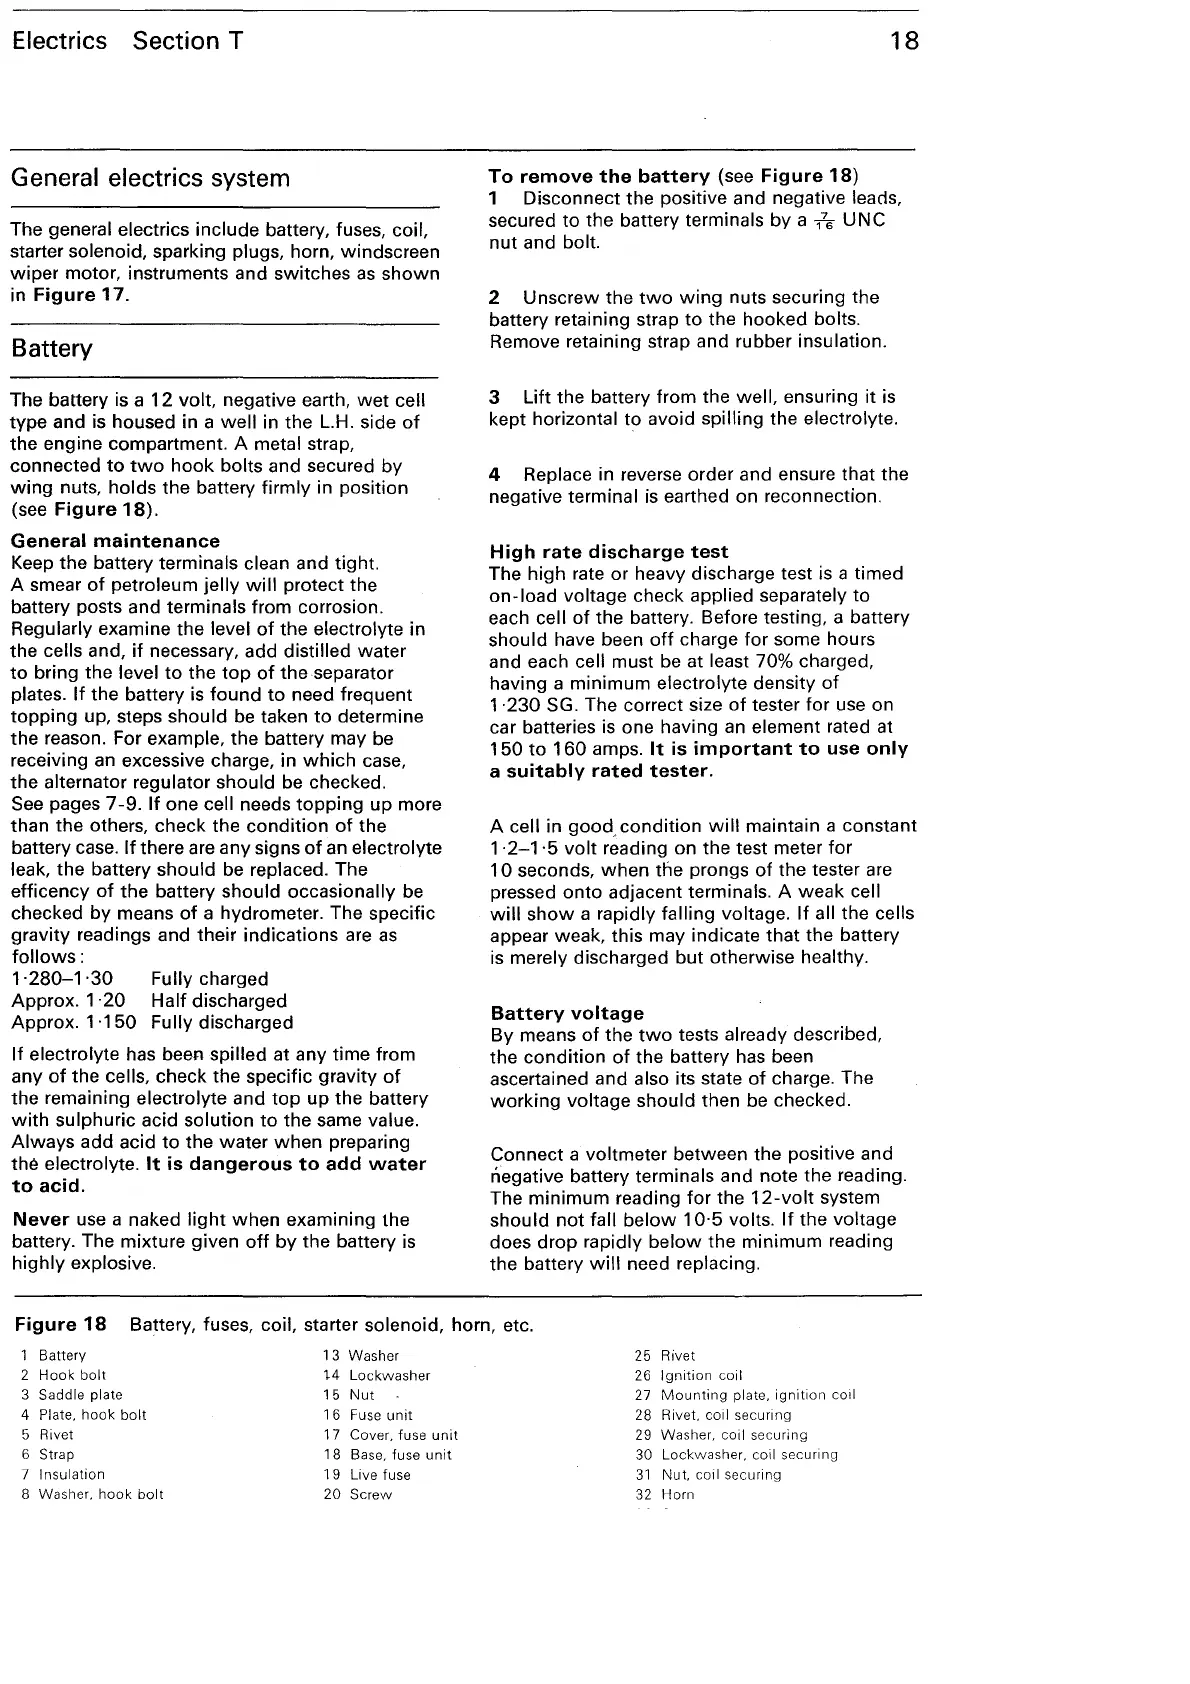
Figure
18
Battery, fuses, coil, starter solenoid, horn, etc.
1
Battery
13 Washer
25
Rivet
2
Hook
bolt
t4
Lockwasher
26
Ignition
coil
3 Saddle plate 15
Nut
27
Mounting
plate.
ignition
co1l
4
Plate.
hook
bolt
16
Fuse
unit
28 Rivet. coil securing
5 Rivet 17
Cover. fuse
unit
29
Washer. coil securing
6 Strap 18
Base. fuse
unit
30
Lockwasher. coil securing
7
Insulation
19 Live fuse
31
Nut
coil securing
8 Washer.
hook
bolt
20
Screw
32
Horn