21
SELECTING THE ORIENTATION OF YOUR PART
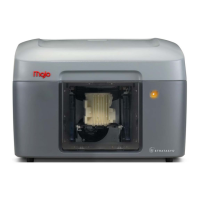
The orientation function displays an expanded preview window that shows the orientation of the part when it
prints. Orientation impacts build speed, part strength, surface finish and material consumption.
Figure 4-22: Part orientation
You can change the orientation of your part by clicking the Orient Part button and then selecting the orientation
desired from the preview window. The selected part can be further manipulated by using any of the X, Y, or Z
axis slide controls or by adding a specific value. When the desired orientation is achieved, click OK to save the
settings.
Orientation considerations
• Build Speed/Material Usage A lesser amount of supports will allow for a faster build speed.
Another factor affecting build speed is the axis orientation. The printer can build faster across
the X-Y plane than it can along the Z axis. Orienting a part so that it is shorter within the printing
chamber will produce a faster build.
• Part Strength - A part is stronger within a layer than it is across layers. You may need to orient
your part to have its greatest strength across a specific area. For example a tab that needs to
be pressed would be weakest if you are applying pressure across layers.
• Surface Finish - Orientation will affect the surface finish in specific areas of the part. How the
part is oriented will determine how the surface finish will look and allow the printer to provide the
smoothest finish for a specific area. For example, if printing a cylinder, orienting the cylinder
upright will have a smoother surface finish than printing it on its side.
Icon Description
Rotates the displayed part around the X axis.
Rotates the displayed part around the Y axis.
Rotates the displayed part around the Z axis.