Appendix C Assembly, Installation and Initial Start Up Procedures C-15
12. Install DIMMs
For the reference enclosure, the DIMM modules can not exceed 1.25 inches
(31.75 mm) in height.
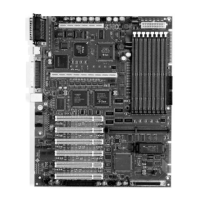
FIGURE C-13 Ultra AXi DIMM Installation
To install a DIMM on an Ultra AXi motherboard, perform the following steps:
Note – The DIMM slots are configured in 4 pairs of two slots. Slots J0403 and J0404
are Pair 0. Slots J0401 and J0402 are Pair 1. Slots J0303 and J0304 are Pair 2. Slots
J0301 and J0302 are Pair 3. See TABLE C-4 on page C-18 for specific configurations.
Caution – Use 60 ns DIMMs only on the Ultra AXi motherboard.
a. Attach an ESD wrist strap
b. Carefully remove the new DIMM from the protective packaging.
c. Hold the DIMM at the top left and right corners using the thumb and index
finger of each hand. Place DIMM in the socket. Be sure you orient the DIMM
so that the two notches at the bottom of the DIMM line up with the two tabs in
the DIMM connector.
d. Firmly push down simultaneously on both upper corners of the DIMM until
the bottom edge of the DIMM (the edge with the gold pads) is firmly seated
into the slot. You may hear or feel a “click” when the DIMM is properly seated.
J0404
J0304
J0403
J0303
J0402
J0401
J0301
J0302
Pair 3
Pair 1
Pair 2
Pair 0