BODY
Read all of SAFETY and this section before attempting any procedure. Pay particular attention to Notices, Cautions, Warnings and Dangers.
19
Repair and Service Manual
647701
Sweater Basket
Tool List Qty.
Torx Bit, T-47IP............................................................ 1
Socket, 15 mm, Deep-well .......................................... 1
Ratchet........................................................................ 2
Ratchet Extension, 6".................................................. 1
Torque Wrench, ft. lbs. ............................................... 1
1. Remove four torx screws (28) and flanged nuts (29)
on the top edge of the sweater basket assembly (27)
(Figure 10).
2. Remove two torx screws (30) securing the back of
the sweater basket (27) to the seat back supports.
3. Slide the sweater basket assembly (27) off the seat
back supports (32).
Installation of the sweater basket is in reverse order of its
removal. Replace any worn or damaged hardware with
new as required. It is recommended that all lock nuts be
replaced after the fifth removal.
Tighten the nuts (29), screws (30) to the torque value
specified below.
Seat Back Assembly
Tool List Qty.
Torx Bit, T-45IP............................................................ 1
Ratchet........................................................................ 1
Torque Wrench, ft. lbs ................................................. 1
Remove four torx screws (26) that secure the seat back
assembly (25) to seat back supports (32) (Figure 10).
Installation of the seat back assembly is in reverse order
of its removal. Replace any worn or damaged hardware.
It is recommended that all lock nuts be replaced after the
fifth removal.
Tighten the screws (26) to the torque value specified
below.
Fender Liner
Tool List Qty.
Notched Pry Bar ..........................................................1
The fender liner can be removed without removing the
rear body of the vehicle (Figure 10).
Remove four ratchet rivets (42) that secure the liner (41)
to the frame of the vehicle. Two ratchet rivets (42) are
located on the lower front edge of the fender liner (41).
The two remaining are located along the inside surface
above the wheel.
Installation is in the reverse order of removal. Replace
any worn or damaged hardware.
Rear Body
Tool List Qty.
Torx Bit, T-45IP ............................................................1
Torx Bit, T-47IP ............................................................1
Torx Bit, T-50................................................................1
Ratchet ........................................................................1
Insulated Wrench, 1/2”.................................................1
Torque Wrench ............................................................1
Remove the lower and upper rocker panels and the
sweater basket. Fold the back edge of the floormat
toward the front of the vehicle. If the vehicle is equipped
as a 2 + 2 with a rear facing seat or with a canopy and
windshield, these must also be removed (Figure 10).
1. Raise and remove the seat bottom assembly from
the vehicle. Remove four torx screws (26) securing
the seat back (25) to the seat back supports (32)
(Figure 10).
2. Using an insulated wrench, disconnect the battery
cable at the negative (-) battery terminal.
3. Remove the two torx head screws that secure the
controller splash shield to the body on the passenger
side of the vehicle.
4. Remove the two strut covers (36) by sliding the cov-
ers up and off of the struts.
5. Disconnect the wires from the charging receptacle to
the battery and unplug the wire to the main wiring
harness. Remove two torx screws (33) securing
each hinge plate (32) along the front edge of the rear
body then remove both hinge plates.
6. Remove two inner torx screws (34) from the back
edge of seat opening in the rear body.
7. Remove four torx screws (10) from the lower edge of
the rear body, two on the driver side and two on the
passenger side.
8. Remove two torx screws (35) from the bagwell floor.
9. It is recommended that the removal of the rear body
is done using two people, one on each side of the
vehicle.
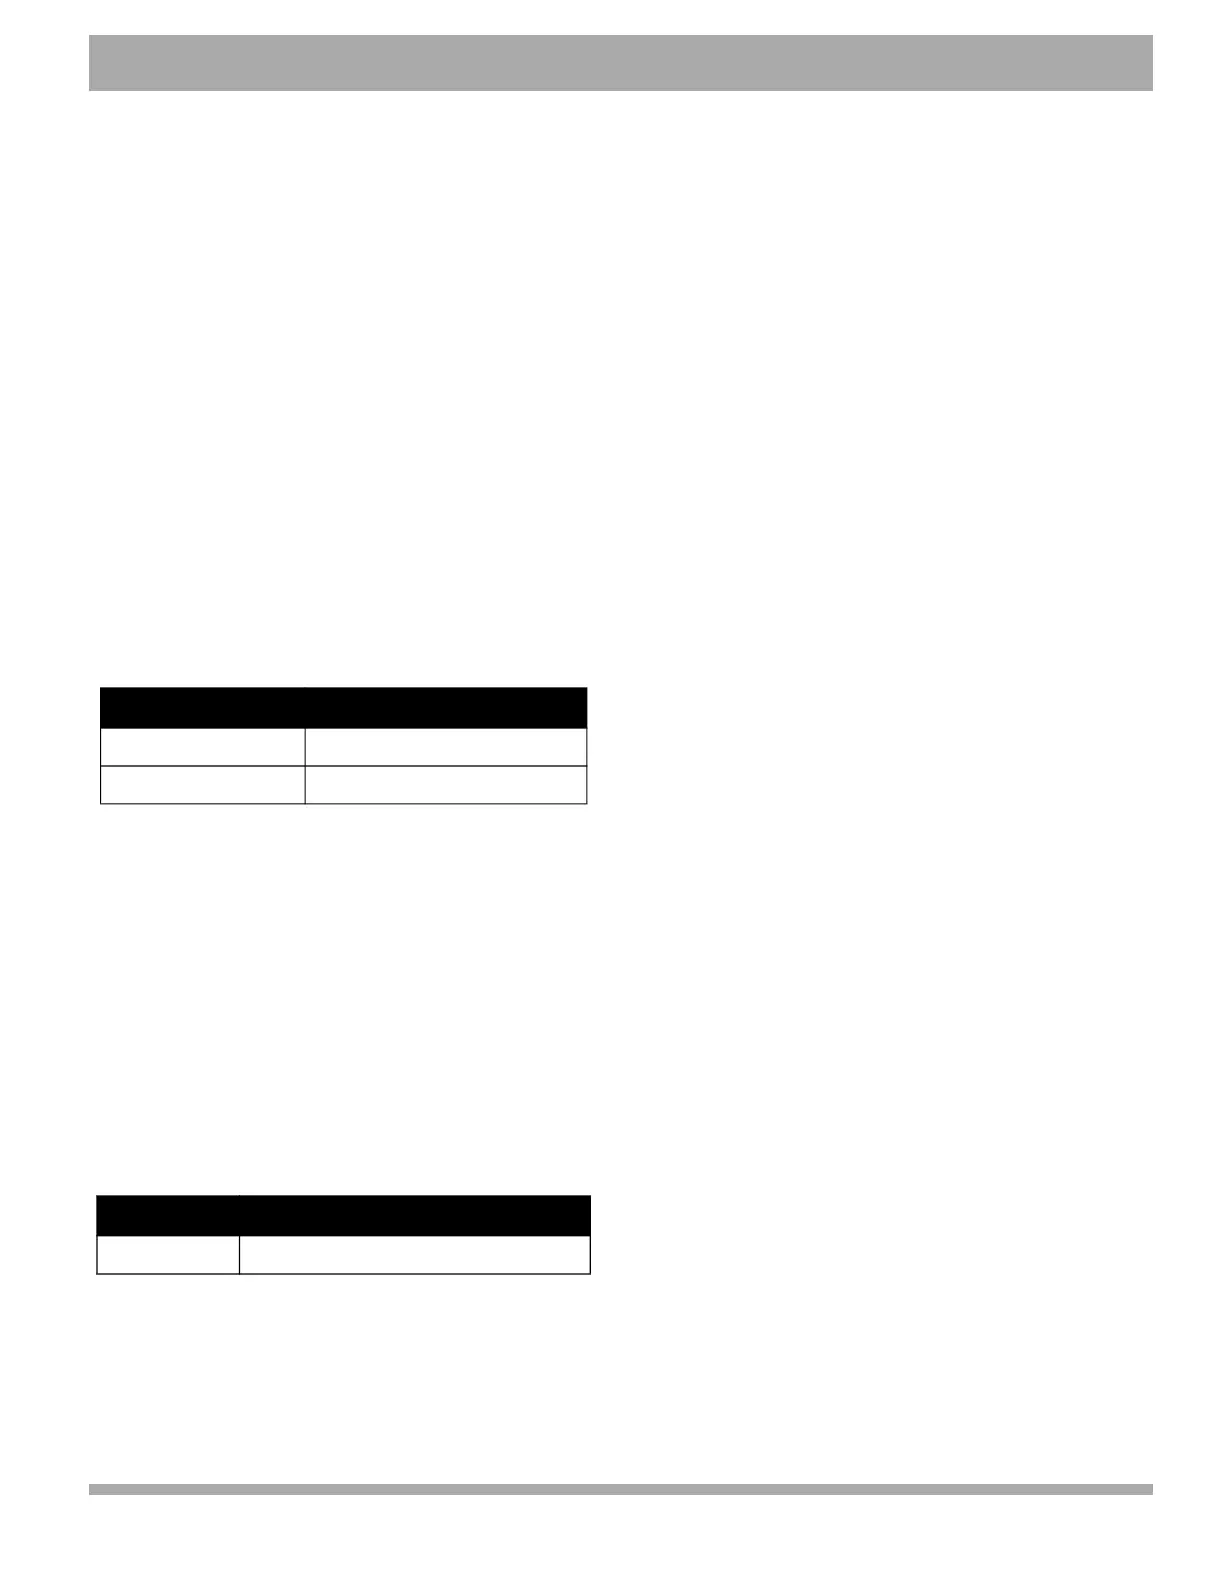
Item Torque Specification
29 4 - 6 ft. lbs. (6 - 8 Nm)
30 13 - 16 ft. lbs. (18 - 22 Nm)
Item Torque Specification
26 13 - 16 ft. lbs. (18 - 22 Nm)