Do you have a question about the adept technology Cobra s600 and is the answer not in the manual?
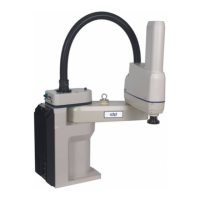
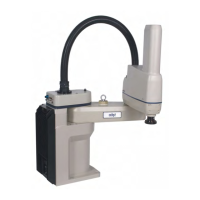
Details the Adept Cobra s600 and s800 SCARA robots, their components, and control system.
Describes the SmartAmp AIB amplifier and SmartController for motion and vision control.
Details the SmartController CX capabilities and the sDIO module for digital I/O.
Summarizes installation, manufacturer declarations, and help resources.
Explains the different levels of alert notation (DANGER, WARNING, CAUTION, NOTE) used in the manual.
Illustrates the location and meaning of warning labels found on the robot.
Outlines essential precautions, required safeguards, and relevant safety standards.
Covers safety barriers, panel location, pinch points, and emergency movement.
Lists sources for safety standards and discusses risk assessment factors.
Details personnel exposure, injury severity, and avoidance measures within the work envelope.
Explains slow speed control, system behavior categories, and EU safety directives.
Specifies intended applications, prohibited uses, and guidelines for robot modifications.
Covers safe transport, sound emissions, and safety for additional equipment.
Defines working areas for robot operation and qualification requirements for personnel.
Details safety equipment for operators and safety aspects during maintenance.
Covers risks from incorrect installation/operation and actions for emergencies.
Specifies environmental conditions and procedures for robot transport and storage.
Details procedures for unpacking, inspecting, and repacking robot equipment.
Lists operating environment requirements for Adept robot system installation.
Provides guidelines for mounting the robot, including surface preparation and procedure.
Details the purpose and function of connectors on the robot's interface panel.
Illustrates the overall system cable connections for Adept Cobra robots.
Lists required cables and parts for system installation, including part numbers.
Summarizes the main steps for installing the Adept SmartController and Front Panel.
Details connecting robot power (24 VDC, 200-240 VAC) and data cables.
Provides details and procedures for creating and installing the 24 VDC power cable.
Details AC power specifications, diagrams, and connection procedures.
Explains how to protect the robot from overvoltages and voltage spikes.
Illustrates AC power diagrams and provides details for the AC mating connector.
Provides steps for creating and installing the 200-240 VAC power cable.
Provides recommendations for grounding the robot system and mounted equipment.
Outlines the user's responsibility for installing safety barriers and related devices.
Explains the meaning of robot status LED indicators and panel displays.
Describes how the status panel displays alpha-numeric codes for robot faults.
Explains the robot's braking system and the function of the brake release button.
Describes methods for connecting digital I/O to the robot system.
Explains using the XIO connector for digital I/O, including pin assignments.
Lists optional I/O products and provides specifications for XIO inputs/outputs.
Guides through system commissioning, startup, safety checks, and verification.
Guides on learning robot programming using V+ operating system and utility programs.
Identifies field-replaceable parts and outlines the periodic maintenance schedule.
Details monthly tests for E-Stop buttons, enabling switches, and barrier interlocks.
Covers checking mounting bolts and inspecting the harmonic drive for oil leaks.
Provides steps for lubricating the Joint 3 ball screw, including cover removal.
Details procedures for removing and installing the SmartAmp AIB chassis.
Details the procedure and timing for replacing the encoder backup battery.
Explains how to attach end-effectors or tooling to the robot's tool flange.
Provides procedures for removing and reinstalling the tool flange to maintain calibration.
Describes user air lines and electrical connections on the robot's Joint 1 and outer link.
Describes internal connectors like OP3/4, EOAPWR, ESTOP, and SOLND.
Details the SOLND and OP3/4 connector pinouts for solenoid kits and other devices.
Describes the EOAPWR connector and provides output specifications.
Details the ESTOP connector and procedure to enable the Breakaway E-Stop.
Identifies locations on the robot arm for mounting external equipment.
Provides the procedure for mounting the 24 V Robot Solenoid option.
Details the components and procedure for installing a robot camera bracket kit.
Explains DeviceNet as a communication link for industrial I/O devices.
Lists vendors for DeviceNet cables and provides connector pinout details.
Describes the adjustable hardstop kit for limiting work envelope and its installation.
Details installation and softstop modification for Joint 1 and Joint 2 hardstops.
Provides dimension drawings for Adept Cobra s600 and s800 robots.
Illustrates internal connections and details the XSLV connector pinout.
Lists detailed performance specifications for the Adept Cobra s600 and s800 robots.
Describes the Cleanroom Option, its features, and particulate cleanliness limits.
Details connections and requirements for vacuum and compressed air sources.
Discusses exclusions, incompatibilities, and bellows replacement for cleanroom robots.
Explains the IP-65 classification for dust and water protection for the Cobra s800 robot.
Details the cable seal assembly identification and installation procedure.
Provides procedures for removing and replacing the robot's outer link cover.
Outlines customer responsibilities for sealing the tool flange and pressurizing the robot.
Describes user connectors and maintenance procedures for IP-65 robots.
Provides steps for replacing bellows on the IP-65 robot.
Provides dimension drawings for the cable seal assembly.
Instructions for mounting and cabling dual Adept Cobra robot systems.
Details the steps for configuring a dual robot system, including software setup.
Explains connecting digital I/O to a dual robot system and default configurations.
Details I/O block configurations for dual robots, including XIO, IO Blox, and sDIO.
Explains how to use CONFIG_C utility for I/O configuration in dual robot systems.
Steps to verify installation and configuration before starting the dual robot system.
Guides on operating dual robots with pendants and V+ programming.
Explains how the E-Stop circuit affects both robots simultaneously in a dual system.
| Type | SCARA Robot |
|---|---|
| Number of axes | 4 |
| Reach | 600 mm |
| Axes | 4 |
| Controller | SmartController EX |
| Mounting | Table |
| Power Requirements | 100–240 VAC, 50–60 Hz, Single Phase |