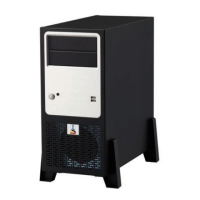
Installation sequence
This chapter describes the installation sequence for the
PRISMAsync controller.
Because the PRISMAsync is connected to the customer’s network please coordinate your
installation with the network administrator at the customer site.
NOTE
Make sure the PRISMAsync
is connected to the copier before entering Engine Service mode.
Procedure
1.
Verify site conditions
on page 15
2.
Assemble the Operator panel
on page 16
3.
Unpack the PRISMAsync
on page 17
4.
Install the PRISMAsync supports/pedestals
on page 18
5.
Connect the PRISMAsync
on page 19
6.
Bundle the cables with a tie wrap.
7.
Finish the installation
on page 23
Verify site conditions
Introduction
Before installing the PRISMAsync, check the site conditions.
Copier
• Is the copier configured for use with the PRISMAsync? For the proper settings, see the
documentation that comes with the copier.
• Is space available for the PRISMAsync behind the copier? The PRISMAsync is placed behind
the copier. Be sure that there is enough room for servicing either the copier or the
PRISMAsync. You may need to move the copier away from the wall so that interface
connectors are accessible.
• Check if the interface cables between copier and PRISMAsync are present. 1 data cable must
be delivered together with the copier. 1 Ethernet cross cable is delivered with the PRISMAsync.
Power & Network
• Is a dedicated, grounded electrical outlet for the PRISMAsync available near the copier?
- Locate the grounded electrical outlet that will supply power to the PRISMAsync. Do not run
the PRISMAsync and the copier on the same circuit.
- Do not plug the PRISMAsync into a switchable wall outlet. This can result in the PRISMAsync
being turned off accidentally.
- Do not plug the PRISMAsync into a circuit with heating or refrigeration equipment (including
water coolers).
- Do not pull on the cable when unplugging the PRISMAsync. Pull the plug instead.
• Make sure that there is a working cabled network connection available at installation time.
A wireless network will not work on the PRISMAsync
• Contact the Network Administrator for the following settings:
- The Hostname of the system
- Static IP-address or DHCP
- Subnet mask, Gateway, DNS-server
Environment
• A networked computer (PC or Mac OS) must be available close to the copier.
Installation sequence
Chapter 3 - Installation 15
PRISMAsync V3.2