2-5
Compaq ProLiant 5500 and 5500R Servers Setup and Installation Guide
For use with Pentium II Xeon and Pentium III Xeon processor-based servers only
Writer: Michele Wray Project: Compaq ProLiant 5500 and 5500R Servers Setup and Installation Guide Comments: 328470-002
File Name: C-CH02.DOC Last Saved On: 2/12/99 12:16 PM
COMPAQ CONFIDENTIAL - NEED TO KNOW REQUIRED
Installation Procedure
There are two installation procedures presented in the following paragraphs.
The procedure you will use depends on whether you are installing a rack-mount
model or a tower model server.
Each procedure is a summary of the steps you will follow to install your
Compaq ProLiant 5500 and 5500R server. Detailed instructions for the general
steps are included in later chapters of this guide.
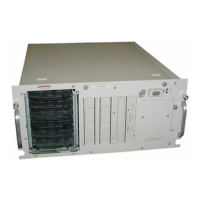
Installing a Rack Mount Model
Below are the general steps for installing the rack-mountable ProLiant 5500R
server:
1. Select an appropriate site for your rack. See the Rack Planning and
Installation Guide in the “Compaq Installing Rack Products”
information for site selection criteria.
2. Make sure that stabilizer feet are installed on the rack.
3. Unpack the server.
4. Unpack the rack mounting hardware.
5. Install any hardware options in the server. See Chapter 4 and the options
kits for detailed instructions.
6. Install SCSI drives in the server only after you load the server into the
rack. You may also lighten the server by removing the power supplies
and reinstalling them after you have mounted the server in the rack.
7. Set switches: peripheral board switches, system board switches, and
SCSI ID settings. See Chapter 4 for detailed information.
8. Attach rack mounting hardware to the rack and to the server. See
Chapter 3 for detailed instructions.
9. Slide the server into the rack. See Chapter 3.
10. Attach the cable management arm to the cable management arm bracket.
See Chapter 3.
11. Connect cables: keyboard, mouse, monitor, network, and power cables.
See Chapter 7 and Chapter 8.