Do you have a question about the Flashforge DREAMER and is the answer not in the manual?
Guidelines for a safe and efficient workspace, including tidiness and avoiding hazards.
Precautions regarding electrical connections and usage to prevent hazards.
Safety measures for the user during operation, covering physical contact and personal condition.
General warnings and precautions for safe and proper printer usage.
Specifies optimal temperature and humidity conditions for printer operation.
Guidelines for selecting a suitable location for the printer.
Recommendations and restrictions on filament usage.
Best practices for storing filament to maintain quality.
Disclaimer regarding document content, warranties, and liability.
Outlines the three steps of 3D printing: model creation, slicing, and building.
Describes methods for creating 3D models: designing from scratch, 3D scanners, and downloading.
Explains the role of slicing software like FlashPrint to prepare models for printing.
Describes the final step where the printer creates the physical object layer by layer.
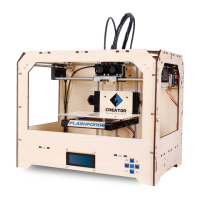
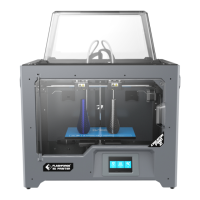
Provides an overview of the Dreamer printer, including main views and components.
Details the components of the Dreamer printer through diagrams of top, front, and side views.
Lists and illustrates all the accessories included with the Dreamer 3D printer.
Defines key terms and components relevant to the Dreamer 3D printer and its operation.
Provides technical specifications and reference data for the Dreamer 3D printer.
Step-by-step guide to installing the extruder module onto the printer.
Instructions for correctly loading filament onto the spool and feeding it into the printer.
Guide on connecting the power and USB cables for printer operation.
Detailed steps for loading and removing filament from the extruder.
Introduces the steps for removing filament from the extruder.
Detailed steps for acquiring and installing the FlashPrint software.
Methods for obtaining the FlashPrint software installation package.
Procedures for decompressing, installing, and launching the software.
Overview of the FlashPrint software's features and interface.
The initial step of selecting the correct printer model within FlashPrint.
Explanation of the main menus and icons within the FlashPrint interface.
Various methods for importing model files into FlashPrint for slicing.
Process for converting image files into 3D models within FlashPrint.
How to change and reset the viewing perspective of models in FlashPrint.
Methods for manipulating model views (moving, rotating, scaling).
Instructions for moving models within the FlashPrint build area.
Procedures for rotating models on different axes in FlashPrint.
How to resize models uniformly or by axis in FlashPrint.
Methods for cutting models into separate parts using the FlashPrint software.
Selecting the left or right extruder for printing models.
Entering support edit mode and choosing support types (treelike, linear).
Configuring print settings like preview, material, supports, raft, brim, and resolution.
Adjusting advanced settings for layer, shell, infill, speed, and temperature.
Configuring print and travel speed for optimal printing performance.
Setting extruder and platform temperatures for different materials.
Controlling cooling fan and setting pause points during printing.
Options for creating, saving, and managing print projects in FlashPrint.
Creating a new blank project or saving existing work.
Methods for saving models as project files or export files.
Setting software preferences like language and update checks.
Configuring the software's display language.
Adjusting the text size within the software interface.
Setting whether imported models are automatically arranged.
Choosing between Base Mode and Expert Mode for the printing window.
Enabling automatic detection of new software versions.
Functions for undoing, redoing, and managing edits within FlashPrint.
Reverting recent editing actions performed in FlashPrint.
Reapplying edits that were previously undone.
Selecting all objects present on the FlashPrint build platform.
Creating copies of selected objects within the software.
Removing selected objects from the FlashPrint workspace.
Automatically arranging multiple models on the build platform.
Using FlashPrint to fix common issues in 3D model files.
Accessing the interface for adding and editing print supports.
Options related to preparing and initiating a print job.
Establishing a connection between the Dreamer printer and a PC.
Step-by-step guide for connecting the printer using a USB cable.
Connecting the printer to a network using AP mode.
Connecting the printer to a network using STA mode.
Understanding and using the manual movement controls for the printer axes.
Information on the printer's limit switches for axis control.
Options for enabling or disabling stepper motors for manual control.
How to change the color of the printer's LED indicators.
Managing extruder speed, duration, and filament loading/unloading.
Setting and monitoring the printer's temperature parameters.
Procedures for updating the printer's firmware via FlashPrint.
Checking printer name and other on-board settings.
Viewing the printer's type, name, and firmware version.
Accessing help resources like wizards, contents, updates, and software info.
Explains the two printing modes and their applications.
Step-by-step guide for performing a single-extrusion print.
Step-by-step guide for performing a dual-extrusion print.
Managing print files, including printing, copying, and deleting.
Overview of the main print interface controls like Abort, Pause/Resume, and Tools.
Details on using the Filament and WiFi options within the print interface.
Instructions for using the preheat function to warm up the printer.
Accessing and understanding the various tool options available on the printer.
Using the filament option for loading and unloading.
Using the level option to adjust the build plate.
Returning the printer's axes to their home position.
Manually controlling the movement of printer axes.
Accessing settings for various printer functions.
Monitoring the printer's current operational status.
Viewing information about the printer model and firmware.
Detailed explanation of manual axis movements.
Entering the printer's setting interface.
Changing the printer's display language.
Calibrating the touch screen for accurate input.
Resetting the printer to its factory default settings.
Controlling the printer's cooling fan.
Enabling or disabling the printer's WiFi connectivity.
Initiating firmware updates for the printer.
Selecting the appropriate pulley type for the printer.
Managing the filament detection feature.
Steps to turn on WiFi and configure it for computer connection.
Selecting the correct pulley type from available options.
Monitoring real-time status of extruder, platform, and internal temperatures.
Viewing essential information about the printer.
Step-by-step guide for printing files from a USB connection.
Step-by-step guide for printing files from an SD card.
Step-by-step guide for printing files wirelessly via WiFi.
A table listing common problems, their causes, and corrective actions.
Procedure for cleaning and unclogging the extruder using a tool.
Recommendations for regular maintenance and proper usage of the printer.
| Nozzle width | 0.4 mm |
|---|---|
| Print technology | Fused Filament Fabrication (FFF) |
| Printing material | ABS, Polylactic acid (PLA) |
| Number of print heads | 2 |
| Maximum build size (WxDxH) | 150 x 230 x 140 mm |
| USB version | 2.0 |
| Card reader integrated | Yes |
| Compatible memory cards | SD |
| Package depth | 430 mm |
| Package width | 565 mm |
| Package height | 535 mm |
| Package weight | 22000 g |
| Display diagonal | 3.5 \ |
| Display technology | LCD |
| Engraver module | - |
| 3D scanner | No |
| AC input voltage | 100-240 V |
| AC input frequency | 50 - 60 Hz |
| Power consumption (typical) | 350 W |
| Depth | 335 mm |
|---|---|
| Width | 480 mm |
| Height | 410 mm |
| Weight | 15000 g |