Do you have a question about the GE 269Plus and is the answer not in the manual?
Discusses the necessity of modern protective devices for industrial motors and their functions.
Details the capabilities of the 269Plus relay, including protection, monitoring, and diagnostics.
Lists common uses for the 269Plus relay in protecting motors and associated equipment.
Explains how to specify options and order the 269Plus relay, noting field-programmable features.
Provides detailed electrical and performance specifications for the 269Plus relay.
Outlines the technical specifications for the Motor Protection Meter (MPM) option.
Shows the physical size and mounting dimensions of the 269Plus relay unit and associated CTs.
Provides instructions and considerations for physically mounting the 269Plus relay in a panel.
Details the various inputs and outputs for connecting external devices and wiring to the 269Plus relay.
Explains the requirements and connection procedures for supplying control power to the 269Plus relay.
Describes the selection and connection of phase current transformers (CTs) for accurate motor current measurement.
Details the connection and selection of ground fault current transformers for ground fault protection.
Explains the function, ratings, and connection of the 269Plus relay's trip output contacts.
Describes the function, ratings, and connection of the 269Plus relay's alarm output contacts.
Explains the function and connection of the first auxiliary output relay contacts.
Describes the function and connection of the second auxiliary output relay contacts.
Details how to connect RTD sensors for motor stator temperature monitoring.
Explains the function and use of the emergency restart terminals for overriding trips.
Describes how to connect an external reset switch for remote reset operation.
Details the analog output terminals and their function for transmitting current output signals.
Explains the connection of external differential relays to the 269Plus relay.
Describes the connection of external speed switches for locked rotor protection.
Explains how to use programming access terminals for setpoint configuration.
Details the connection and configuration for serial communication via RS485.
Explains how to adjust the display contrast for optimal readability.
Describes the material and cleaning instructions for the front panel faceplate.
Details the connection and use of spare input terminals for additional relay contact inputs.
Describes the features and installation of the drawout case option for the 269Plus relay.
Explains the installation of the Motor Protection Meter (MPM) option with the 269Plus.
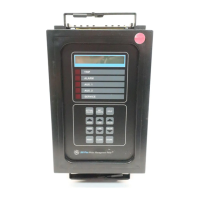
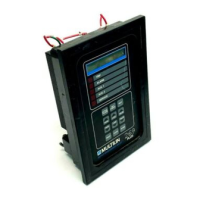
Describes the front panel layout including keypad and indicators of the 269Plus relay.
Explains the function and use of each key and indicator on the 269Plus front panel.
Outlines the four operational display modes of the 269Plus relay: Actual Values, Setpoints, Help, and Trip/Alarm.
Details how to view monitored or calculated motor operating parameters in the Actual Values mode.
Explains how to view and alter the trip, alarm, and other relay setpoints.
Describes how to access and use the HELP function for information on keys and displayed messages.
Explains how the relay enters TRIP/ALARM mode and how to navigate these messages.
Details the setpoints for phase CT ratio and motor full load current (FLC) for accurate current measurement.
Explains the purpose and use of the acceleration time setpoint for protecting driven equipment.
Describes the inhibit features that prevent motor starting until conditions are met.
Details how unbalance is measured and protected against, including phase and voltage unbalance.
Explains the ground fault protection features and setpoints.
Provides wiring diagrams for connecting the relay to contactors and breakers.
Describes the setpoints for detecting low motor current conditions like loss of load.
Explains setpoints used to protect driven mechanical systems from jams.
Details the short circuit protective function for phase current faults.
Describes the setpoint for an immediate overload alarm function.
Explains how to configure setpoints for stator winding temperature monitoring using RTDs.
Details setpoints for RTD inputs used for motor and load bearing temperature monitoring.
Explains how to select and configure overload curves for motor protection.
Describes the setpoint for the thermal capacity alarm and its time delay.
Explains the internal thermal memory register and how it models motor thermal capacity.
Details the emergency restart feature for overriding lockouts and discharging thermal memory.
Explains how to reset the relay after a trip or alarm condition.
Describes the built-in self-test functions for verifying internal circuitry.
Explains how to access and clear motor statistical data and pre-trip values.
Discusses the default setpoints shipped with the relay and their purpose.
Explains the valuable voltage and power measurement capabilities provided by the MPM meter option.
Lists factory preset relay configurations and functions for common applications.
Introduces the communication capabilities of the 269Plus relay with other equipment.
Describes the operating modes for the 269Plus relay in Modbus communication.
Details the physical connections and requirements for the RS485 serial communication link.
Explains the structure of Modbus RTU packets used for communication with the 269Plus.
Describes the communication handshake process between the master and the 269Plus slave.
Lists the Modbus functions supported by the 269Plus for reading and writing data.
Explains how the 269Plus responds to communication errors and exceptions.
Details the CRC-16 error checking algorithm used for data integrity.
Provides an overview of the 269Plus memory map for actual values and setpoints.
Explains the format codes used for interpreting data in the memory map.
Describes how to verify system operation by injecting primary current through CTs.
Details how to test relay functions using secondary injection and the setup required.
Explains how to test the relay's ability to read injected phase currents correctly.
Describes how to test the ground fault current input circuitry and functions.
Details how to test RTD inputs by simulating RTDs with potentiometers.
Explains how to test the relay's behavior during power failure and memory retention.
Describes how to test the analog current output functionality.
Provides guidance on performing annual testing for correct operation and protection system verification.
Explains the procedure for performing a dielectric strength test on the relay.
Describes the internal hardware components and architecture of the 269Plus relay.
Explains the firmware structure, modules, and execution flow of the 269Plus relay.
Illustrates a scenario where the relay is powered from a motor phase input and considerations for fail-safe operation.
Discusses the impact of control power loss due to faults on the relay's tripping capability.
Explains how to use the FLC Thermal Capacity Reduction setpoint to accurately model motor thermal capacity.
Introduces the 269PC software for accessing relay setpoints and actual values.
Lists the minimum hardware and software requirements for running the 269PC software.
Provides a description of the functions of the toolbar icons in the 269PC software.
Outlines the structure and functions of the menus within the 269PC software.
Details the connections and equipment needed for RS485 communication setup.
Provides step-by-step instructions for installing the 269PC software.
Explains how to configure startup and communication settings for the 269PC software.
Illustrates how to enter setpoints using the 269PC software.
Describes the process of saving relay setpoints to a file on a PC.
Explains how to load setpoints from a file into the 269Plus relay using the software.
Shows how to view measured and monitored values like RTD temperatures and currents.
Describes the trending feature for viewing and saving actual value parameters over time.
Explains how to use the troubleshooting feature to read and write register data.
Provides a summary table of setpoints required for commissioning the 269Plus relay.
Lists the revision history of the 269Plus software and associated manual part numbers.
Explains the assumptions made by the 269Plus unbalance algorithm regarding phase supply.
Provides a detailed example of calculating unbalance using phase magnitudes and symmetrical components.
Explains the discrete time-based algorithm used for the thermal model of the motor.
Details the RTD bias feature and its role in correcting the thermal model based on RTD measurements.
Explains the basic operation of the RTD circuitry and constant current source.
Describes a method for connecting RTDs using fewer wires, though not recommended.
Illustrates how to compensate for lead resistance in two-wire RTD configurations.
Illustrates how two CTs can be used to sense three phase currents and the importance of polarity.
Explains the concept of asymmetrical starting current in inductive loads and its characteristics.
Provides recommendations for proper, orderly, and reliable operation of the 269Plus relay.
Lists essential practices for grounding, CT connections, and RTD wiring.
Lists critical actions to avoid for proper operation and to prevent damage to the relay.
Describes the two programmable instantaneous elements for Short Circuit and Ground Fault protection.
Discusses the importance of CT withstand capability, especially for high current ground faults.
Explains how to determine CT characteristics and select appropriate sizes to avoid saturation.
A comprehensive list of all figures present in the manual.
A comprehensive list of all tables present in the manual.