3. C300 Controller Installation and Upgrades
3.2. C300 Controller installation
Series 8 C300 Controller User's Guide
Honeywell
Position the assembled IOTA board at the proper mounting location.
Thread the four mounting screws only half-way to attach the IOTA board to
the channel. Do not tighten.
Tighten the mounting screws securing the IOTA board to the panel.
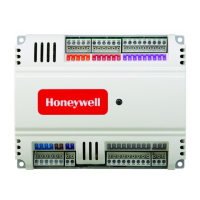
Connect FTE-A and FTE-B Ethernet link cables to the RJ-45 connectors on
C300 IOTA board.
The Yellow Cat5 cable connects to the "FTEA" connector on the IOTA.
The Green Cat5 cable connects to the "FTEB" connector on the IOTA.
If using the IOLINK interface in the controller, connect IOLink cable pairs to
IOTA board.
Four connectors on the IOTA provide redundant support for two IOLink
interfaces IOLINK 1 (Gray) and IOLINK 2 (Violet). IOLink cable pairs include
multidrop connectors to connect other I/O components to the IOLink.
Connect IOLINK cable pair to IOL1A and IOL1B for IOLINK 1 interface
of the controller.
Connect a second IOLINK cable pair to IOL2A and IOL2B for IOLINK 2
interface of the controller.
Note that when connecting Redundant C300 Controller pairs; connect the
primary controller IOLINK and the redundant partner IOLINK to the same
IOLink cable pair.
Install the two-wire twisted pair Battery cable onto the MEMORY HOLD-UP
connector on the left side of the IOTA board.
Set the Device Index (FTE DEVICE INDEX) of the controller according to the
site documentation by turning the three rotary decimal switches located on
the IOTA board. Set the switches to the three digit address ranging from 001
to 509. The leftmost switch (100) is used to set the hundreds digit. The
middle switch (10) is used to set the tens digit and the rightmost switch (1)
sets the ones digit.
 Loading...